A. Pack

December 15, 2003

Encoding AC3 Audio with A.Pack

By Jeff Warmouth

 
Why A.Pack?
DVD Studio Pro ships with A.Pack, which is a very useful little application. A.Pack is used to encode AIFF or WAV audio audio files into Dolby Digital format, also known as AC3. There are several reasons for encoding audio into AC3. First of all, AC3 can be used to store 5.1 surround-sound audio tracks on your DVD. However, most of us are not equipped to mix surround-sound audio, and are instead working in plain ol' stereo.

Even though we're only using stereo audio, AC3 can be very useful for us. AC3 is a compressed audio format, which uses a much lower data rate than standard AIFF or WAV audio. AIFF is around 1500 kilobits per second (kbps), while AC3 stereo is typically compressed at 192 kbps. This means that AC3 audio takes up only about one-eighth the amount of space on a DVD. Why is this important? Because this frees up additional space for video, which means that you can encode video at a higher bit rate.

For example, Compressor's presets are based on using AIFF audio. If you encode audio to AC3 you can use a significantly higher bit rate for video. As you can see, the results are quite dramatic when you go over 60 minutes on a DVD. You can store much more video on a DVD-R, and use a higher bit rate (and quality) for video encoding between 60 and 150 minutes. Using AIFF audio, you can fit a maximum of 170 minutes of video/audio, but using AC3, you can fit up to 280 minutes -- over 4 and a half hours!

Comparison of video bitrates using AIFF vs. AC3 audio for a DVD-R / DVD-5:

Preparing audio for use in A.Pack
Preparation is fairly simple: A.pack will accept 48.000 kHz, 16 bit AIFF or WAV files. If you encode video using the QuickTime MPEG-2 encoder or with Compressor, an AIFF file with the proper settings will automatically be created. Alternately, export audio from Final Cut Pro as a 48kHz 16 bit AIFF file. To do this in FCP 4, choose File > Export > Audio as AIFF, and choose Options to select the proper sample rate and bit depth.

Using A.Pack
When you launch A.Pack, the Instant Encoder window will display. On the left is the Graphical View of the channel configuration, which defaults to a 5.1 surround-sound setup displaying Left, Center, Right, Left Surround, Right Surround, and LFE (Subwoofer). In a minute, you will change this to a stereo channel configuration.
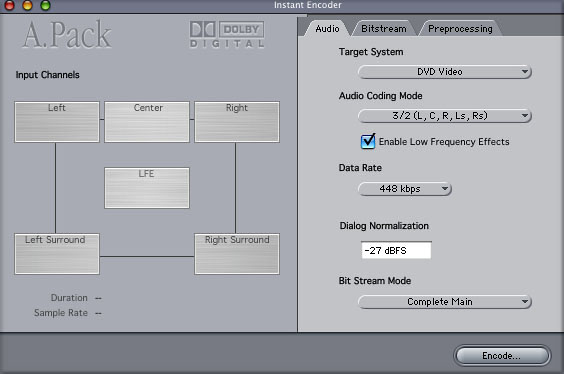
The Instant Encoder

Audio Tab
On the right of the Instant Encoder window are three tabs that contain important settings that must be configured before encoding your audio. The Audio tab contains the most basic settings for your AC3 file. Leave Target System at the default setting of DVD Video.

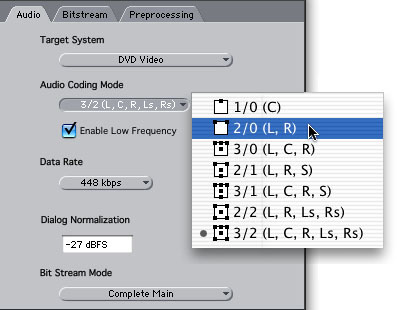
Set Audio Coding Mode to 2/0 (L, R), to change the channel configuration to stereo. Notice that the graphical view on the left will change to reflect your new two-channel stereo setup.


Setting Audio Coding Mode to 2/0 Stereo

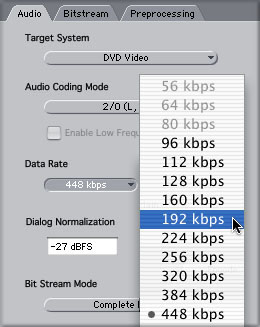
Data Rate determines the file size and the amount of information in your AC3 file. Set Date Rate to 192 kbps for stereo AC3. Although you can go up to 256 kbps for stereo, you will offset the benefits of compressing your audio.


Setting the Data Rate

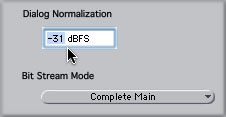
Set Dialog Normalization to -31 dBFS, and hit return. If you do not hit return, the value in the field will not change. Dialog Normalization, also known as DialNorm, determines whether the audio level will be raised or lowered in the DVD player. Setting DialNorm to -31 will ensure that the level is not altered at playback; this setting assumes that your audio tracks are mixed correctly so that dialog is at -12 dB. Keep Bit Stream Mode set to its default value of Complete Main.


Setting Dialog Normalization to -31 dBFS

Bitstream Tab
Nothing needs to be set here, you can safely leave all settings in this tab at their default values.

Preprocessing Tab
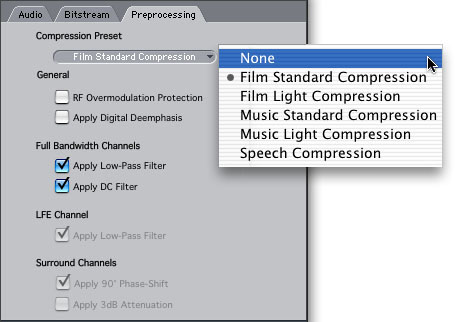
There is only one crucial setting on this third tab: Compression Preset. You MUST override the default value and choose None. The default value of Film Standard Compression is used only when the AC3 file will accompany a theatrical film print; setting this for a DVD audio file will cause the audio level to be automatically adjusted throughout the AC3 file. The effect is much like an AGC circuit on a sound recorder. In other words: YOU DON"T WANT IT! This single setting will make or break the quality of your AC3 file, so make sure to set Compression Preset to None.


Setting the Compression Preset to None

The other values in this tab can be left to their default values.

Setting the Input Channels and Encoding
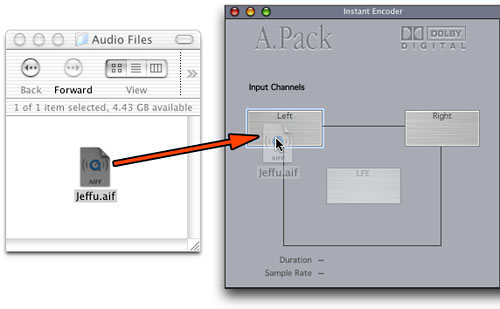
Now you can set the Input channels for your stereo AC3 configuration. The simplest way is to drag and drop. Just select your AIFF or WAV file in the Finder, and drag it onto the Left channel in the Instant Encoder. If your AIFF file is stereo, then a dialog box will prompt you to select the Left or Right channel from the AIFF file. Choose Left and hit OK. This will extract the left channel from the stereo AIFF and encode it to the left channel of the AC3 file.


Dragging to set the Input Channels

Now you must set the Right channel. Drag the exact same AIFF or WAV file from the Finder and drop it on the Right Input Channel. Again, a dialog box will prompt you to choose Right and hit OK; this will extract the right channel from the stereo AIFF and encode it to the right channel of the AC3 file. Although this process seems redundant, remember that A.Pack is also set up to encode surround-sound AC3 and this feature allows you to specify channels from stereo files as AC3 surround channels.

Summary

Double-check your settings in the Audio and Preprocessing tabs. You should see the following:

Audio Tab:
Audio Coding Mode: 2/0 (L,R)
Data Rate: 192 kbps
Dialog Normalization: -31 dBFS (remember to hit Return)

Preprocessing:
Compression Preset: None

Encoding
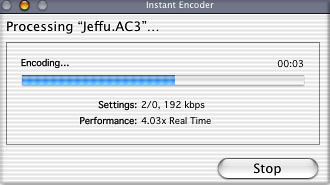
To compress your audio to AC3 format, hit the Encode button at the lower right of the Instant Encoder. Choose a location and hit OK to encode.


Processing

Batch Processing
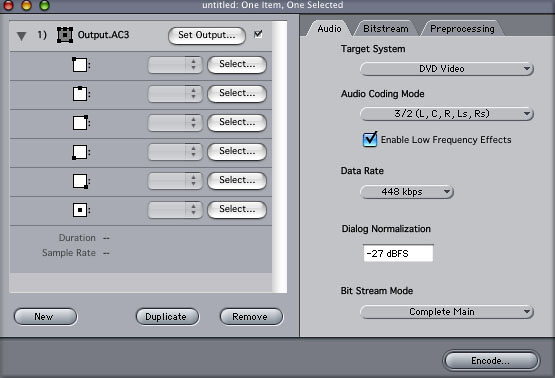
A.Pack will also let you batch process. Choose File > New Batch List to open the Batch Window. The left side of the Batch window shows a list version of the default 5.1 surround configuration, with a default name of Output.AC3. The right side of the Batch window is exactly like that of the Instant Encoder, so you can set the same values in the Audio and Preprocessing tabs.


A.Pack's Batch Window

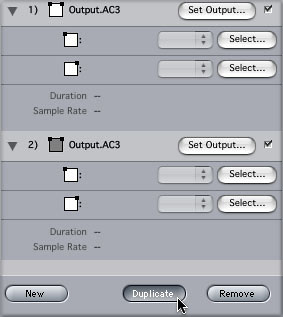
Once you have set up your tabs correctly, hit the Duplicate button to create additional Batch files with the same settings, all ready to have their Input Channels set. If you instead hit the New button, the new Batch file will use the default settings and you will need to configure your tabs for each one.


Duplicating to create a new batch item with the same settings

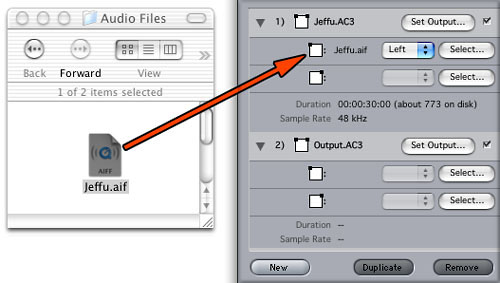
To set the Input Channels in a Batch file, drag an AIFF or WAV file from the desktop to the Left and then the Right channel in the batch list. Be sure to choose Left or Right from the corresponding pop-up menu. When you set one of these channels, the Batch file name changes from Output.AC3 to match the AIFF file name, so dragging Jeffu.AIFF will rename the batch to Jeffu.AC3.


Dragging to the Input Channels of a Batch item

To encode your entire Batch list, hit the Encode button, choose your location and hit OK. Now you know how to use A.Pack to compress your audio files into AC3 format. It's really quite simple, and can really give you the freedom to boost the quality of video on your DVD.

Happy encoding!

 
Jeff "Jeffu" Warmouth teaches video and interactive multimedia at Fitchburg State College in Massachusetts. He is the author of the upcoming book "DVD Authoring with DVD Studio Pro," to be published by Focal Press in early 2004. Jeffu is a moderator of the DVD Forum at the LAFCPUG site and at Kenstone.net, and is an independent video/DVD producer and media artist. His work can be seen at www.jeffu.tv.

 
copyright © www.kenstone.net 2003

[Top]

All screen captures, images, and textual references are the property and trademark of their creators/owners/publishers.