October 6, 2008
By Jon Chappell
 In my conversations with other editors it became
clear that for a lot of them (myself included), audio was a major
area of weakness. They could handle editing, color correction,
graphics, etc, but only knew a few ways of improving bad audio.
This inspired me to create this guide to show people exactly
what Final Cut Pro offers out of the box.
Filters in FCP are split into two categories - Apple Audio Units (AU) which ship with the operating system and are available to any application, and FCP-specific ones. Today I'll be giving details on the Audio Units with the FCP-specific ones coming in Part 2.
Audio Units
AUBandpass

The bandpass filter allows a certain range of frequencies to pass through and rejects any frequencies that are outside of that range. So if you have a person talking with rumbling traffic and high-pitched TV static in the background, you could use the bandpass filter to isolate the center frequencies of the person's voice.
AUDynamicsProcessor
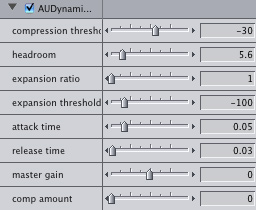
Using a compressor and expander at the same time allows you to avoid overly-loud peaks while still maintaining dynamic range. The compressor will reduce the louder portions of the audio in proportion to their distance from the threshold (i.e. louder sounds will be reduced by a much larger amount), helping to even out amplitude variations. The expander will then take the quieter sounds and reduce their volume (again, proportionally), thus evening out the amplitude variation of the quieter sounds and increasing the dynamic range.
Imagine some music where you have loud crashing drums, a relatively quiet triangle and a trumpet somewhere in between. The drums are far too loud so you apply a compressor to bring them down. The drums are now a lot quieter but you've noticed that the subtlety of the triangle has been lost - it is now far too prominent. So you apply an expander to lower the volume of the triangle to an acceptable level. The AUDynamicsProcessor allows you to do this with one filter instead of two, which is a much more efficient use of system resources.
Attack time refers to the amount of time it takes for the compressor to implement a change in volume, and release time is the time taken to reduce the compressor back to its original level afterwards.
There's a bit of debate over what "headroom" actually means as it's not a standard term. To the best of my knowledge, it refers to the number of dB the signal is permitted to exceed the threshold of the compressor/limiter.
The Dynamics Processor is a great way of compressing and/or expanding your audio to make sure that it fits within the audible range of your listening equipment.
AUDelay
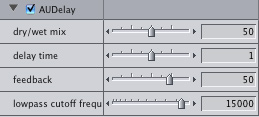
This repeats parts of your audio. Dry/wet mix controls whether or not the repeated sounds overlap each other. 100% dry means no overlapping and 100% wet means full overlapping. Delay time is the delay before the repeat starts. Feedback controls the number of repetitions. Lowpass cutoff frequency stops certain low sounds from passing through the filter.
This filter is normally used for atmospheric effects.
AUDistortion (Leopard only)
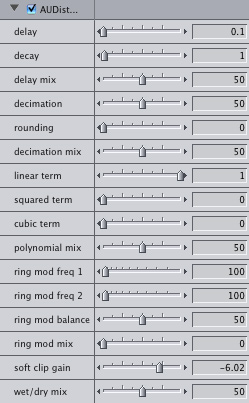
This is a very comprehensive distortion filter offering a lot of control. I can't give much advice on the various parameters as I don't actually know what they mean and there's no documentation available. I would suggest adjusting by ear (it is probably worthwhile lowering the render quality while adjusting, and then raising it again once you're happy with the results).
AUFilter
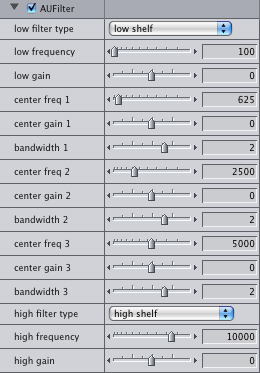
I use this one a lot. It allows you to take 5 bands (5 ranges of frequencies) and adjust the gain up or down for each one. If a person's voice is muffled, increasing the gain on the higher frequencies can often improve this. I also sometimes use it to add bass to make a person's voice sound richer.
The bandwidth slider allows you to adjust the size of each frequency range, with the frequency sliders referring to the center of the range.
AUGraphicEQ
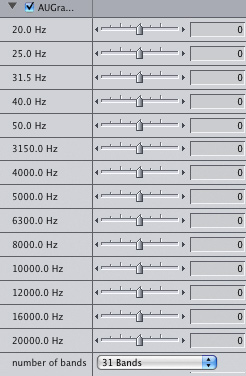
This is similar to the AUFilter above but the size of the frequency ranges cannot be adjusted and you can have up to 31 bands instead of just 5. This site provides a guide to common frequency ranges.
I've used this a couple of times to boost bass in a person's voice but I generally prefer AUFilter for this. It's good for removing or reducing a specific frequency range.
AUHighShelfFilter

This cuts off frequencies above the cutoff frequency, allowing lower sounds to pass through. The gain slider controls the amount that the frequencies passing through will be boosted.
Good for reducing high-frequency noise.
AUHipass

This reduces lower frequencies and allows higher ones to pass through. Resonance controls the intensification of the higher frequencies that pass through.
Good for removing low rumbling sounds such as traffic or for reducing very deep voices (I have had to do this at times).
AULowpass

Reduces (attenuates) higher frequencies and lets lower ones through, controlled by the cutoff frequency. Resonance controls the intensification of the frequencies that pass through.
Good for removing high-pitched noise.
AULowShelfFilter

Reduces frequencies lower than the cutoff frequency and lets higher ones pass through. This is similar to the AUHighPass filter above but this offers the ability to adjust the gain instead of resonance.
Good for removing low hums.
AUMultibandCompressor
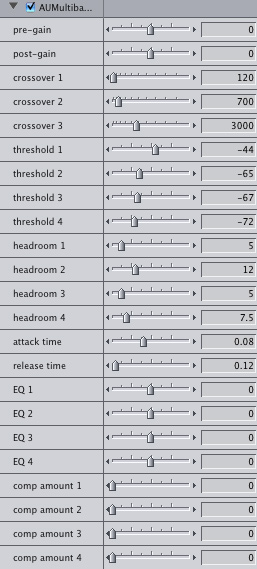
This allows you to compress multiple bands (frequency ranges) individually for more control than a traditional compressor.
Pre-gain boosts the signal before it is processed which is useful if the signal is too low to be processed adequately by the compressor, and post-gain reduces the gain back to a normal level afterwards.
Crossovers 1, 2 and 3 define the point at which the previous band ends and the next one begins. Threshold refers to the amplitude level at which the compressor kicks in. Headroom, as stated above, probably gives you extra leeway above the threshold. Eq allows you to boost or lower each band.
Possible uses for the Multi Band Compressor include lowering the dynamic range of bass sounds without interfering with higher frequency sounds. This is different from the High Shelf Filter which indiscriminately cuts all bass below a certain frequency.
AUNetSend
![]()
AUNetSend is one of the most interesting filters in that it's not actually a filter. It does absolutely nothing to affect the way your audio sounds but what it does do is allow you to send audio across a network.
You need to have an application that implements audio generators. Audio editing applications such as Logic implement these. Alternatively, there is a tool called AU Lab in /Developer/Applications/Audio if you have the developer tools installed. Soundtrack Pro does not support this. Add an AUNetReceive generator to the track in your audio application, add an AUNetSend filter to your FCP audio clip and hit play in FCP. You should see "AUNetSend" pop up in the AUNetReceive configuration dialog. Select it and your track should be receiving the audio from Final Cut Pro. Note that it only appears while the timeline is playing in FCP.
In my testing, the Status parameter appeared to do absolutely nothing.
AUParametricEQ

This allows you to boost or lower the amplitude of a signal within a certain range. This is useful if for example you have a high-pitched buzzing noise in the background and you only want to eliminate that particular frequency and keep your higher sounds intact.
AUPeakLimiter
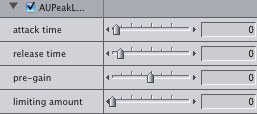
The Peak Limiter differs from a compressor in that a compressor reduces the volume of an entire track when a frequency reaches a certain level whereas the Peak Limiter reduces just that frequency. This is particularly useful if there is background noise on the track that would produce a noticeable fluctuation if the entire track were to receive a volume adjustment.
Attack and release time, as mentioned above, control the amount of time it takes for the filter to implement a change in amplitude, with longer times allowing a smoother transition. Pre-gain allows you to boost the volume before it reaches the filter in order to change the number of frequencies being affected. The limiting amount allows you to limit the amount that the filter will reduce the amplitude.
AUPitch
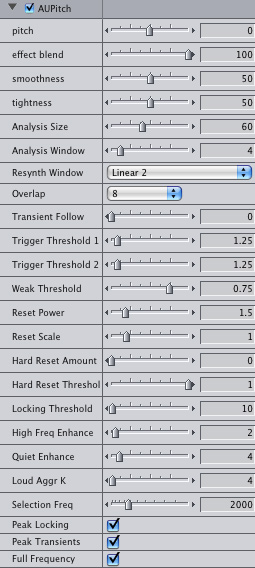
Adjusts the pitch of your audio, obviously. There are a LOT of controls though, and I have to admit that I don't have a clue what a Glb Trigger Thresh or a Loud Aggr K is. Effect blend blends the pitch-shifted audio with the original and is sometimes necessary to make voices sound natural. It is worth mentioning that I've gotten perfectly acceptable results by adjusting the first two parameters and not bothering with any of the others. I'd imagine that most people wouldn't have to adjust more than these.
I tried a Google search on some of these parameters but they only turned up forum threads where people were asking what on Earth they meant and no-one was able to solve their problem. If anyone does know, I'd be interested to hear from them.
This can be useful for making a male actor's voice more masculine (yes, I have had to do this!).
AURogerBeep (Leopard only)
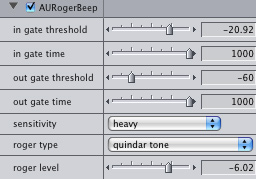
This emulates the "roger beep" sound when someone lets go of the button on a walkie talkie. It will automatically play the sound when the audio level drops below a certain threshold for a certain amount of time (as if the person stopped speaking).
In gate threshold and in gate time refer to the time that the threshold amplitude must be maintained before the sound kicks in. Out gate threshold and out gate time refer to the amount of time that the threshold must be maintained before it ends the roger beep (adjust this if there is background noise). Roger level is the volume of the roger beep, and I think sensitivity and roger type are self-explanatory.
This is an effects filter with quite a narrow purpose so it's not something that gets used very often.
AUSampleDelay
![]()
Similar to AUDelay except that the delay time is set as a number of audio samples instead of a number of seconds.
Important:
Two of the above filters are Leopard only. If you use those filters and then transfer your project to a Tiger machine, you will receive an error message and will be unable to use those filters within the project.
Expect Part 2, covering Final Cut Pro's built-in filters, in about a week or so.
Copyright 2008 Digital Rebellion, LLC.
This article was first published on Digital Rebellion and is reprinted here with permission from the author.
Jon Chappell is an editor,
VFX artist and software developer originally from the UK. He
is the owner of Digital
Rebellion LLC and is a regular contributor to the Final Cut
Pro community. He is well known for developing the popular troubleshooting
applications FCS
Remover and Preference
Manager. His film credits include Perfect Sport.
are either registered trademarks or trademarks of Apple. Other company and product names may be trademarks of their respective owners.
All screen captures, images, and textual references are the property and trademark of their creators/owners/publishers.