
The Basics - Getting Started June 12, 2001
The Basics - Editing with Transitions in Final Cut Pro
By Ken Stone

The Basics - Getting Started June 12, 2001
The Basics - Editing with Transitions in Final Cut Pro
By Ken Stone
What are Transitions?

Cross Dissolve |
When working on a Project in FCP clips from within a scene are often put end to end, what we call straight cuts. This creates the feeling that the scene is happening continuously. Often at the end of a scene we want to convey to the viewer a passage of time or place before starting the next scene. In order to achieve this effect we use Transitions.
While FCP has some 67 different transitions that we can use, some of the most often used transitions are; Cross Dissolve, Dip to Color Dissolve, or Fade in Fade Out Dissolve, which can be subtle. FCP also has many, very graphic transitions like Cube spin, Wipes, Page Peel, etc.
While transitions are often applied to the edit point between two adjacent clips, they can be applied to the beginning or end of a clip as well or to a single clip, beginning or end. A Transition that is placed at the start of the first clip or the end of the last clip will use the color Black to transition to, a kind of a 'fade to black'. A transition can be modified in many ways and can also be saved as a Favorite for future use.
So how do transitions work?
Transitions work by weaving or blending the end of one clip with the beginning of the next clip. But, and it is very important that you understand this, Transitions do not use material (video) from inside the 'in and out' points of a clip; they work using material that is outside the 'in and out points'. Transitions work on the material that we normally call 'handles'. Every Transition has a default duration of one second, a requirement of 15 frames in and 15 frames out. This is to say that for a default transition to work the first clip must have at least 15 frames of material outside of it's out point and the second, adjacent clip must have at least 15 frames of material before it's in point. While the default duration for a transitions is one second, you can shorten or lengthen the duration either on the TL or by double clicking the transition in the Browser to load it into the Viewer window, where you can change the duration in the duration field, upper left in the Viewer. If you want to extend the duration of a transition to more than two minutes it must be lengthen in the Viewer window.

You can see that to use Transitions some prior planning is required, even as early as the capture process, capture with handles so you have extra material to work with. If you want Transitions with a duration longer then 15 frames (1/2 second) on each side of the edit point you will need longer handles. You may find that you prefer your Transitions to have a longer duration to achieve the desired effect. I do.
Applying Transitions
There are a number of ways to apply Transitions to clips and their edit points. We will use drag and drop. Open two clips or stills in the Viewer, set 'in and out' points, and place them on the TL. From the Effects browser drag the 'Cube Spin' and drop it on the edit point between the two clips.
In the TL double click the Transition to load it into the Transition Editor (Viewer window). While each Transition has different controls and settings many of these are basic to every Transition. Looking at the Transition Editor window below: the Black arrow points to the Transition name. The red arrow points to the Duration box which shows the total duration time for the Transition. You can change the duration of the Transition by entering a new numerical duration in this box. You can also change the duration of the Transition by dragging the end points of the Transition, (White arrows). Dragging on either end of the Transition will extend the Transitions equally in both directions. Editing a Transition in this manner will open a 'Two-Up' clip display in the Canvas window, which will show the Outgoing and Incoming clips. The Blue arrows point to the Alignment buttons. By clicking on these buttons you can set your Transition to start from the edit point, be centered on the edit point or end on the edit point. You can achieve the same results by placing your Transition in the TL in the start, center or end position of the adjacent clips.
The Orange arrow, the 'Recent Clips' Pop up menu. The Green arrow points to the 'Drag Handle'. When you have finished customizing your Transition you can drag it to a completely different edit point in the TL or into the 'Favorites' bin in your Effects browser for future use. The White arrows point to the Transition itself. Shown below in the centered position you can see the outgoing clip, Lucia Dreams and the incoming clip Landscape 1-2. The Purple arrow shows the 'Reverse Transition' button. Transitions have default directions; left to right, clockwise direction, etc. Clicking on this button will reverse the direction of the Transition but does not effect either of the two clips. The Yellow arrow points to the 'Reset' button which will re set the Transition to it's default settings. Brown arrows point to the 'Start and Ending' percentage slider. With the Start set to 0% the transition effect does not show in the first frames but reveals itself as the playhead moves down the TL. If you want to start the Transition with the effect already in progress at the first frame move the 'start' slider up from 0%. If you want the clip to end with the Transition having not finished then move 'end' slider down from 100%
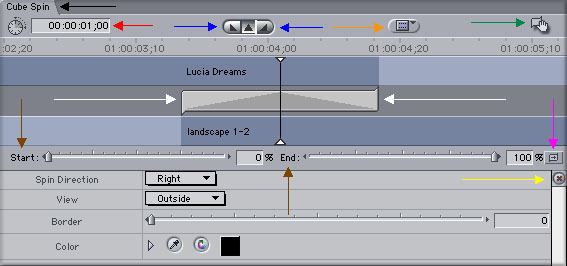
 In my example of the 'Cube Spin' Transition there are additional settings, as there will be with many of the Transitions. Spin direction; right, left, up, or down. View; Outside or Inside. There is a Border control which allows you to set a border around the edges of the Cube, and a Color control to give the border a color. Some Transitions have a 'Center' button "+" (Red arrow), click on this button and then click with the cross hairs in the Canvas window to position the center of the Transition. 'Soft Edges' (Green Arrow) is available with some Transitions, you can use this to soften the edges where the two clips touch. The Gradient Wipe Transition uses a third image, video or still, that becomes the wipe pattern. You add an image to the Transition by dropping it in the 'Image Well' (Blue arrow).




Cube Transition Inside 'View' |

Cube Transition with Border |
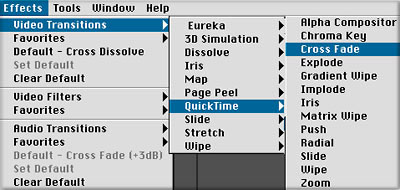
Another way to add Transitions is to select the edit point in the TL then from the Effects Menu > Video Transitions > select a Transition. This will place the Transition on the TL. You will need to double click on the Transition in the TL to open the Transition Editor. If you double click on the edit point rather then the Transition the 'Trim Edit' window will open instead of the Transition editor. To return to the Transition Editor click once on the Transition in the TL.

Aligning Transitions to an edit point.
There are several ways to 'Align' a Transition to an edit point. You can align a Transition on the TL by dragging and placing the Transition in the desired location, shown below. The yellow playhead is sitting on the edit point. You can also change the alignment by 'Control' clicking the Transition in the TL, then make the change using the short cut menu.

Transition centered on edit point |

Transition ends on edit point |

Transition starts on edit point |
Align Transitions in the Transition Editor window using the 'Alignment' buttons, below.
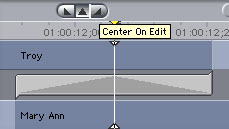
Transition centered on edit point |
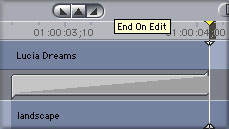
Transition ends on edit point |
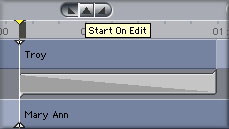
Transition starts on edit point |
Favorites and Default Transitions.
After having modified a Transition you can save it as a 'Favorite' by either dragging it from the TL into the Favorites Bin in your Effects browser or you can drag it to the Favorites Bin from the Transition Editor by clicking on the ' hand drag' icon (green arrow in Transition Editor shown above). Once inside the Favorites Bin you can re name it.
You can set any Transition or Favorite as the Default Transition. In the Effects browser 'control' click on the Transition and select "Set Default Transition" from the short cut menu. To use a Default Transition, 'control' click the edit point in the TL and choose "Add Transition (name of Default Transition)".
Audio Transitions.
 In FCP we have two Audio Transition filters found in the Effects Browser at the bottom. The '0 db cross fade' filter works by dropping the volume at the edit point. This effect is used when the ambient or background sound is different for the two clips or if there is very little ambient sound. It is also useful when cutting dialog. The '+3 db cross fade' maintains a constant overall volume crossing from one clip to the next. This cross fade is used when the background sound is the same and provides a smoother transition.
Transitions have been around forever, they are ubiquitous. The power of Transitions is that they can range from the rapid fire, staccato effects that we see on MTV, to subtle, subdued scene changes what we find in the movies. Transitions are a very powerful tool used in story telling. The six samples shown below are screen shots taken from the Canvas window at the mid - point of the Transition and really do not convey the movement and power of Transitions, you have to see them running on NTSC.

Swing |

Additive Dissolve |

Dip to Color Dissolve |

Ripple Dissolve |

Page Peel |

Random Edge Wipe |
--ken
copyright © Ken Stone 2001