
November 23, 2009
Compressor 3.5 Basics
By Ken Stone
Compressor Interface
Compressor Preferences
Bringing video into Compressor
Batch Window
Compressor Presets - Settings and Destinations
Applying Presets
Preview Window
The Inspector
Submit
History Window
Droplets and Custom settings
Notes
Compressor
We use Compressor for two different tasks; to encode files to make them smaller and change their codec to a delivery format for distribution, and to transcode source video to different codecs to improve or facilitate workflow.
In FCP we can work with a number of different video formats, including a large number of new HD formats. As the frame size and quality of our video goes up, so does the size of the video files. Faster Macs and falling prices for hard drive storage and ram means that we can comfortably work with these new HD formats in FCP. But what do we do when it comes time for final delivery, i.e. create MPEG 2 for SD DVDs or H.264 for web distribution? There is also another issue, there are times when we have video that is not in the correct format for us to work with, we may need to change the frame size, rate and/or codec of the video (some new digital still cameras now shoot video but use non-standard frame rates and codecs). While it's true that FCP has an 'open' timeline and can accept and work with different frame sizes, rates or codecs, often the resulting quality is less than stellar.
While the Compressor may seem a bit daunting at first, it's really fairly simple to use. Bring in the video you want to work with, select a Preset, adjust the Preset, click on the Submit button.
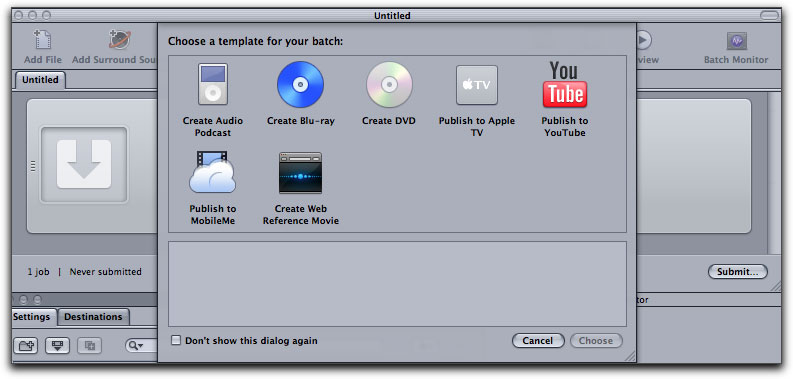
When you first launch Compressor, a new Batch Templates window will open up. This window contains 7 Batch Templates that allow us to choose the encode process that we want Compressor to perform and then also, the Job Action (Distribution), what we want Compressor to do, once the files have been encoded. For more information on the new Batch Template feature, check out Compressor 3.5. You can go ahead and close this Template window.

Compressor Interface
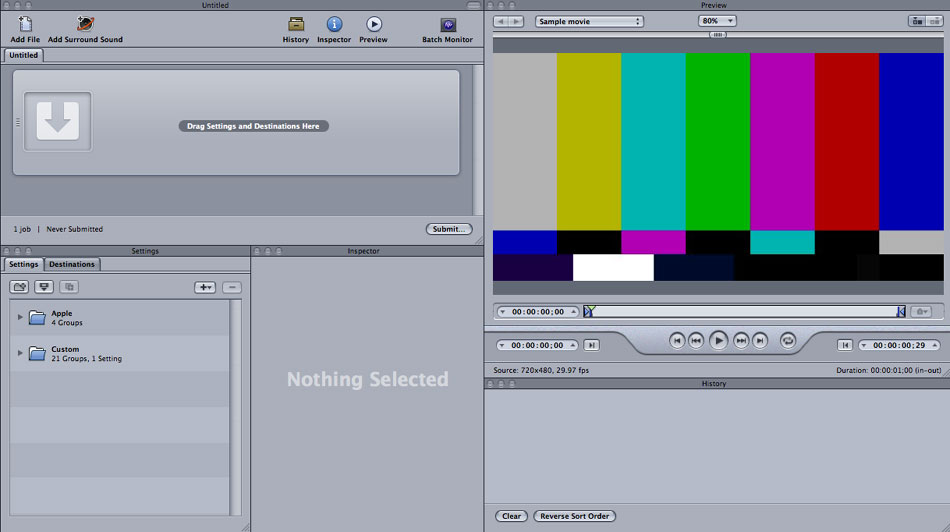
Before we start working with Compressor lets take a look around the Compressor interface. Top left is the Batch window, top right is the Preview window. Lower left is the Settings/Destination window, lower center is the Inspector and lower right is the History window.

[Top]
Compressor Preferences
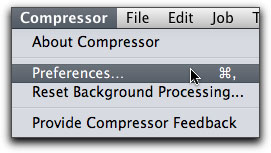
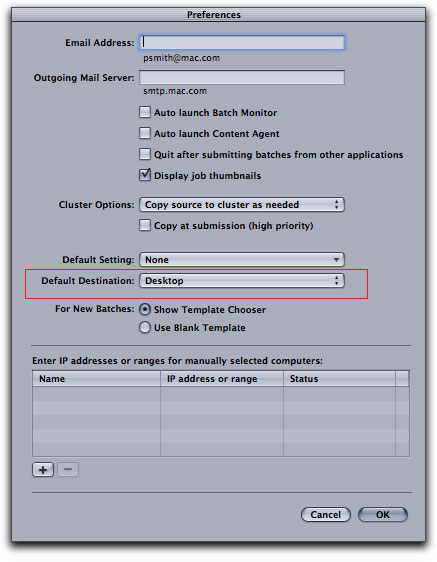
There is one thing that needs to be done before we start working in Compressor. Launch Compressor and from the Compressor menu > Preferences. In the Preferences window, set the 'Default Destination' to Desktop. Compressor can create a number of files while it's working and in order to be able to find those files, I suggest that you direct all Compressor files to the Desktop. You can, of course, direct these files to any location of your choosing. There is also a feature in the History window that will let you find any completed job in the Finder. For this article, I'll be saving everything to the Desktop.


[Top]
Bringing video into Compressor
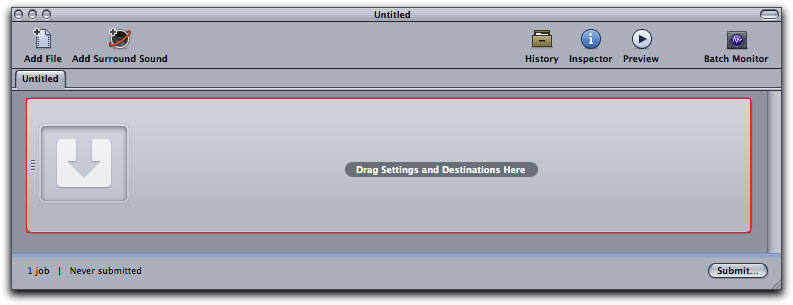
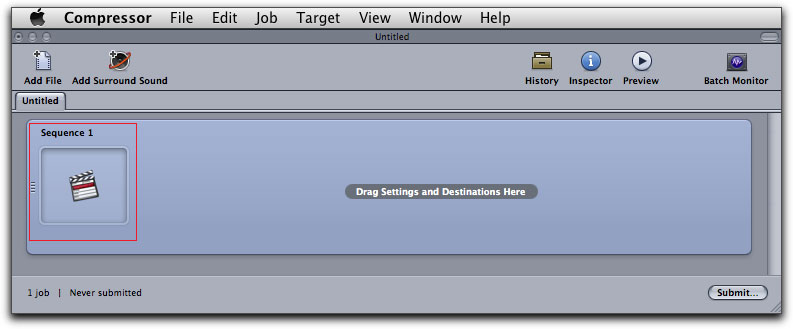
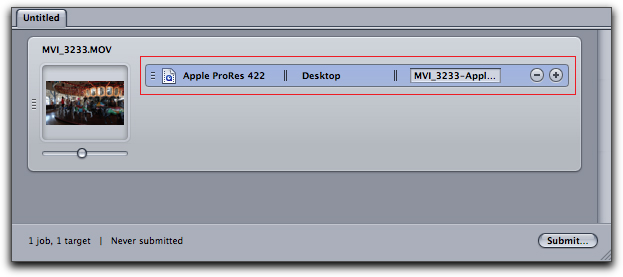
In the upper left of the Compressor interfaces is the 'Batch Window', inside the Batch window is a long horizontal window which is called a 'Job' (boxed in red below), to which we will add our source video in the "Video Well", and a 'Target', which consists of a codec, Destination of the saved finished file and the Name of the exported file. There can be any number of Jobs in the Batch window.

There are a number of different ways to bring your video into Compressor. Compressor will accept any QuickTime formatted file, but it will not accept a FCP Project file.
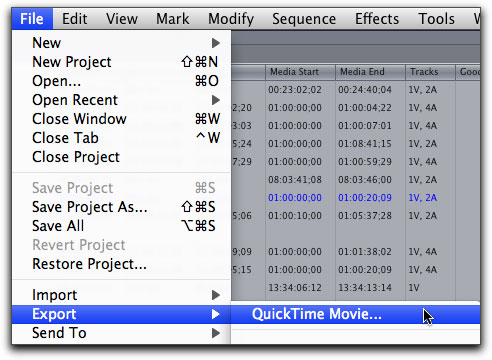
- An often used method is to export from FCP as a Self-Contained QuickTime movie. In the past, before FCP 7, there could be issues moving projects from FCP to Compressor using 'Export to Compressor'. Aside from tying up FCP during the transfer process (which took forever), sometimes the resulting finished export from Compressor had errors. The QuickTime Self-Contained movie has been around from the very start of FCP and it has always been rock solid. While FCP 7 has resolved a number of issues, there are still a few reports of problems with the new 'Send to Compressor' process. If you encounter issues in FCP 7 with 'Send to Compressor' (or are using an earlier version of FCP), use a QuickTime self-contained movie to transfer from FCP to Compressor. Another advantage of working with a QuickTime self-contained is that it is an exact clone of your FCP timeline and can be archived for storage or use at a later time.

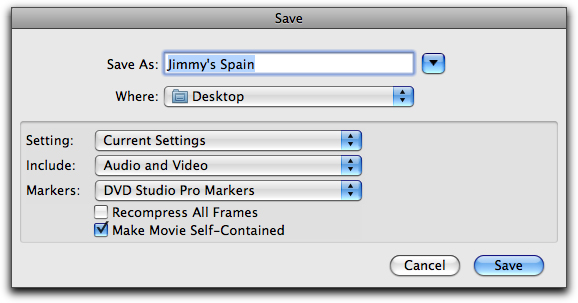
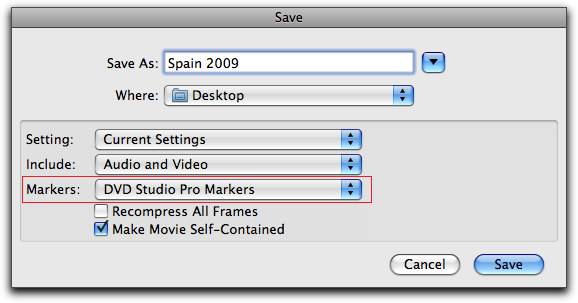
In the Save dialog box, enter a name for the export and set Desktop for the destination. Settings should be at 'Current Settings', Include: Audio and Video, Markers: 'DVD Studio Pro Markers'. Leave the 'Recompress All Frames' Unchecked. The last option is 'Make Movie Self-Contained', this is is my preferred choice. If you uncheck this box, you will export what we call a 'Reference' movie. A Reference movie does not contain video media, but rather, it has pointers that reference back to the video media in FCP. A Reference movie is much smaller than a Self-Contained movie and is quicker to export, but change or move anything in FCP and the Reference movie will become invalid. I have found that a Self-Contained movie is very stable and can be used even after the FCP project has been changed or deleted. I would only recommend making a Reference movie if you are short on hard drive space.

After your QuickTime Movie has been exported it will appear on your Desktop. Note that it has the FCP clap-stick icon along with a QuickTime icon. You can now drag the QuickTime movie into the 'Video Well' in the Job. Compressor will not accept FCP Projects!

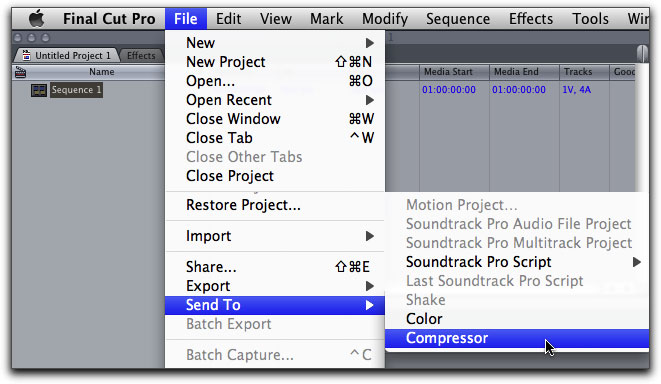
- In FCP 7, there is a new command, 'Send To Compressor', which replaces the previous 'Export Using Compressor' function. In the past, when we used 'Export Using Compressor', FCP handed off the video to Compressor one frame at a time, tying up FCP for the duration. This is no longer the case. As soon as you 'Send To Compressor', you can return to FCP and continue working immediately, even working on the Job that you just sent to Compressor.

When we use the 'Send to Compressor' command, the FCP video will be placed into the 'Video Well' (red box below) in the Job (in the Batch window).

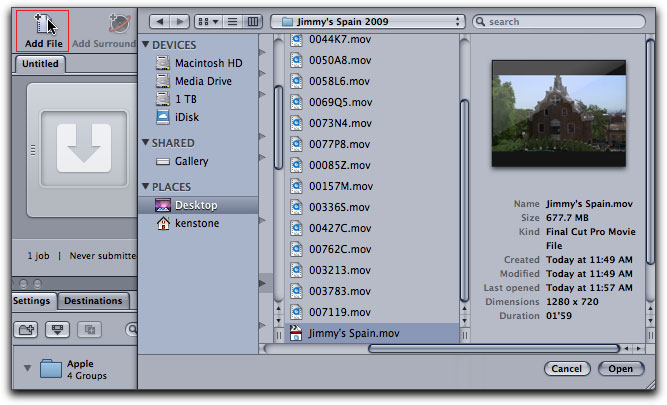
- We can bring in a video clip by clicking on the 'Add File' button top left of the Batch window. This will open the Finder where you can navigate to the video file you want to bring in.

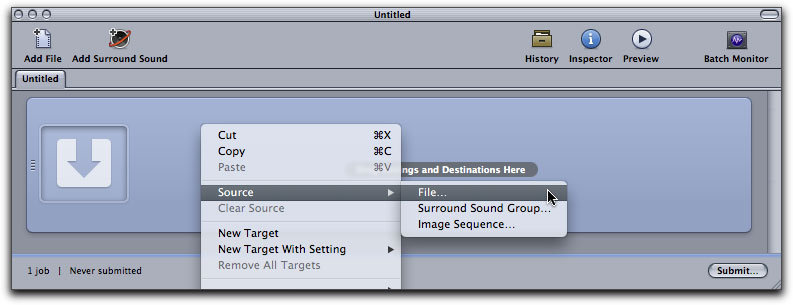
You can also control (right click) in the Job and select 'File' which will open the Finder.

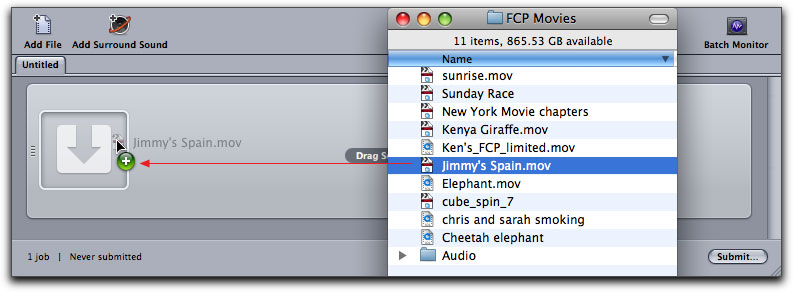
- We can also drag any clip or QuickTime movie into the 'Video Well' from the Finder.

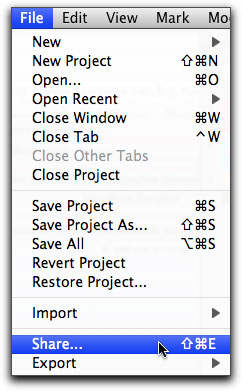
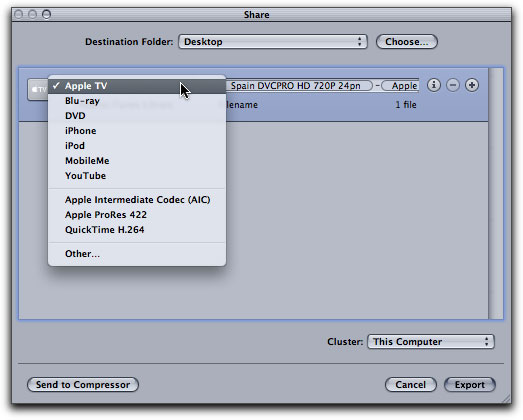
- This is a back door approach to using Compressor. In FCP, select your project, sequence or clip and from the File menu > Share. This will open the Share window, new in FCP 7, which offers quick access to a number of encoding options.


[Top]
The Batch window is Compressor's work bench, the Batch window can hold any number of 'Jobs', which is what we call each separate item (movie) that we want to run through Compressor. The Batch window is shown below with one empty Job, boxed in red.

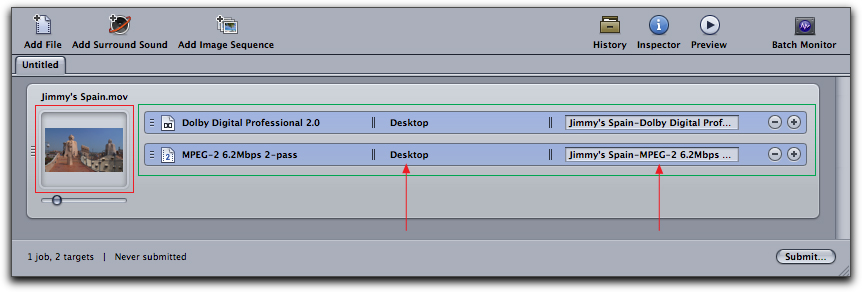
Below, the Batch window with one Job. The Job holds the two required elements needed to process the video. On the far left is what I call the 'Video Well', red box below, this is the actual video that we have brought into Compressor. There is a slider beneath the Video Well which you can use to scrub through your video which is displayed in the Preview window. The second element is called the 'Target', below green box. The Target is comprised of three elements, the 'Settings' (Preset), in this case "Dolby Digital Professional 2.0 and MPEG-2 6.2Mbps 2-pass", the destination where the finished export will be saved to, 'Desktop' and the file name of the finished export. The Target defines the output file. As you'll see later, when you apply a Preset to the job, the destination and naming will be done automatically for you. If you want to remove any of these elements in the Job, you can select the element and hit the Delete key or click on the minus sign (-) at the far right of the Job. You can also add a new element by clicking on the plus sign. Additionally you can control (right click) anywhere in the Batch window to add a new Job.

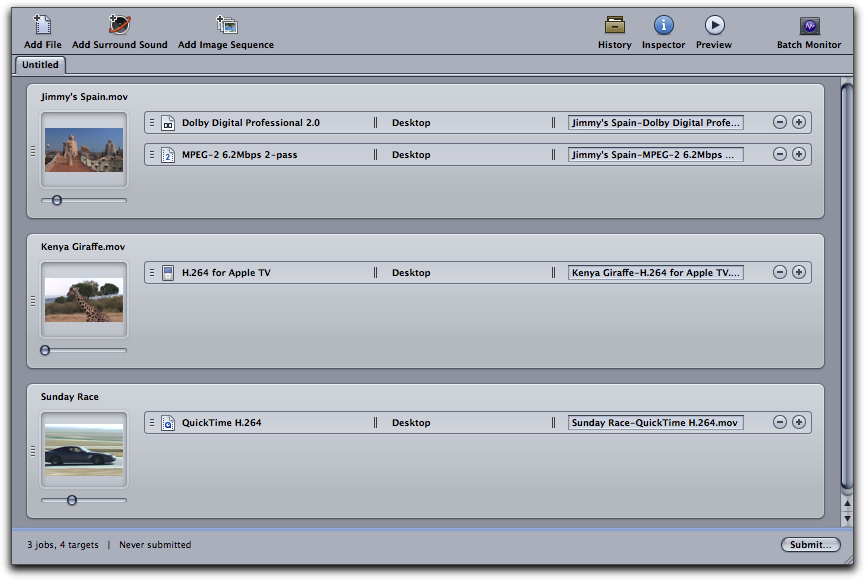
As mentioned, the Batch window can hold any number of Jobs, shown below with three Jobs. Because of the Compressor interface design, multiple jobs quickly fill the Batch window requiring that you either do a lot of scrolling or enlarge the Batch window to access any of the different Jobs.

[Top]
Compressor Presets - Settings and Destinations
In these modern video times there are so many codecs and formats, seemingly more than we can keep track of; codecs for SD DVDs and Blu-ray discs, formats for the web, for mobile devices like the iPod and iPhone, for ATV, audio (AIFF and ac3 Dolby), uncompressed, ProRes 422, Apple Intermediate Codec (AIC), Animation, NTSC, PAL, MPEG-1 MPEG-2, MPEG-4, Podcasting, Photo JPEG, DV, HDV, XDCAM EX, DVCPRO HD, AVCHD. The lists goes on.
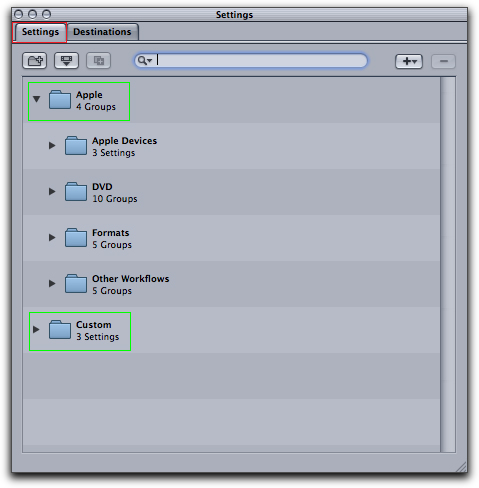
It is fortunate for us that Compressor has settings for each of these formats, but more to the point, Compressor has a large number of 'Presets', pre-build encode settings that we can use (drag and drop) and this greatly simplifies our work in Compressor. Beneath the Batch window is the 'Settings/Destinations' window, it is in the Settings tab of this window that we'll find those pre-built Presets. The Settings window is divided into two main groups of Presets; Apple and Custom. The Apple Presets are locked and can not be deleted but any Custom Preset that you build can be deleted by selecting the Custom and hitting the Delete key.

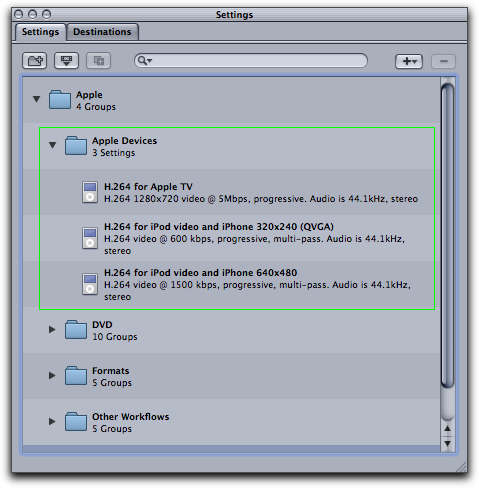
In order to use these Presets all you need to know is what your final delivery format will be; DVD, web, Mobile devices, etc. The first group of Presets is 'Apple Devices'.

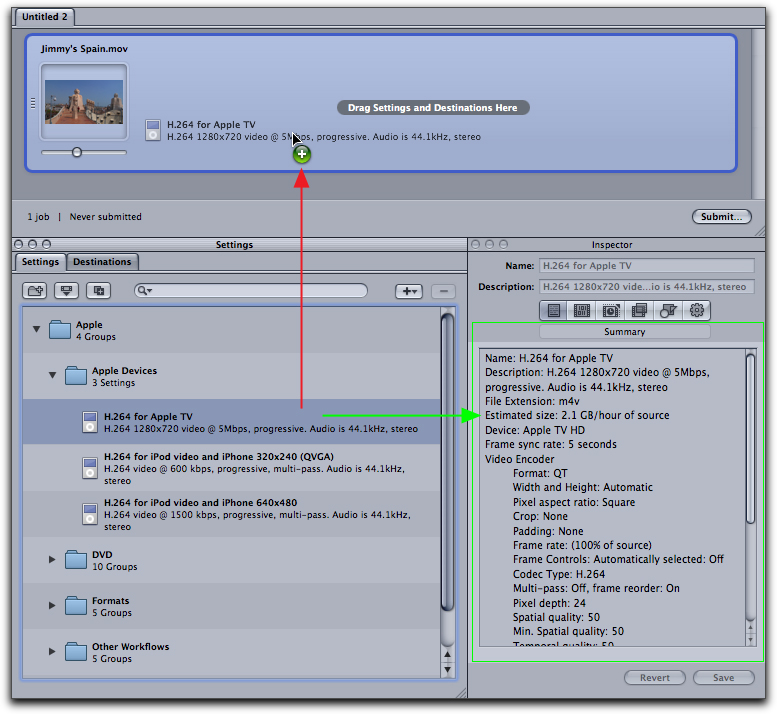
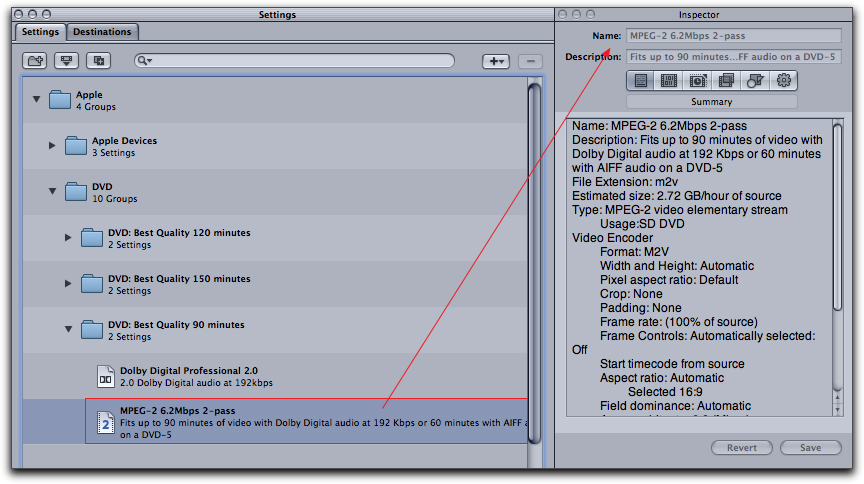
Let's say that you have brought your video into the batch window and you know that you want to convert your video so it will play on an ATV (Apple TV). Find the Preset and drag it up into the job in the batch window. Pretty easy. Even before you drag the Preset into the job, once you have selected the Preset, a Summary of all the settings belonging to that Preset will show in the Inspector window, just to the right.

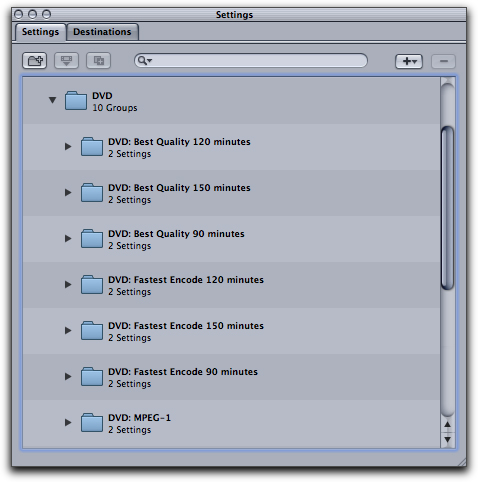
If you want to encode your video for Standard Definition DVDs, twirl down the DVD disclosure triangle. You pick your DVD encoding Preset based on the duration of your video movie and also the quality of the encode that you want. Remember that there is always a trade off when encoding, if you want higher quality, it's going to take longer.

Most often, when we bring video over from FCP to Compressor, the accompanying audio is in the AIFF format. AIFF audio is excellent, but it also takes up a lot of space, space that we can use to achieve higher quality encoded video. The SD DVD Presets in Compressor take this into account for us, by providing a 'Dolby Digital Profession' ac3 audio codec in the Preset. ac3 audio uses just 1/8 the amount of space that AIFF requires.

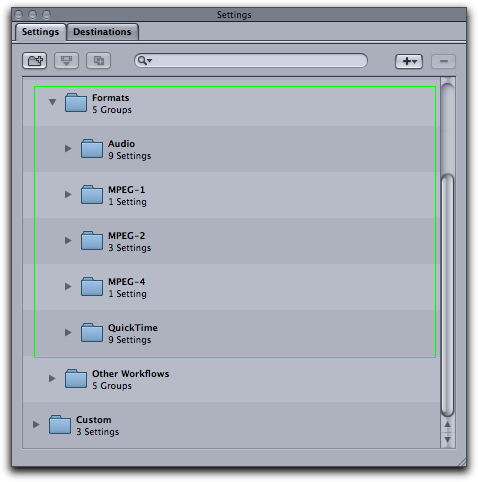
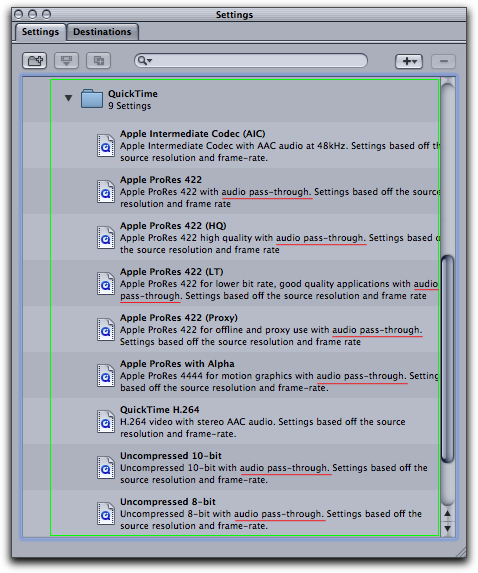
The next main group of Presets is 'Formats', which contains, Audio, MPEG settings and a group of QuickTime settings, shown below left. On the right, I have opened up the QuickTime group. If you look closely at the audio settings for the ProRes 422 and Uncompressed, you'll note that the expression "audio pass through" is used. This means that the audio from your source file will be copied to the output file without modification, the audio will be 'passed through', left alone.


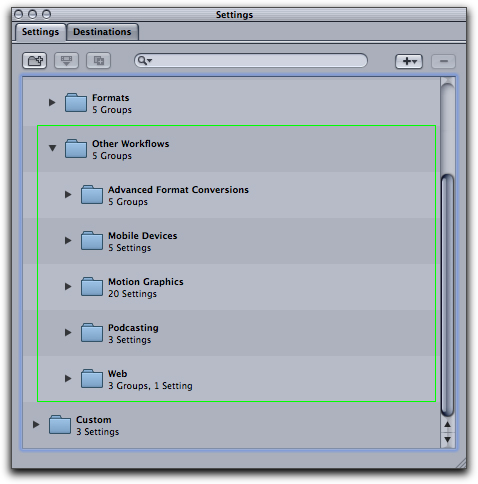
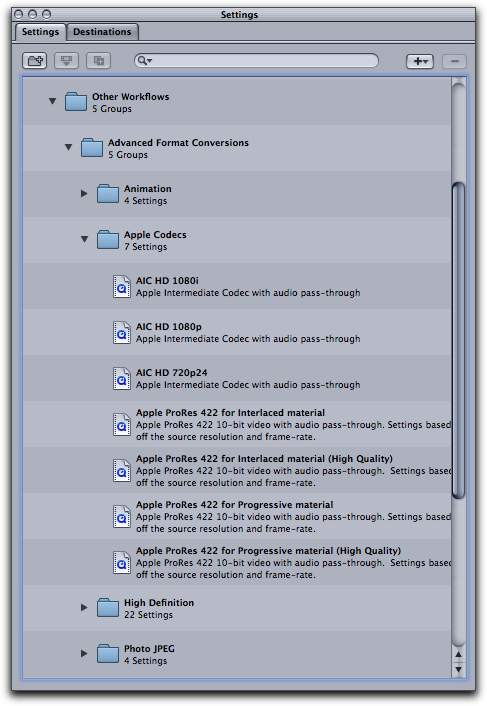
The next main category, (below left) is 'Other Workflows', which contains five groups. On the right you can see that there are groups within groups, not unlike Chinese Nesting Dolls, you can go a little crazy with all the options.


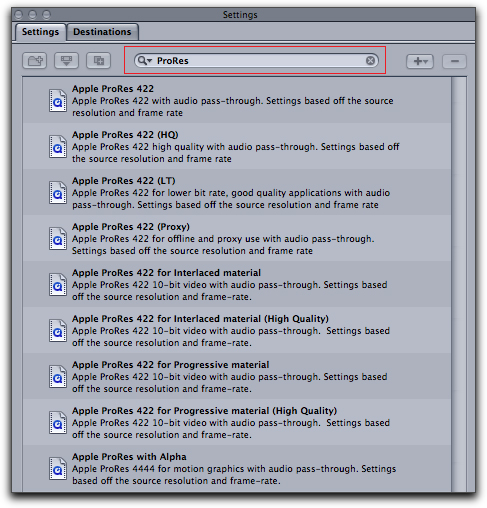
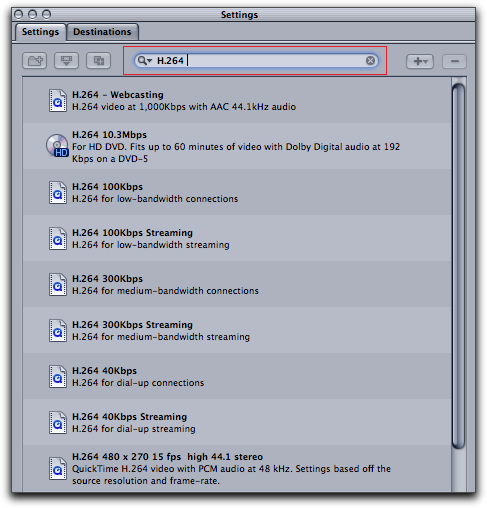
Fortunately for us, there is a Search function at the top of the Settings window, just type in what you are looking for, in this case, on the left, ProRes 422. Below right, H.264.


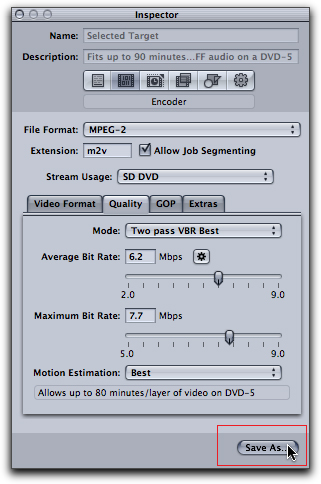
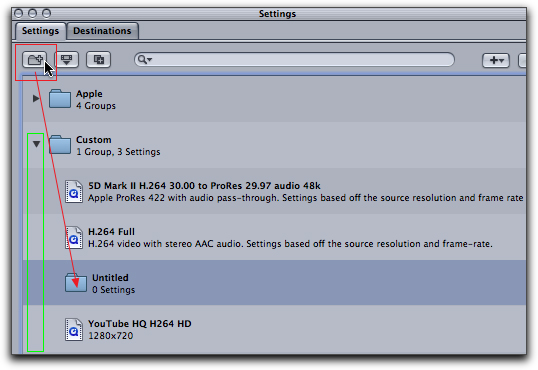
In many cases these pre-built Presets will work just fine, but in some cases, you'll want to make some adjustments to the Preset. Change the frame rate or frame size of the video, change the quality of the encode level, change interlaced to progressive, apply Compressor filters or crop the video for final output. There are any number of 'tweaks' we can make to a Preset and we do all of this in the Inspector. After you have adjusted all of your settings, you can use as is, if this is a one time shot, or, if you plan on using your modified Preset again, you can name and save it as a Custom Preset, for future use, by clicking on the 'Save As' button, bottom of the Inspector window. You can click on the 'Add Folder' button top left of the Settings window. This will add a new folder to the Custom folder that you can then name and put Custom Presets, that you have built, into this folder for organizational purposes.


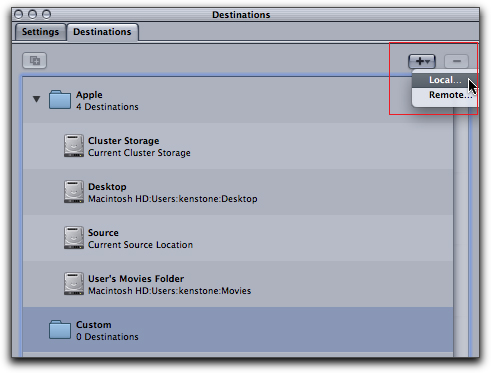
There is a second tab in this window, 'Destinations'. Early on we set the destination of our exported files to the Desktop in Compressor Preferences. If you want to change the destination of the exported files, you can drag one of the Compressor Preset Destinations up into the Job in the Batch window. You can also create a Custom destination by clicking on the small + icon upper right of the Destinations window. This will open the Finder where you can navigate to the location that you want the export saved to.

[Top]
Applying Presets
Next we need to add a 'Preset' to the job in the Batch window. There can be some confusion when we talk about Presets because once a Preset has been applied to a Job, it would then be called a 'Target'. A 'Target' is comprised of three elements; the Codec, like MPEG-2, the Destination where the exported file will be Saved to, i.e. the Desktop, and the name of the exported Compressor video or audio file.

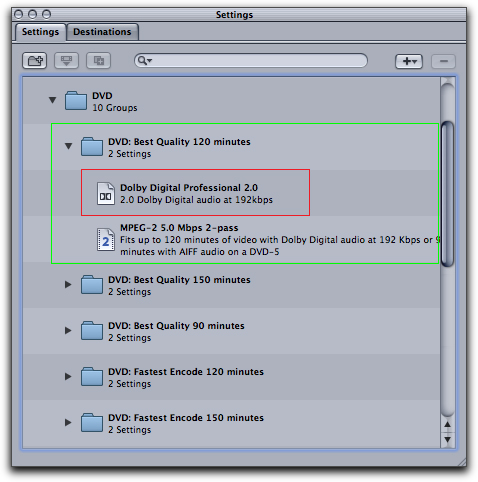
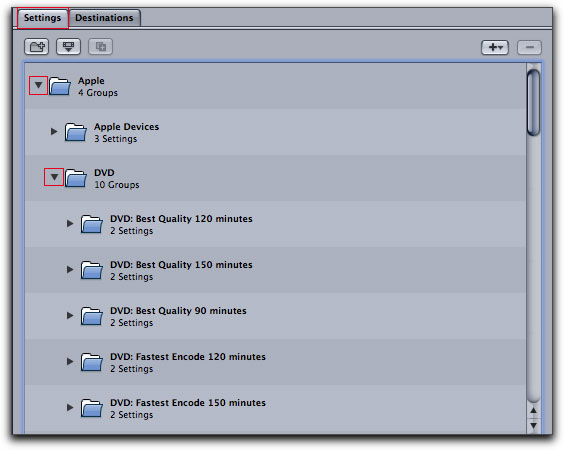
In this example, I want to encode as MPEG 2 for Standard Definition DVD authoring. As shown below, I have selected the Settings tab and twirled down the 'Apple' folder and then the 'DVD' folder.

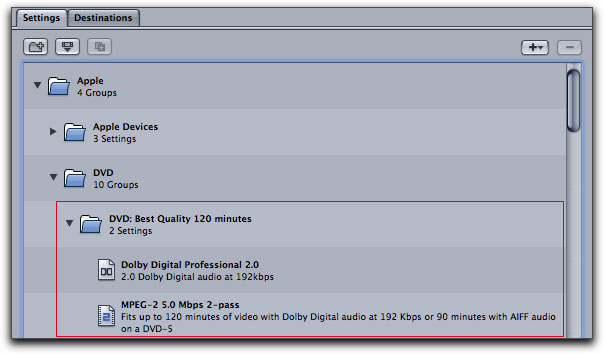
For this job I have chosen to use 'DVD Best Quality 120 minutes'. In earlier versions of Compressor, included in the Presets, were two audio options, AIFF and ac3 (Dolby 2). As you can see below, the AIFF preset is no longer available leaving us with only the ac3 Dolby Digital Professional 2 encode option. This is actually a good thing as Dolby audio takes up only 1/8 the amount of space as AIFF audio. With less space taken by audio, we can assign a higher encode rate to the job for better quality.

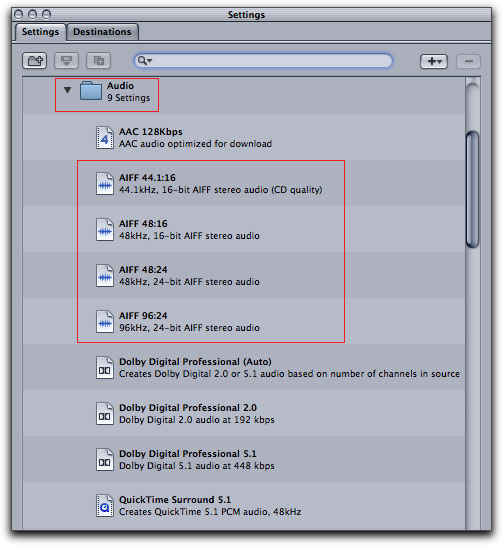
AIFF audio Presets are still available in the Audio folder in the Compressors Presets.

To add a Compressor Preset to the job in the Batch window, click on the Preset folder of your choice and drag it up into the Batch window and into the job.

Below the Preset folder has been added to the job in the Batch window. It will now be called a 'Target'.

Finding the correct Preset in the Settings window requires a lot of twirling down and scrolling to find the Preset you are looking for. There is another, slightly less cumbersome way of adding Presets to a job. Move your cursor into the blue area of the job in the Batch window and control (right) click. This will present you with a contextual menu. First slide down to 'New Target With Setting' from there you can then select your preset.

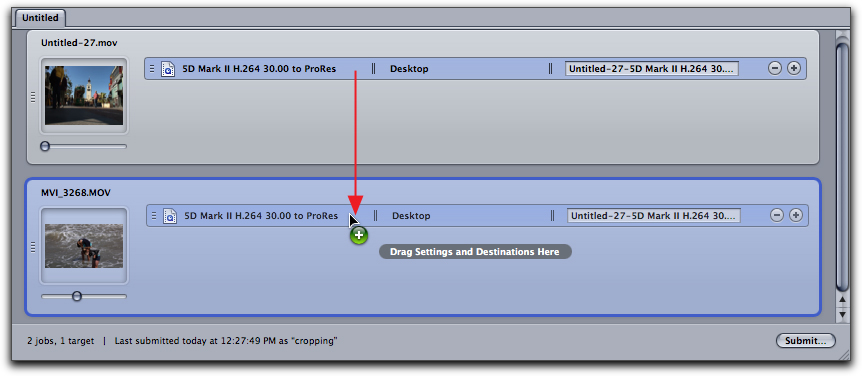
Once you have applied a Preset (Target) to a Job, if you create a new job, you can drag the Preset (Target) down from the first Job into the second, new Job.

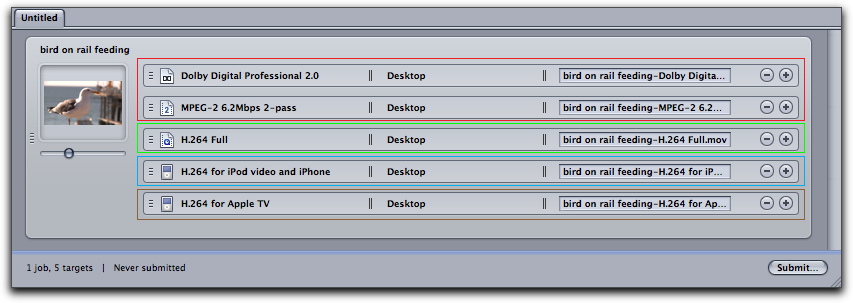
You can add any number of Targets (Presets) to one video Job. You may have finished your FCP project and need to compress it to several different codecs for different distributions, i.e. MPEG 2 and ac3 for SD DVD, H.264 for the web, for the iPod and for ATV, all from one video file.

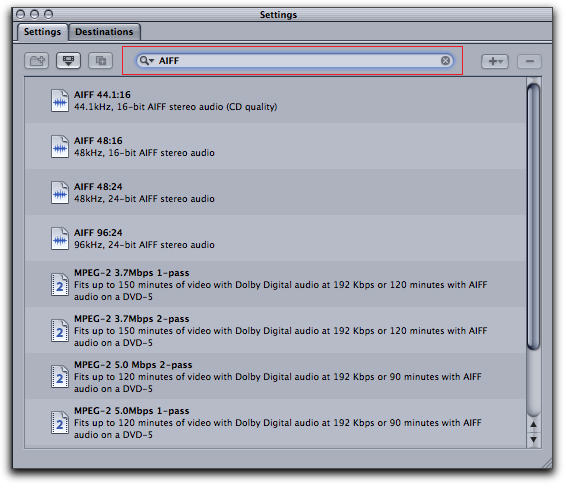
You can also do a 'Search' in the Settings window, just enter what you are looking for, in this case AIFF. Drag the resulting Preset into the Job in the Batch window.

[Top]
Preview window
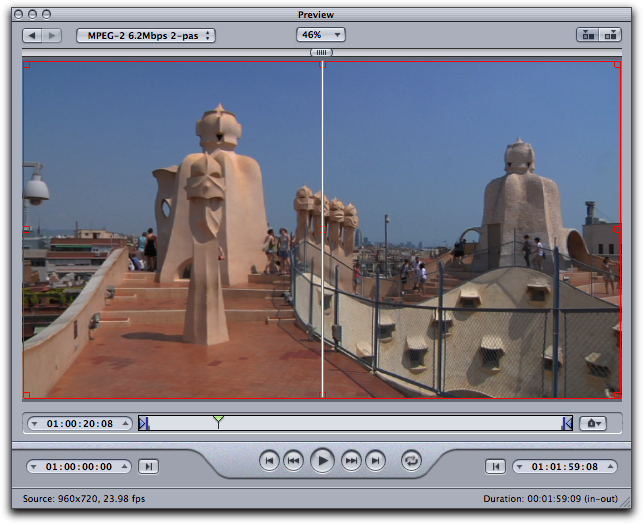
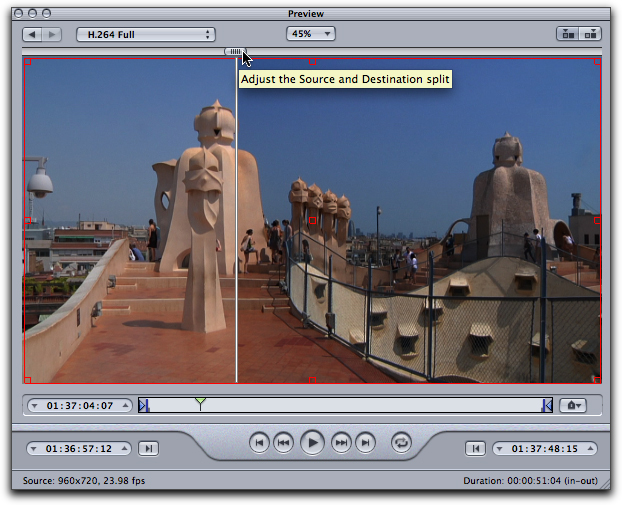
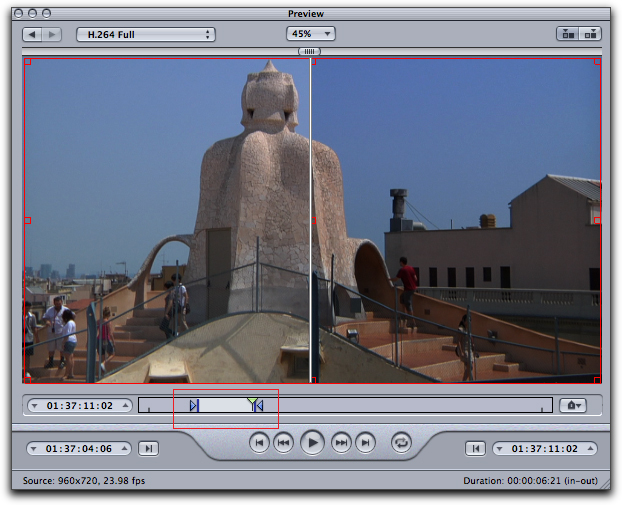
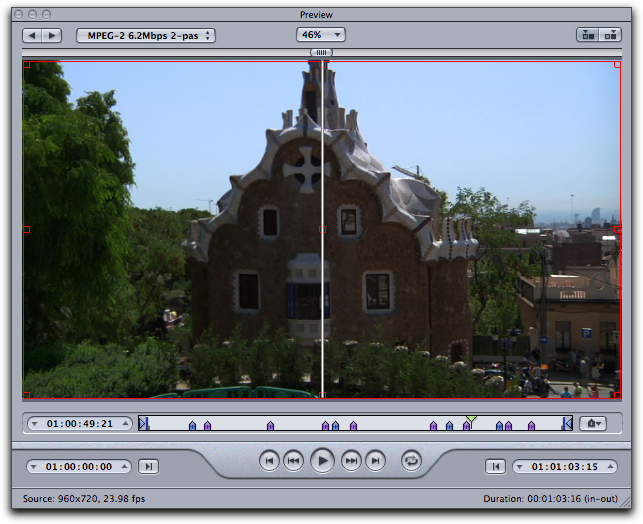
When you select a Job in the Batch window, the Preview window will update to display the item you have chosen. The Preview window is not unlike the Canvas window in FCP. You can scrub through or play your media using the controls at the bottom of the window. The window defaults to source (unaffected) view on the left and output (setting applied) on the right. Source and duration information is found at the bottom of the Preview window.

The Preview window offers an adjustable split screen, divided by a movable white vertical line, which you can drag left or right to view different sections of the media, source on the left and output on the right. I have applied the Gamma filter (below) to demonstrate.

In order to view the red and white overlay lines in the Preview window, you need to actually click on and select the video Target in the Job.

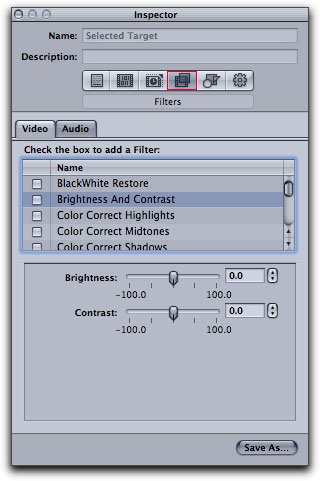
The Preview window in Compressor is limited to what it can actually preview. It can dynamically display changes made in either the Geometry tab, (i.e. cropping), or in the Filter tabs, (i.e. Brightness and Contrast) that are set in the Inspector window, that's about it.


The Preview window can not display the media with the encode settings that you have applied via Presets in the Batch window. So, if you need to see the final results of your media with the encode settings applied, in this case MPEG 2, you will need to submit the job and then check out the finished results. This is a major shortcoming, as it would be very helpful to be able to view the quality of the video, in the Preview window, with different encode settings applied (bit rates, etc), before you submit the Job for processing. There is a workaround for this dilemma. In the Preview window, pick some video that is particularly challenging (like fast motion), and set In and Out points around it. When you click on the Submit button in the Batch window, only that portion of video between the In and Outs will be encoded. You can do a number of short test to determine the best encode settings, then remove the In and Outs and Submit the Batch.

The Cropping feature in Compressor is a very utilitarian tool. Unlike in FCP, when we crop a video image, we finish up with black borders where we cropped. Cropping in FCP simply replaces video image with black boarders, you can wind up with letter boxing, pillar boxing or both. The cropping tool in Compressor actually crops the video and the final output size from Compressor is reduced by the amount of the crop. No black boarders.
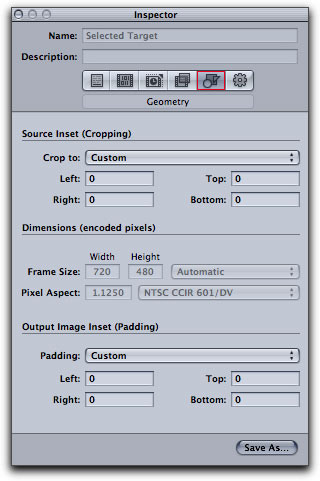
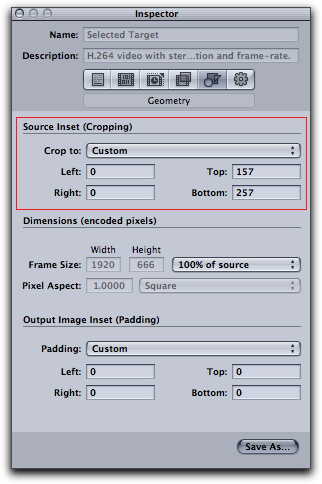
There are two ways to crop in Compressor. The first way is to select the Geometry tab in the Inspector window, where you can set the amount of your crops mathematically in the 'Crop to' section. After you enter you values you can see the results in the Preview window.

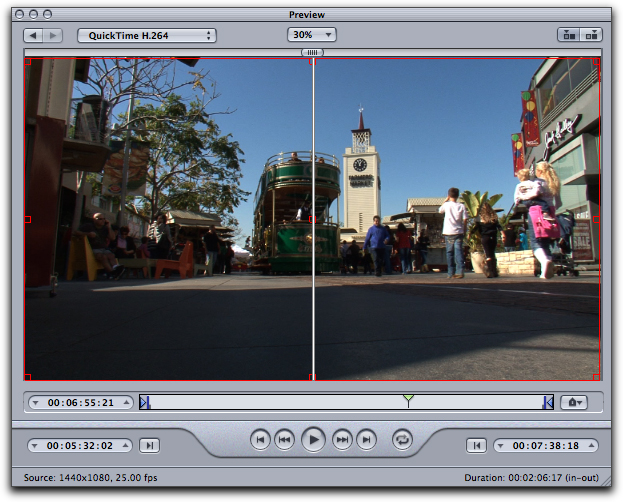
The act of cropping may be more of a visual than mathematical, in the Preview window, we can do our cropping by dragging the red overlay borders to the position in the video where we want the crops placed. The Preview window below shows the full video image.

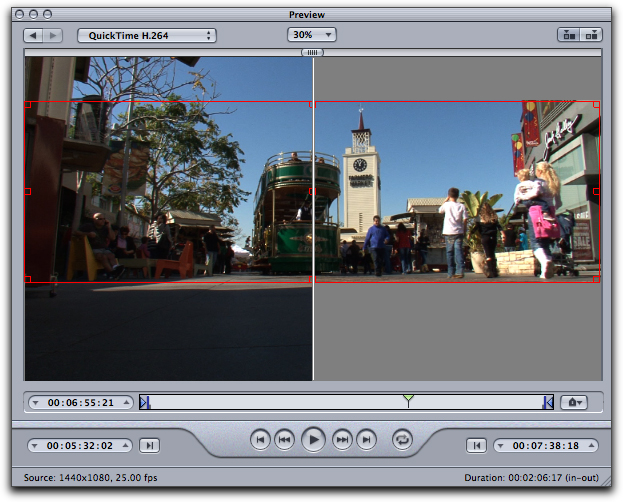
In the Preview window I have dragged the top and bottom red crop lines up into the image. As shown below, you can see the full video image (source) on the left and the cropped version on the right.

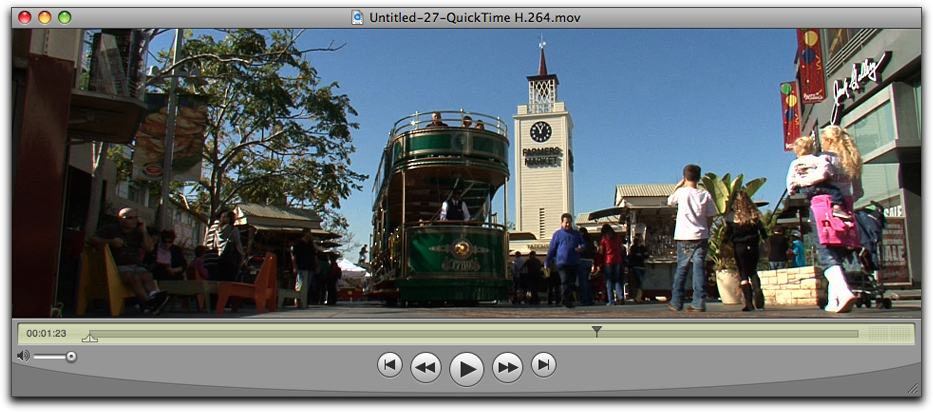
To demonstrate that Compressor performs a real crop, I exported this video as H.264 and opened it in the QuickTime Player. No black borders. We can also use the cropping tool to convert, by cropping, letterbox 16:9 video to 4:3, or convert 4:3 video to 16:9.

You can set the correct aspect ratio of your video in the Preview window by using the drop-down menu.

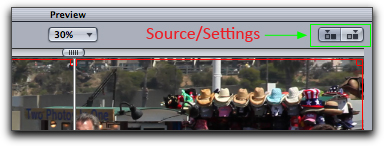
At the top right of the Preview window are two small buttons called 'Source/Settings' selection. The button on the left should be on by default and would display the source, unaffected, video to the left of the 'Split screen slider', the white vertical divider line, and the affected video (output) to the right of the Split screen slider. Clicking on the button to the right will show both sides of the Preview window as output, with effects applied.

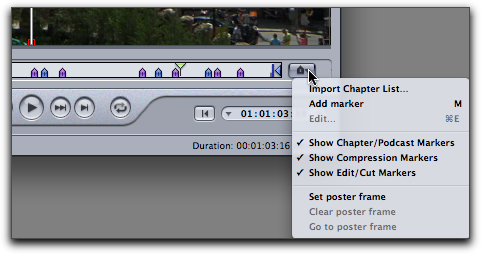
If you have added Markers to your project in FCP, these markers can be carried forward into Compressor and will show up at the bottom of the Preview window.

If you have exported properly from FCP, as 'DVD Studio Pro Markers', and you don't see the markers in the Preview window, you may need to turn them on from the Marker drop-down menu.


[Top]
The Inspector
Whether working with an existing Preset or a Custom one, it is in the Inspector that we make all necessary changes. When you select a Preset in the Settings window, that Preset will be loaded into the Inspector window.

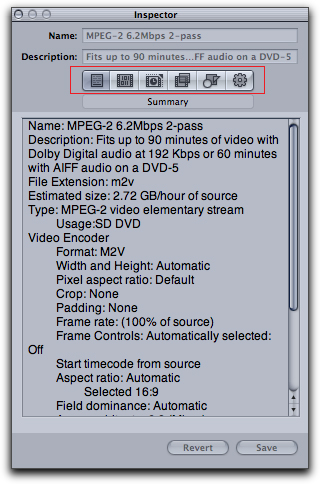
At the top of the Inspector window are 6 tabs; Summary, Encoder, Frame Controls, Filters, Geometry, and Actions. Each tab serves a different function in setting up the Preset. We will work in some of these tab during this article.

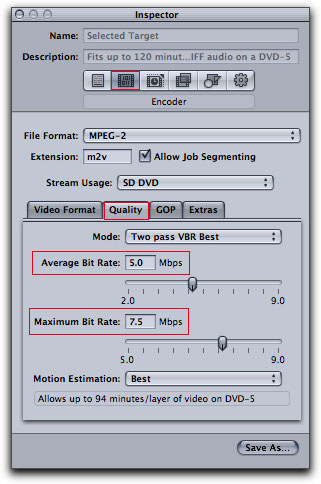
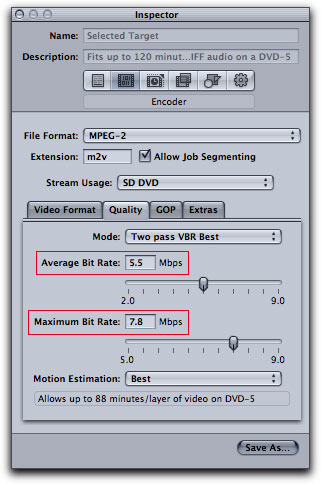
Okay, we have added the FCP movie to the Batch window, set a 'save to' destination and picked our MPEG 2 and ac3 (Dolby) Preset, but there is a little more to do. My FCP movie is 98 minutes in length, too long for the 90 minute Preset, but smaller than the 120 minute Preset which I have chosen. The trouble is that I am loosing some quality because 120 minutes is larger than I need. In order to get the maximum quality out of the Preset I have chosen, I am going to adjust the bit rate settings to match the actual length of my FCP movie. To do this we will work in the Inspector. Select the MPEG 2 section of the job in the batch window.

The MPEG 2 selection will now be displayed in the Inspector window which opens in the Summary tab (below left). As shown below center, I have selected the Encoder tab and then the Quality tab. As you can see, this Preset uses an average Bit Rate setting of 5.0 and a Maximum Bit Rate setting of 7.5 as its default settings. Using this free Bit Budget to calculate the average and max Bit rate settings for my 98 minute FCP movie, I get 5.5 average 7.8 max bit rates, which I have entered into the Inspector, below right. Of course, if the length of your movie is close to the duration (but not more than) of the Preset, you can use the encode settings 'as is'.


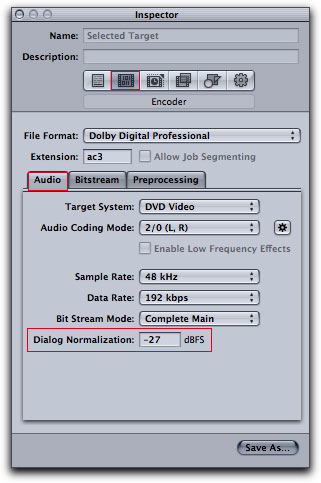
There is one other area of Presets that we need to look at, although I have discovered that many people are either unaware of these needed adjustments or just don't bother. These two adjustments have to do with the ac3 (Dolby) audio encode Preset. Select the ac3 (Dolby) in the Batch window.

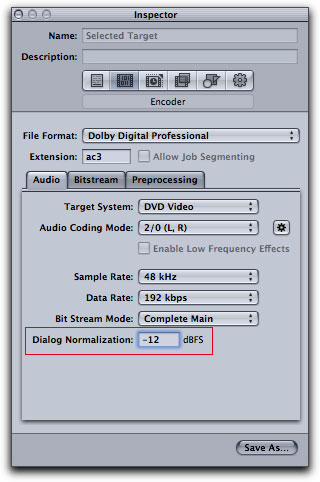
The Inspector will now reflect the ac3 (Dolby) Preset. As shown below left, select the Encode tab and then the Audio tab. At the bottom of the Inspector window you will see 'Dialog Normalization' which is set to -27 as default, but the default setting of -27 is not appropriate for most of our ac3 (Dolby) encoding tasks and we will need to change it. The point of Dialog Normalization, (audio volume is measured in decibels, dBs), is not to normalize the audio volume within a track but rather to normalize the audio volume levels between different tracks. This will help maintain the same audio volume from track to track during playback. The dB number that you enter into this box is determined by the 'peak audio levels' that you work with in FCP. For example, it is common practice to use a -12 dBs peak audio level when working with DV video in FCP, as shown by the FCP VU meters, below center. The peak audio level you chose to work with will be the dBs number entered into this box. In my example of DV video, audio volume is adjusted in FCP to peak at -12 dBs, so -12 dBs is entered as the setting, below right. To disable the Normalization process, to avoid changing the levels that were set in FCP, enter -31 into the box. This, in effect, turns off Dialog Normalization.


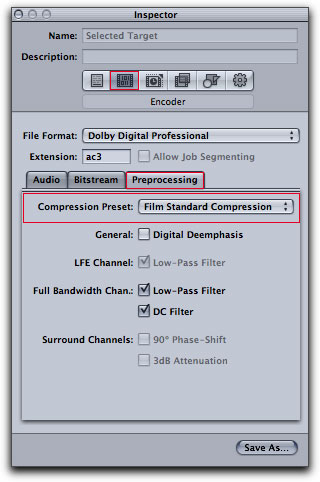
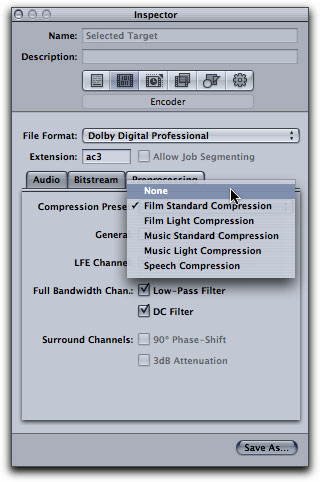
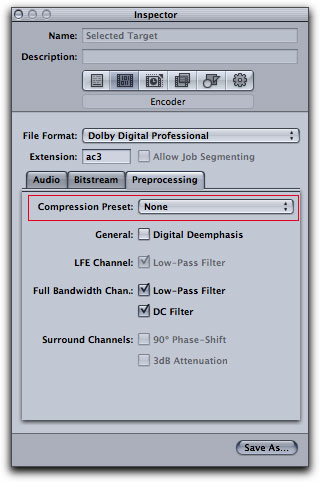
One last item to change in our ac3 (Dolby) Preset. In the Inspector window, with the Encode tab still selected, click on the 'Preprocessing' tab, shown below left. The 'Compression Preset' defaults to "Film Standard Compression", but this setting is not what we want for DVD authoring. Click on the 'Compression Preset' drop-down and set to 'None'.


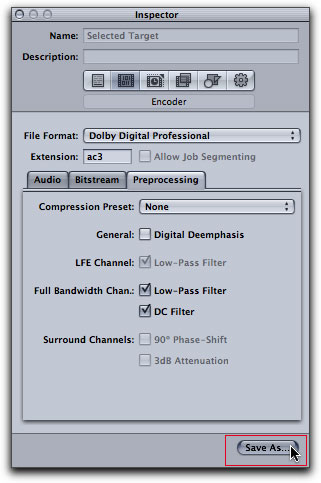
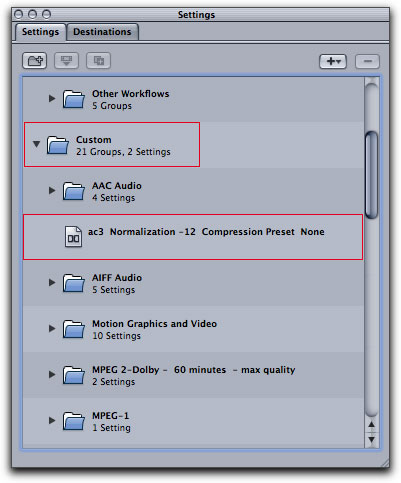
As you can imagine, if you are doing a lot of MPEG 2, ac3 (Dolby) encoding, redoing the ac3 settings in the Inspector each and every time would be a drag. After adjusting the ac3 (Dolby) to match my requirements, I can save it as a Custom Preset by clicking on the 'Save As' button at the bottom of the Inspector window. I then name it with my special settings.


The next time that I need to apply ac3 Presets to a job, I can select my custom ac3 Preset found in the Custom folder. Of course, you can build an ac3 Preset with Normalization set to -31(turns Normalization off) as well.

[Top]
Submit
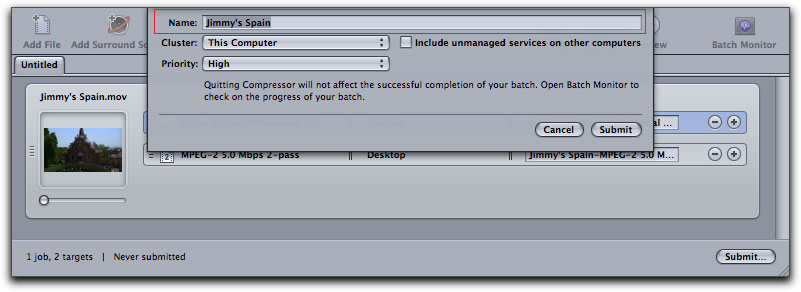
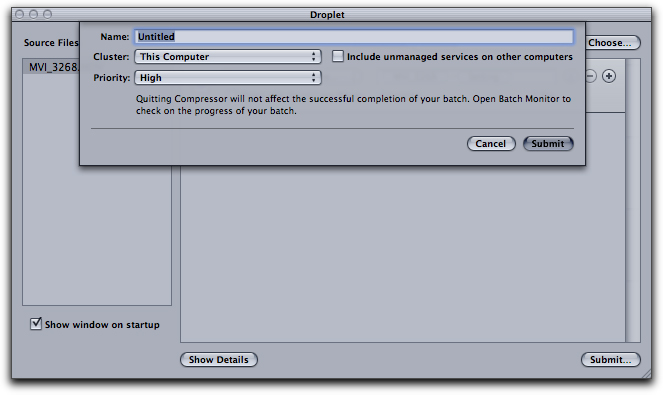
We have finished adjusting our Preset parameters and are now ready to submit our job for processing. Return to the Batch window and click on the 'Submit' button. You will be presented with a dialog box that is used when you have a 'Cluster' of Macs, access to several networked Macs, to distribute the encoding workload to. As most of us are working on just one Mac, the only setting that you might want to change is 'Name'. When you change the name in this box, it does NOT change the name of the final output files from Compressor. The name that you enter here will only be displayed in the History window and is meant only to help identify which jobs are being processed as reflected in the History window. Click on 'Submit' in this dialog box and the encoding process will begin.

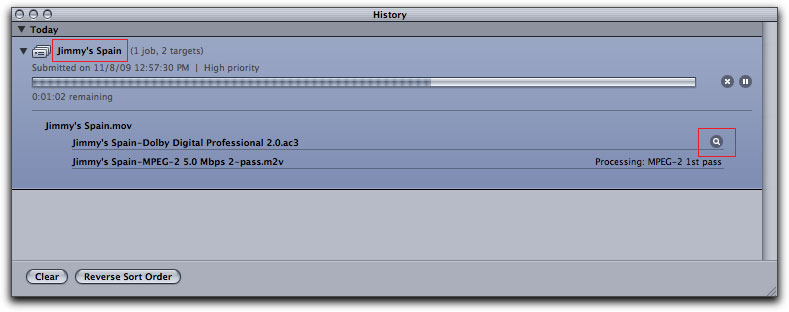
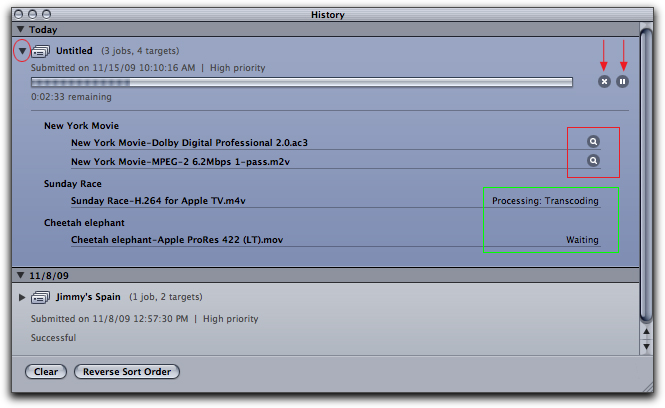
The History window is where we view the progress of the encode process. Twirl down 'Today' to display your job as it is encoded. Notice that the name of the job, as shown below in the History window, "Jimmy's Spain" is the name that I gave the job in the first 'Submit' dialog box, (above). A cool thing about the History window is, that once a batch has completed encoding, a little magnifying glass will appear to the right of the batch's entry, red box shown below. Clicking on the magnifying glass will take you to the output media in the Finder.

Another way to monitor the progress of your job is to click on the 'Batch Monitor' icon in the Tool bar at the top of the Batch window.

After you have opened the Batch Monitor window you will need to click on 'This Computer' to display the encoding information and progress bar.

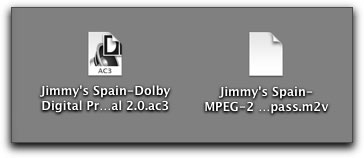
When Compressor has finished its encoding work, creating the MPEG 2 and ac3 (Dolby) files, it will place the files on the Desktop, ready to move into DVD Studio Pro. While the example in this article is about MPEG 2 encoding for DVD authoring, the process employed would be applicable to any of the many different types of format Presets found in Compressor, i.e. MPEG-1, MPEG-4, H.264, etc, (there are a lot).

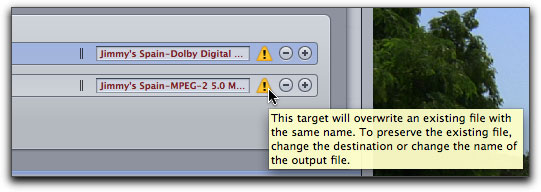
After processing has been completed, look back at the Batch window, our job now displays 'warning signs' and the job names for both ac3 (Dolby) and MPEG 2 have changed to red.

This change in appearance warns us that the job has been processed and that if the job is re-submitted, the existing encoded files will be over-written.

Moving the finished encoded files from the desktop to another location and then clicking in the blue job area of the Batch window, will restore the job to it's original state, the job names will change back to black text and the warning symbols will disappear. You can also click on the red names and change them to something different. You are now ready to start over.

[Top]
History Window
The History window tells us not only what has been happening in Compressor but also what is currently going on, we can check the status of any encoding job, past or present, it does this by date. When you click on the 'Submit' button, the Batch shows up in the History window, you'll need to twirl down the disclosure triangle to see the progress of the Job, red circle below. Just beneath this is a progress bar that displays the encoding progress of the batch. To the right of the progress bar are both cancel and pause buttons. The Pause button works with some codecs but not others, 'pause' seems to have trouble with long GOP codecs. If a codec can not be paused, it will start over from the beginning. The History window below shows a batch being processed, with three different jobs in this batch; 'New York Movie', 'Sunday Race' and Cheetah elephant'. The History window displays the status of each of the jobs in the batch. Processing of 'New York Movie' has been completed, we can tell this because there is a magnify glass, called the 'Reveal in Finder' button, to the right of 'New York Movie', MPEG-2 and ac3. Not only does this tell us when the job has been processed, but if you click on the magnify glass (red box below), the Finder will open to the file that Compressor just encoded. The History window also displays the status of the other two jobs in the batch; 'Sunday Race' and 'Cheetah elephant'; Processing and Waiting, (green box below). When the entire Batch has been processed the word 'Successful' will appear just beneath the Submitted date.

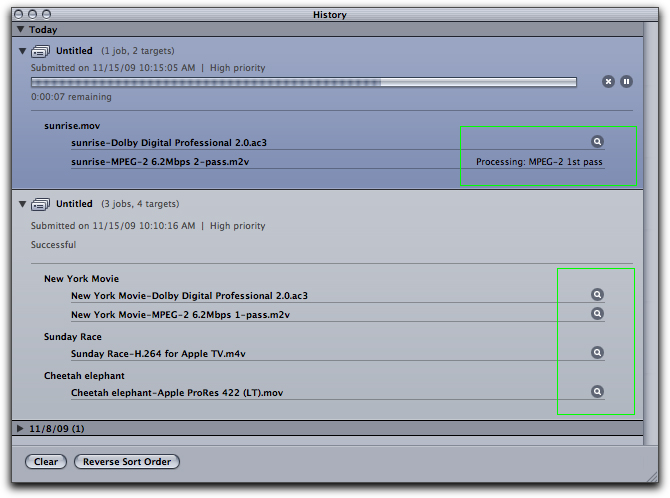
The History window below, shows that the three jobs in the batch have been successfully encoded and that Compressor is now working on a new batch, with just one job, 'Sunrise'. The ac3 encode has been completed and Compressor is working on the MPEG 2 encode.

The History window has one more ability. Let's say that you have completed processing a job and you now discover that you either need to change a setting or need to re run the job, maybe with a different Preset. You don't need to start over, just click and drag the job from the History window back into the batch window. You can then make any adjustments in the Inspector window and Submit.

[Top]
Droplets and Custom settings
There are going to be times, when after modifying a Compressor Preset, that you'll want to save it as a 'Custom' setting, this is easy to do in Compressor. For highly repetitive tasks, Compressor also has the ability to create a 'Droplet'. A Droplet is a special 'mini' application made from a Compressor Preset or Custom setting, it sits on your desktop and has a special Compressor icon. Whenever you want to run some video through Compressor, if you have built a Droplet of that chore, then all that is required is for you to drop your video file onto the Compressor Droplet. No need to launch Compressor or do anything else. The Droplet will run the task for you in the background and deliver the exported file to your destination (desktop).

You can create a Custom setup or Droplet for any type of job that you need to run through Compressor. As you might know, Canon has a digital SLR camera, the 5D Mark II, that shoots video and is all the rage. The camera shoots to memory card so getting the video into the Mac is easy. But, there are several problems with this video. First, it shoots at a non-standard video frame rate of 30.00 fps. I don't mean 29.97, it actually shoots at 30.00. The second problem is that it shoots to card in the H.264 codec, not a codec that FCP likes to work with. The audio off the 5D Mark II is non-standard and needs to be transcoded as well.
What we will do here is first build a Custom Preset that will convert the 30.00 fps to the standard 29.97 fps. And at the same time we will transcode the video codec of H.264 to something that FCP handles well, ProRes 422. We are going to change the frame size from 1920 x 1080 to 1280 x 720. The audio will be changed to 48k audio sample rate at 16 bit. Then we will turn the Custom Preset into a Droplet. While Compressor can transcode most video without any special attention, when we want to change the frame rate or frame size of the video, we will get much higher quality if we utilize the powerful 'Frame Controls' engine that Compressor got from the 'Shake' application.
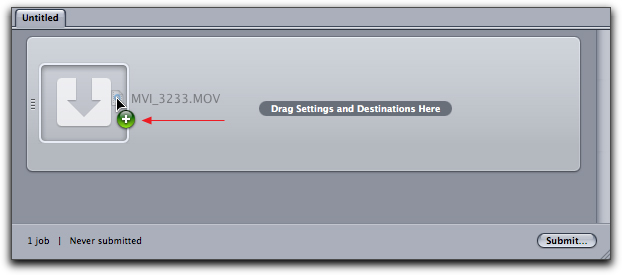
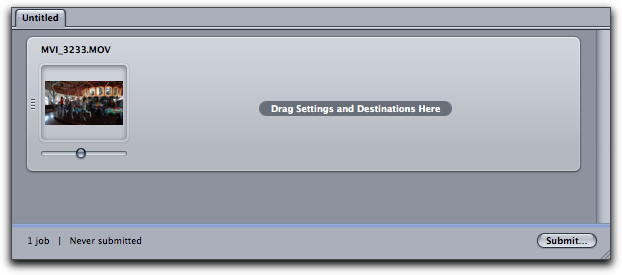
First I am going to drag the 5D video footage into a Job in the Batch window.


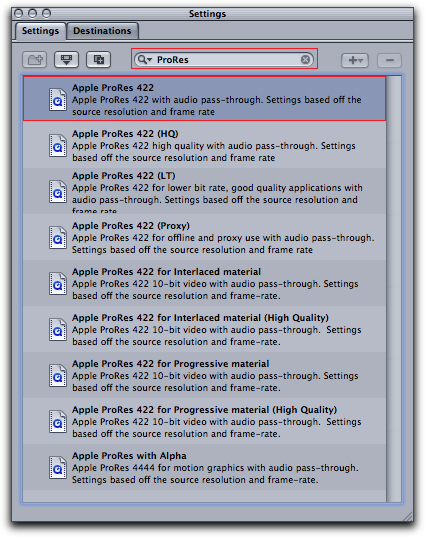
In the Settings window, I have typed ProRes into the Search box. From the results I have selected Apple ProRes 422 (standard quality).

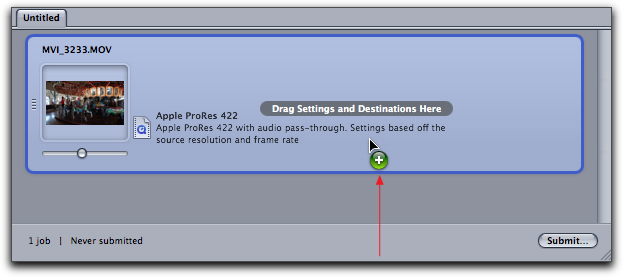
This Preset has been moved up into the Batch window into the Job.

I have clicked on and selected the Target (codec - destination - file name), red box below, which will load it into the Inspector widow where we can make our changes.

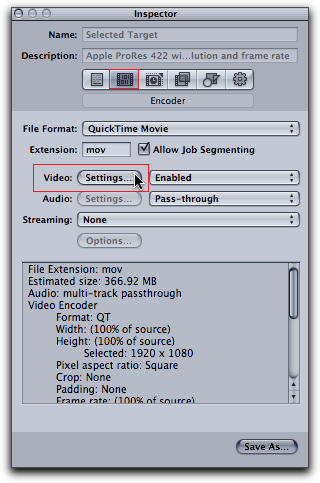
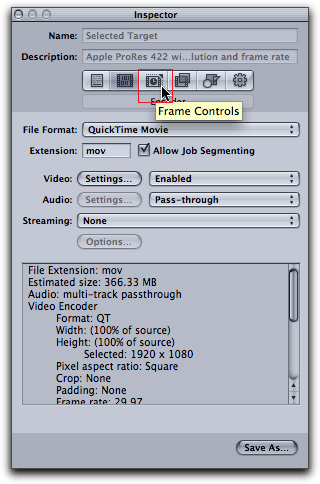
As we have already selected a ProRes 422 Preset (to get out of the H.264 codec), what we need to do now, is to convert the frame rate from 30.00 to 29.97. In the Inspector window, click on the Encoder tab, red box below. Then click on the 'Video' Settings button.

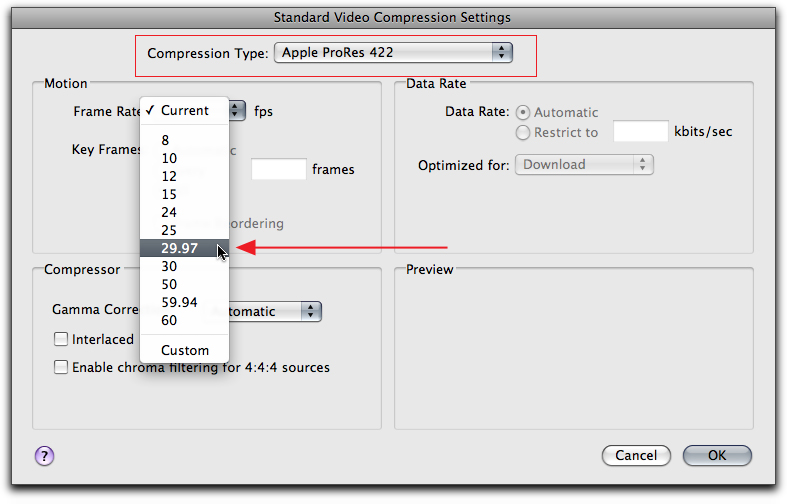
When the Settings window opens you'll notice that 'Compression Type' is Apple ProRes 422. This is because we selected the ProRes 422 Preset. Click on the 'Frame Rate' drop-down menu and select 29.97 fps.

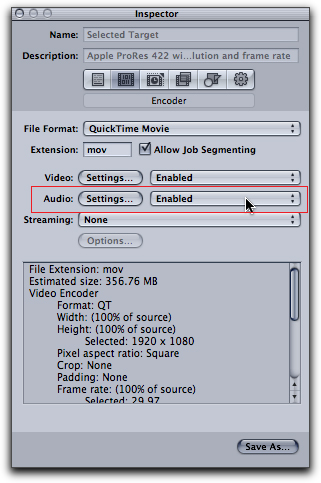
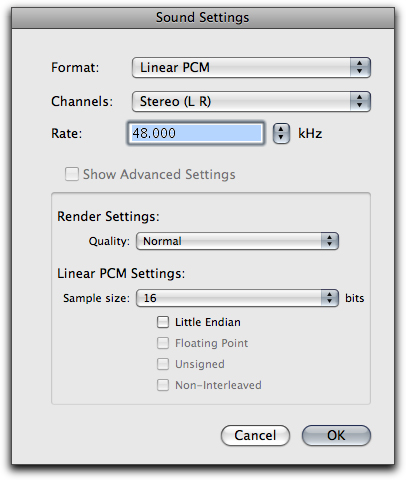
Now we need to work with the audio. The 5D Mark II shoots at 44.1k, we need to transcode this to PCM audio at 48k for FCP. If we don't, then when we use the converted video in FCP, we will get a red audio render bar in the timeline. In the Inspector > Encoding tab, the Audio 'Settings' button is grayed out with 'Pass-through' enabled. We need to active the 'Settings' button by changing 'Pass-through' to 'Enabled'. The 'Settings' button now becomes active, click on it. The 'Sound Settings' window opens, set audio to 48k, Stereo, 16 bit, Linear PCM.


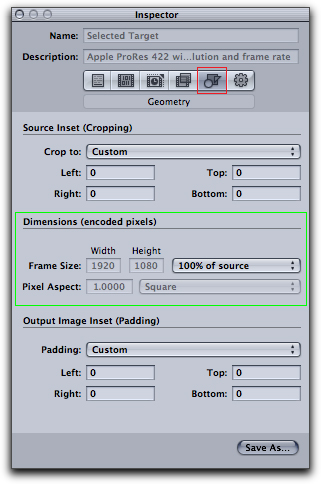
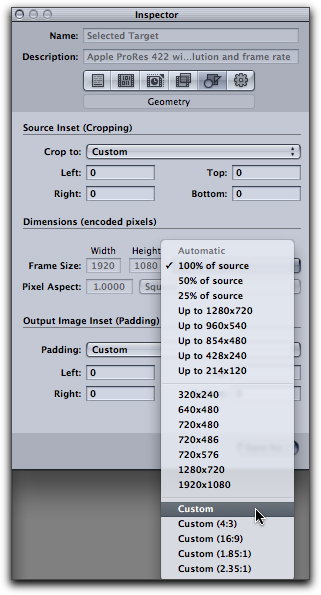
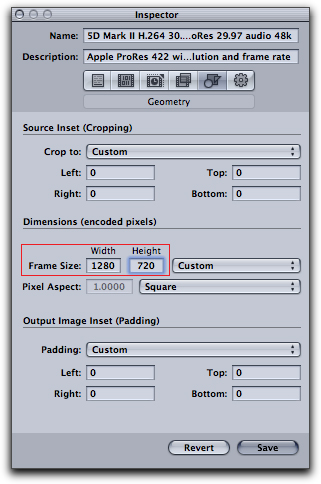
In the Inspector, we are going to click on the Geometry tab (yes, the same tab that does the cropping) to change the video frame size from 1920 x 1080 to 1280 x 720. We will be working in the 'Dimensions' section. Click on the 'Frame Size 100% of source' drop-down and select Custom. In the 'Frame Size' box enter 1280 and 720. When using custom frame sizes, be careful to maintain the same aspect ratio as the source video in order to avoid distortion of the video image.


You'll remember that I mentioned that when we change either the frame rate, frame size or both, that to get the highest quality output we need to use 'Frame Controls', but Frame Controls are not on by default, we need to turn them on. Back in the Inspector, click on the Frame Controls tab.

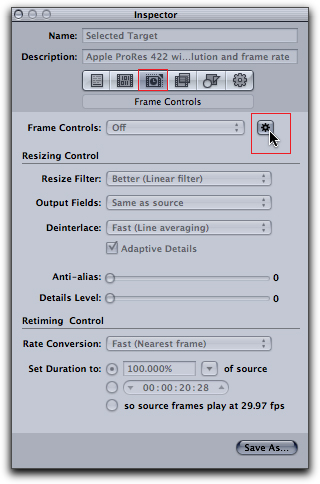
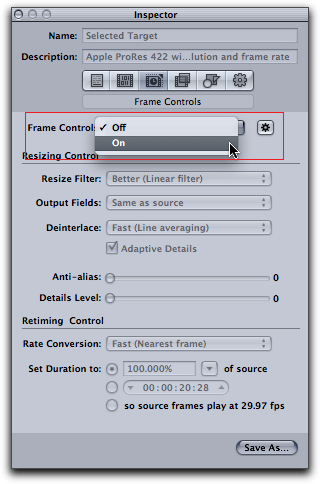
In the Frame Controls tab, to the right of the Frame Controls, is a small gear icon, click on it. Then click on the Frame Controls drop-down and select 'On'.


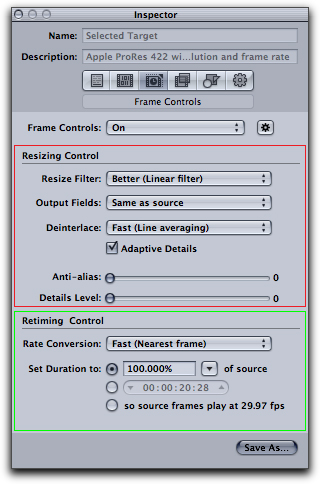
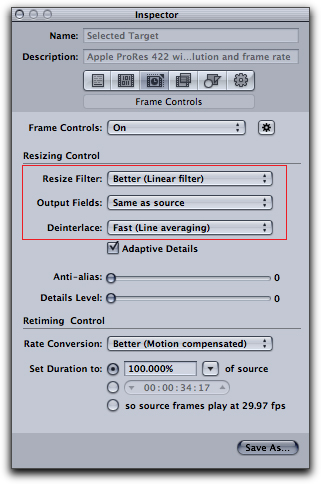
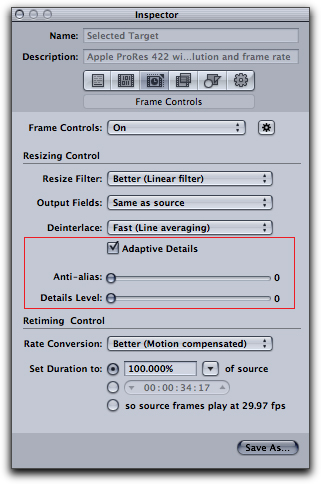
Frame Controls are now turned on. There are two different areas in the Inspector window, one for 'Resizing Control' (red box below), changing the frames size of the video, the other 'Retiming Control' (green box below), for changing the frame rate of the video.

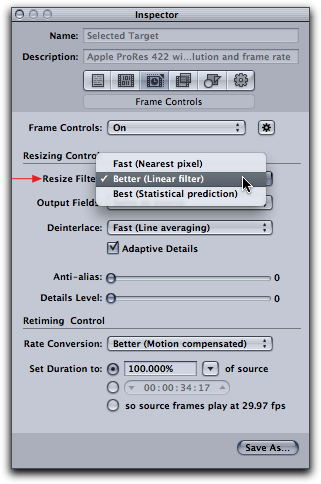
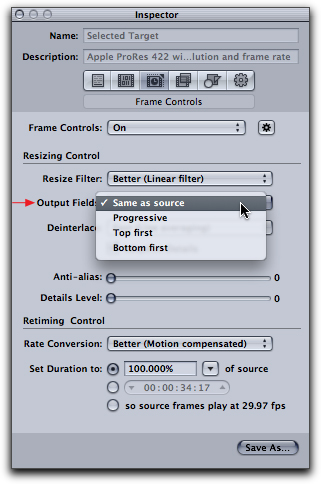
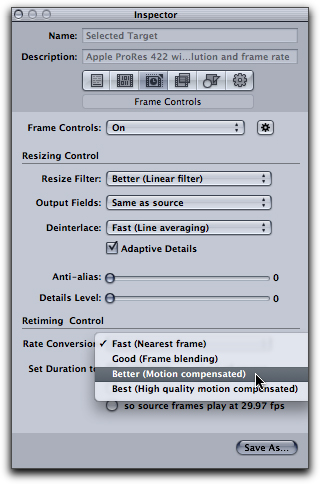
The 'Resizing Control' section is used when we are converting the frame size of our source video to a different frame size for our output file. If you are not changing the frame size of your video, then you would leave this at default. It's in this section that we access the Optical Flow technology for a higher quality transcode when converting frame sizes. The default setting in this section, for this encoding job and most encoding jobs, are actually good to go, below left. The first setting 'Resize Filter' is set to 'Better', which does employ Optical Flow technology, below center. The next setting is 'Output Field', is set to 'Same as source', which is correct because the source video is Progressive and we want to output Progressive. If we had source video that was interlaced and we wanted to transcode it to Progressive, we would select Progressive from this selection. And if we wanted to convert Progressive video to interlaced, we would select 'Top' or 'Bottom' first.


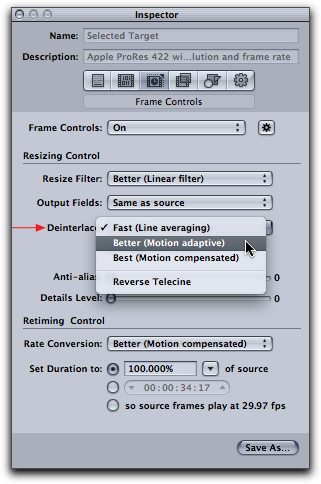
The next setting down, 'Deinterlace', is used when converting from interlaced video to progressive. If this is the case, then I would suggest that you change the setting from 'Fast' to 'Better' (Motion adaptive), which will employ Optical Flow for much better results. This is important because you know how hard it is to get good deinterlacing. There are three settings left. The 'Adaptive Details' check box would be Un-checked if the output video is progressive and its destination is for computers or mobile devices like the iPhone or iPod. This would save a great deal of encoding time. But for everything else, leave this box checked. The 'Anti-alias' control is for those times when scaling of the video image causes stair-stepping or jagged lines. This control will help smooth edges. If the video is too flat, the 'Details Level' slider will increase sharpness. These two last controls would probably be used infrequently and you would use just one or the other.


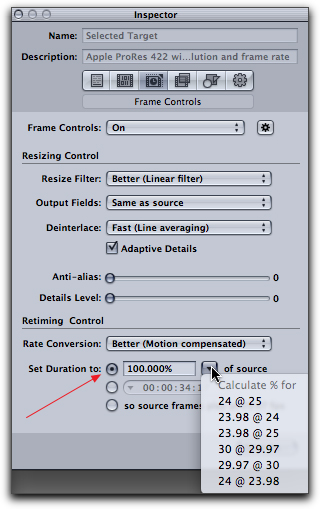
In the Retiming Control section, 'Rate Conversion' drop-down menu, there are four settings. The first two; Fast (Nearest frame) and Good (Frame blending), would produce the same quality results as if we simply dropped the 5D Mark II 30.00 fps video into a FCP sequence set to 29.97 and let FCP convert on the fly. While this works, the quality is not as good as it needs to be. The next setting in the drop-down, Better (Motion compensated) takes advantage of the Optical Flow technology to produce much higher quality frame rate conversion, though this setting takes significantly more time then the first two settings. The last setting, Best (High quality motion compensation) will produce even higher quality, though it is quite possible that you can not see the difference. If you do use this setting, you can take a two week vacation, come back and Compressor will probably still be working away. (I have never had a two week vacation, so I have never used this setting.) The other setting in this section, below right, is, 'Set Duration to', which enables a constant speed change by entering the percentage speed change that you want. You can also do frame rate conversions in this setting.


So now Compressor is set up to do our conversion.
- Transcode from H.264 to ProRes 422, as we picked the ProRes 422 Preset.
- Convert the frame rate from 30.00 to 29.97, in the Video Settings window in the Inspector, Encoder tab.
- Convert the frame size from 1920 x 1080 to 1280 x 720 using the 'Resize Filter' in the Geometry tab.
- Convert the audio from 44.1k to 48k PCM 16 bit, in the Audio Settings, Encoder tab in the Inspector.
- Lastly we turned on Frame Controls and selected 'Better (Motion compensation)' Rate Conversion to get a higher quality export.
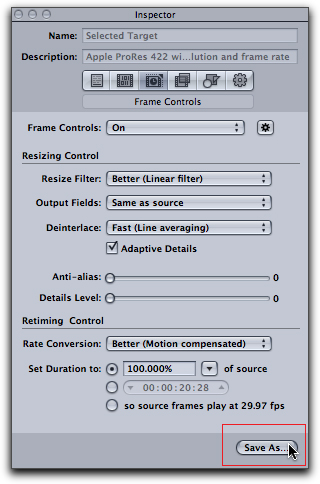
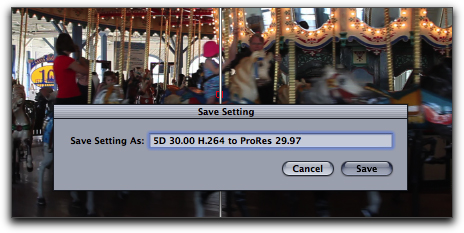
If this was a one time job, we could return to the Batch window and click on Submit and be done. However, if there is a chance that you might need to use this set up again, lets save it as a Custom Preset. At the bottom of the Inspector window is a 'Save As' button, click on it. This will open the Save Setting window, give the setting a descriptive name.


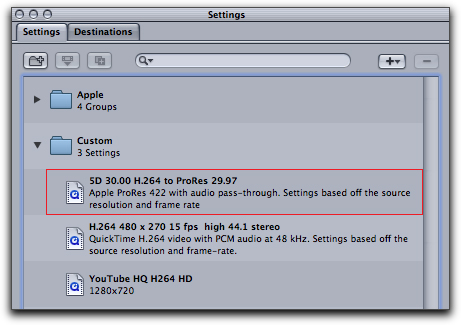
After saving the Custom Preset it will show up in the Settings widow. If you click on a Custom setting in the Settings window, it will load into the Inspector. If you then make changes and click on Save, those changes will be saved to that Custom. If you want to create a new Custom setting from an existing one, drag the Custom setting up into the Batch window, then click on it in the Job, to load it into the Inspector. After you have made changes, you can 'Save As', which will create a new Custom setting with your changes but will leave the original Custom setting untouched.
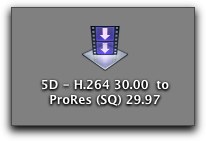
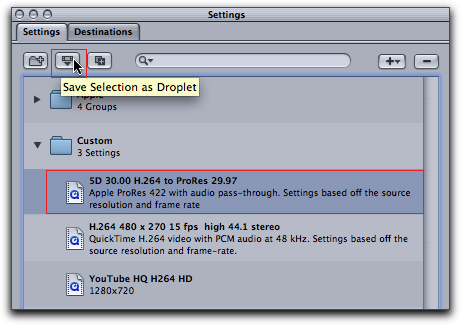
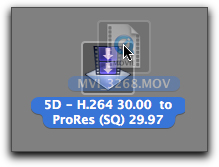
Any time you need to transcode video from the 5D Mark II, you can simply drag this Custom Preset up into the Job in the Batch window. But, if you do this a lot, you may want to create a Droplet of this Custom setting. Select the Custom setting in the Settings window and then, top left, click on the 'Save Selection as Droplet' button.


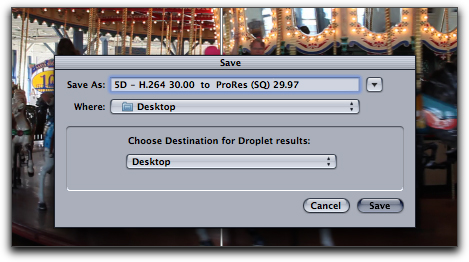
The Save dialog box that opens gives you a chance to rename the Droplet, which I did. In the 'Where' drop-down, you pick the location that you want the Droplet saved to. 'Choose Destination' will set the location of the resulting export files from the Droplet. The Saved Droplet will appear on your Desktop. Just drag any file, group of files onto the Droplet to start the process. You do not need to launch Compressor, the Droplet application will launch in its place, when you drop a file onto the Droplet.


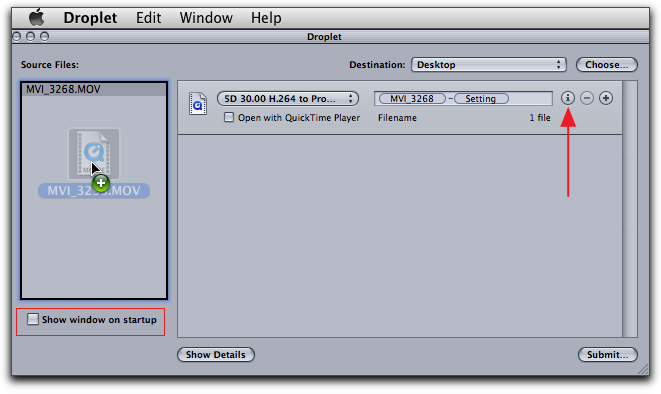
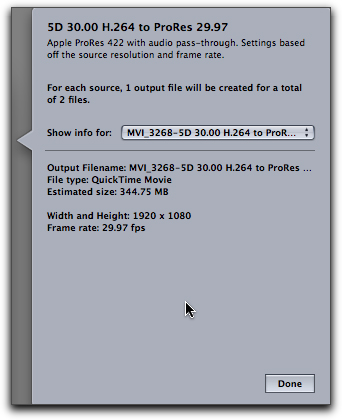
When you drop a file onto the Droplet, the Droplet Application will launch (Compressor will not launch) and open the Droplet window. On the left side of the window, 'Source Files' shows the files that you are working with. As shown, you can drag additional files into the Source window. The area to the right is like a Batch window for Droplets. There is a 'Open with QuickTime player' check box, if this box is checked, when the encode is complete, QuickTime will open the movie on your screen. If you are encoding a number of movies then you might want to uncheck this box or you'll have a screen full of open QuickTime movies. There is also an 'Information' button, click on it to get additional information about the Droplet. The Information window is shown below right. If you don't want the Droplet window to open, when you drop a file onto a Droplet, there is a 'Show window on startup' check box (red box below) that will prevent this window from opening, be sure to uncheck it. You can click into the File name box and rename the output file. If you choose to have the Droplet window not open, then the encoding process will begin as soon as you drop your file onto the Droplet. You can open the Droplet window at any time by double clicking on the Droplet itself.


When you use the Droplet window, you'll need to click on the Submit button to start the encoding process. This is similar to the way you submit files when using Compressor.

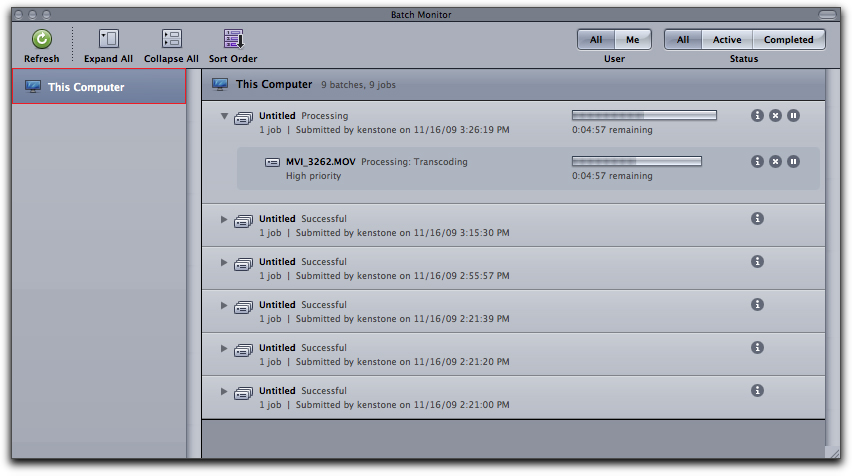
There is one disadvantage to using Droplets. Unlike Compressor, with its History window that shows progress bars for each encoding task, when using Droplets, there are no progress bars, no way of knowing how far along you are, nor the time remaining to completion. There is a workaround for this situation. Did you know that 'Batch Monitor' is a stand alone application? It can be found in the Utilities folder inside your Applications folder. I have placed a Batch Monitor alias on my dock. When you are using Droplets, you can check their progress by launching the Batch Monitor. When you first open the Batch monitor, the window will be empty. You will have to click on 'This Computer' which will open the Jobs on the right. At the top right of the window is 'Status', that lets you view jobs in the Batch Monitor as All, Active or Completed.

During the encode process, if you click on the progress bar 'time remaining' will change to 'elapsed time', click again and it changes back. Droplets do have their advantages, no need to fool with Compressor, you can create any number of them, put them all into one folder and they are portable, you can email or take them with you.
[Top]
Notes
- It is very important to remember that whenever changing the frame size, frame rate or both of your source video, that Frame Controls be turned on in the Frame Control tab of the Inspector, in order to achieve a high quality transcode. I have this Converting Frame Rates in Compressor article.
- I have covered most of the new features in Compressor 3.5 in my Compressor 3.5 Batch Templates and Job Actions article.
- When talking about video and formats and codecs, we tend to mix terms for this technology. While these terms actually have specific meanings, we tend to use them interchangeably. When we say 'Transcode', what we really mean is the changing of one codec to another. For example, if we change an audio file from 44.1k to 48k, this would be a transcode, as would converting XDCAM EX to ProRes 422 (for editing purposes). 'Encoding' most often means applying compression to a video file to make it smaller, say for internet distribution. For example, encoding a DVCPRO HD file to H.264, to reduce its size, or DV NTSC to MPEG 2 so that the video will fit onto a DVD. We also throw the term 'codec' around a lot. 'Codec' stands for 'compress-decompress' which enables computers to create and play back media files. There are many different codecs like; DV, HDV, XDCAM, H.264, ProRes 422, MPEG 2, Animation, AIC, HD, Jpeg, etc. There are audio codecs as well; AIFF, MP3, AAC. Think of the different codecs as being different languages for the computer. Codecs often reduce the size of the media files to make them more manageable and workable on our computers. When we use the word 'Compress', we could use the term 'Encode', they mean the same thing.
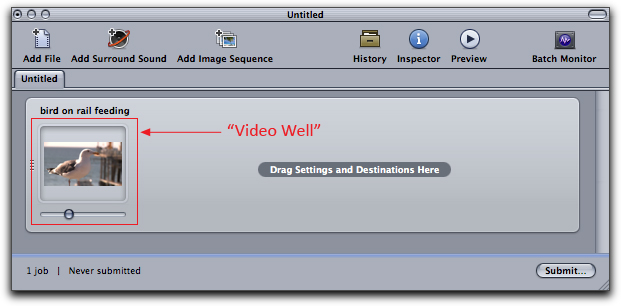
- Speaking of Terminology, in this article I use the term "Video Well" as the place in the Job that we place our video that we want to encode. I don't know that there is an official term for this, so I made my own up. There is a scrubber bar beneath the 'Video Well', you can position the playhead to the video frame that you want to become your 'Poster Frame'.

- In my example of transcoding 5D Mark II footage from H.264, 30.00 fps at 1080 to ProRes 422, 29.97 fps at 720, I selected ProRes 422, what we now call standard quality. Choosing this version of ProRes does create huge files because the data rate is around 147 Mbps which is quite high. ProRes (LT), new in FCP 7 does have a smaller data rate of 102 Mbps which will produce smaller file sizes. I have not yet tested to see if ProRes (LT) has sufficient bandwidth to work properly with this footage.
- When using the standard Apple Presets for iPod, iPhone and ATV (Apple TV), Compressor will automatically employ Frame Controls, (Optical Flow technology) when transcoding to H.264. Compressor will also employ Frame Controls when transcoding HD to SD for use with; iPod, iPhone, and the ATV (Apple TV).
- When to use 'Better' and when to use 'Best'. In my discussions of settings when using Frame Controls, I recommend using 'Better' for both the Resize Filter and for the Deinterlace. The 'Better' settings produce excellent results and most often you would not be able to tell the difference between 'Better' and 'Best'. The 'Best' setting will take almost forever to encode. So, the only time you would choose 'Best' would be when you are not happy with the output results using 'Better'. This would probably only happen if there was very fast motion (movement) in the video.
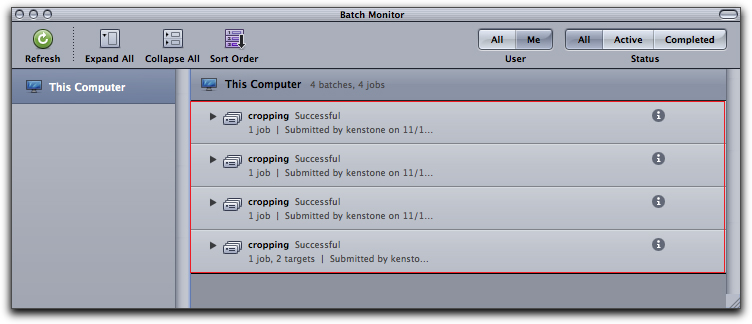
- There is one thing that I don't like about the Batch Monitor, there is no way to delete Jobs from the Batch window (red box below). Even quitting Batch Monitor does not clear the window. The only way I have found to clear things out, is to shut down your Mac, just a bit inconvenient don't you think. You can always go to the History window in Compressor, highlight and delete it. Odd that you can't do the same in the batch monitor.

-
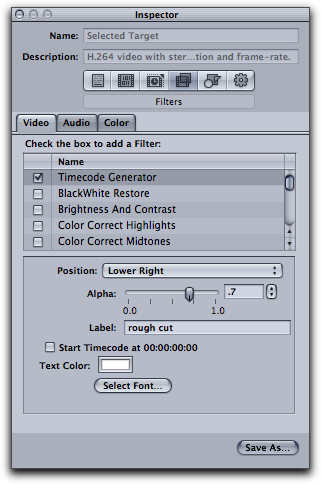
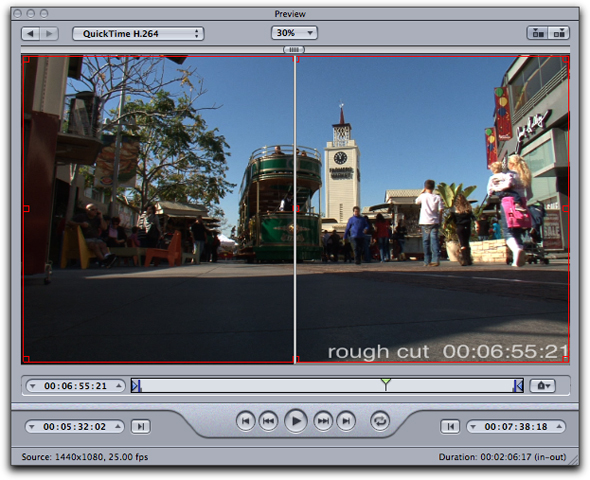
In the Filters tab in the Inspector there is a TimeCode Generator. You can set the starting timecode and the position of the timecode, use the 'Alpha' slider to reduce opacity of the timecode type, change the color of the type and even give it a label.


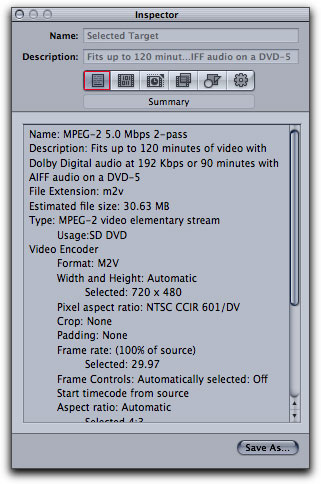
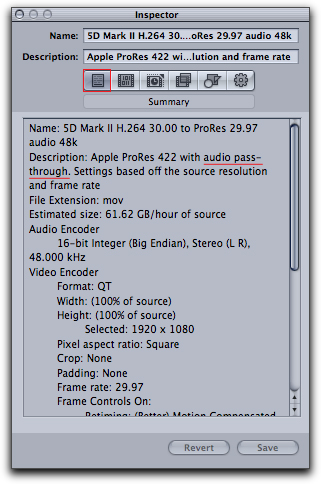
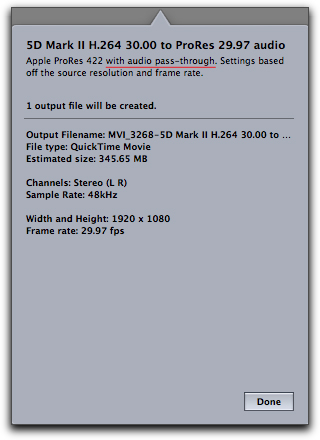
- When demonstrating working in the Inspector, I did not go over the Summary tab in the Inspector. This is because the Summary does not always update or properly reflect the changes made in the other tabs in the Inspector. As shown below, the Summary tab shows that the audio is 'Pass-through' but in Audio Settings, I have made changes, so that the audio is being transcoded to a new audio sample rate and format and is not 'pass-through'. This error also shows up in the Information window of Droplets.


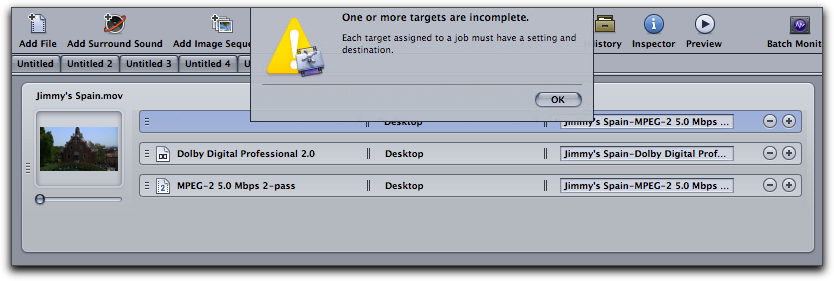
- On several occasions when working in the Batch window, I found that after applying the MPEG 2 and ac3 (Dolby) Presets to the job, the Batch window contained three items, not the expected two, as shown below. The extra item has no Presets applied and is redundant.

If you attempt to Submit the job with this extra item, a warning message will be displayed. To fix this, simply select the item and hit the delete key, or the minus sign (-) , then Submit.

Enjoy,
--ken
[Top]
copyright © www.kenstone.net 2009
© 2000 -2009 Ken Stone. All rights reserved. Apple, the Apple logo, Final
Cut Pro, Macintosh and Power Mac
are either registered trademarks or trademarks of Apple. Other
company and product names may be trademarks of their respective
owners.
All screen captures, images, and textual references are the property and trademark of their creators/owners/publishers.


