
Overview - Final Cut Express 2 February 16, 2004
Final Cut Express 2.0.2


Overview - Final Cut Express 2 February 16, 2004
Final Cut Express 2.0.2
System Requirements
By Ken Stone
A year ago Apple introduced Final Cut Express, a consumer version of Final Cut Pro. The FCE interface was the same as it's bigger brother FCP, but as a consumer version, the application was greatly simplified. Advanced features were removed, some items were hidden from the user and other items were modified to help keep the user out of trouble. Many of these changes were done 'under the hood', out of view. Unlike FCP which is a fully scalable NLE, being able to go from DV-25 all the way to High Definition, FCE is DV FireWire only. By making FCE DV only, Apple greatly simplified the setup process to a single click in 'Easy Setup'. Plug in your DV camera and away you go. A large step up from iMovie, FCE offers a profession interface and set of features. Additionally, projects created in FCE 1 could be opened in FCP 3 and continued on there. As the interface and much of FCE 1 was the same as FCP 3 it also was a bridge to FCP, enabling the user to move to FCP with a greatly reduced learning curve.
When Apple introduced FCP 4, things changed. The new interface sported new features, new tools have been added and there was a major change to clip and media organization and management. The addition of the Patch Panel and Auto Select to the timeline and the addition of the Master/Affiliate clip relationship are just a few of the many changes. FCE and FCP had grown apart. Now with the recent release of Final Cut Express 2, Apple has updated the interface to match FCP 4 and added some of the new features found in FCP 4. Compatibility has been restored, projects created in FCE 2 can be open in FCP 4.
FCE 2 - New Features
RT Extreme
In the past we have seen adds for different NLEs (Non Linear Editors) that bragged of 'RT effects'. Until now this has been more marketing hype than anything else. What was offered was RT 'Preview', the ability to preview just a very few effects in Real Time (denoted by bold type in the effects browser). The preview played in the Canvas window only. Even with the fastest Macs available, this feature was so limited that it was of little value. With the launch of FCP 4 and FCE 2, Apple introduced RT Extreme, and this is the real thing. Final Cut now renders on the fly, so we can preview our work on screen in real time. Apple rebuilt the Final Cut rendering engine which now provides RT preview for effects, transitions and filters, and up to 5 DV streams (video tracks). On my G5 dual 1.8, almost all transitions and filters are in bold. Audio transitions and filters are RT as well.
The amount of RT effects and the quality of the preview is totally dependent on the speed of your Mac, the faster the Mac, the more RT available and the better the quality (High, Medium, Low) available for RT preview. While with Final Cut Pro 4, RT preview is available in both the Canvas window and down FireWire to NTSC or PAL at the same time, with Final Cut Express 2, it is either or. You can have RT Preview in the Canvas window but FireWire output is cut off. If you choose to view your work down FireWire then no RT Preview will be available, you will have to first render to view your effects work on NTSC or PAL. Still, the ability to view your compositing work in the Canvas window or listen to your audio as you adjust audio filters in real time, is a huge feature.
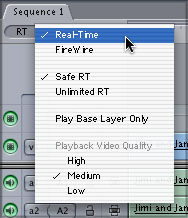 The RT Extreme feature is found upper left corner of the TL and it is through this drop-down menu that you can control both the number of effects and the playback quality in the Canvas window. The two primary settings are 'Safe RT' and 'Unlimited RT'. Safe RT means the FCE will playback effects without dropping frames. If the load on the processor becomes too much for Safe RT, a red render bar will appear in the TL. Unlimited RT will playback effects and when the load is too great, it will stutter or drop frames in an effort to continue playback but will maintain quality.
In addition to Safe RT and Unlimited RT there are three other settings that will enable you to utilize RT preview. As you add effects or video streams, it become increasingly more difficult for your processor to render on the fly and playback in RT. You can adjust for this increase in processor demand by lowering the quality of your preview playback, hence the three settings; High, Medium and Low. The High setting will give you full frame, full resolution interlace video, of course this takes the most power. If you get a red render bar you can change this setting to Medium. Medium plays back at reduced quality and non interlaced video. The Low setting will handle the most effects and video streams but at the lowest quality.
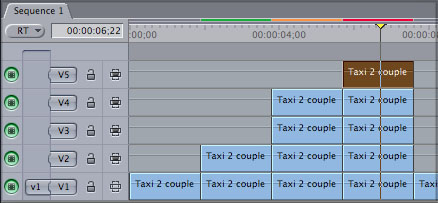
So how do you know where you stand, how many effects and video streams can you have and what settings should you use? FCE tells you in the render bar section of the TimeLine. The render status for each clip can be one of four different colors. As shown below, the first clip has a gray render bar, no render is required for fully quality playback. The next clip has a green render bar indicating RT Preview can be played back at your quality setting without rendering . Orange indicates that the load is too much and during playback stuttering or dropped frames may occur. Red render bar requires render before playback is possible.
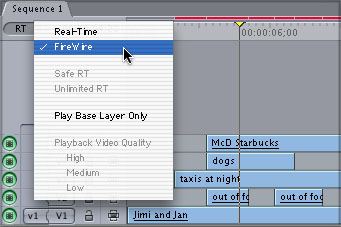
If you have a DV camera or deck attached to your Mac via FireWire then you will have two options. If you select FireWire, as shown below left, you can see that all of the RT options; Safe RT, Unlimited RT, and Playback Video Quality are grayed out and are not available. If you select Real Time, below center, RT options will be available but the FW feed to NTSC or PAL will be cut off presenting you with a gray monitor. If you have no FW device connected to your Mac, the ability to select will be eliminated and even-though grayed out, you can see that Real Time is checked and RT will be available in the Canvas, below right.
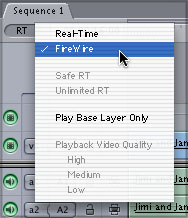
FireWire selected - RT options grayed out |

Real-Time selected - no FireWire available |
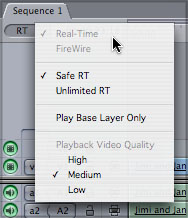
No FireWire Device attached - RT selected |
Below left, I have four video streams, with RT set to Safe and Playback Quality at medium. The green render bar denotes that this will play back RT in the Canvas. Below right, I have added a fifth video stream. Leaving the RT settings as they are I now have a red render bar indicating that this can no longer be played back in RT.
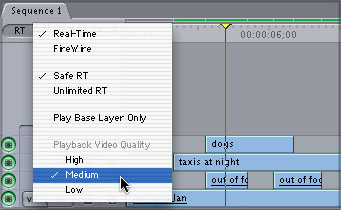
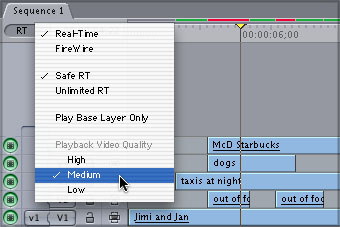
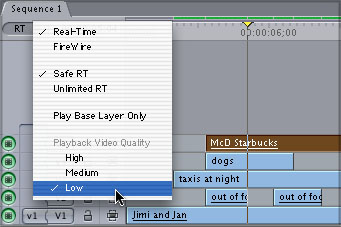
If I change Playback Video Quality from Medium to Low, below left, this lowers the load on the processor and the green render line returns. Switching from RT to FireWire, below right, disables RT and rendering will be required to view on NTSC or PAL. While with FCE 2 you must choose between RT or FW, this does not diminish the power of RT Extreme. The ability to preview multiple video stream with transitions and filters applied is probably the biggest of the FCE 2 new features.
Clip Relationships
Until the release of FCP 4 and FCE 2, a clip and a copy of that clip, as when a clip from the Browser was placed on the Timeline, were independent of each other. The Browser clip and the clip on the Timeline both pointed to the same source (captured) media, but other then that, the two clips were totally independent. Changes to one clip, like re naming or labeling in the Browser, changed only that clip, the copy on the Timeline remained as it was. Even though the clips on the timeline are copies of clips in the Browser, a change to one had no effect on other instances of that clip.
This has now changed, there are now three types of clips; Master, Affiliate and Independent. This is an important change made to the way that clips now relate to each other. A Master clip is the first instance of a clip, as when you capture or import a clip into the Browser. An Affiliate clip is any clip that is derived from a Master clip, as in placing a clip on the timeline from the Browser. Master and Affiliate clips now share properties; Name, Reel, Good, Log Notes, Anamorphic, Offline, Scene, Shot/Take and Master Comments 1-2 and A-B. Changing any of these properties of a Master clip will be reflected in the Affiliate clip and vise versa. An Independent clip is just that, independent, and is not tied to other instances of that clip. A change to any of the properties of an independent clip will effect only that clip. Master or Affiliate clips can be be made independent, breaking the relationship. It is important to note that once a clip has been made independent, it's relationships can not be re-established.

This new clip scheme is provided to enhance the organization and management of media in FCE 2. It is an excellent way to track a clips usage throughout a project.
Patch Panel and Auto Select - Changes to the Interface
There are two major changes to the Timeline in FCE 2, PatchPanel and Auto Select. This changes how we get clips into the Timeline and how we work with clips on the Timeline. These two new items replace the 'Targeting' function found in FCE 1.
The Patch Panel controls the placement of clips brought in from the Viewer and is used to set the track that the clip will be placed on. The Patch Panel consists of two columns, shown below left, the Source column, red arrow and the Destination column, blue arrow. The v1 and a1/a2 tabs in the Source column represent the video and two audio tracks of a clip that is loaded into the Viewer. The Destination column represents a choice of tracks that can be use to place the clip that is in the Viewer.

Below left, the Source tabs v1 and a1/a2 is connected to the Destination tabs V1 and A1/A2. When the clip from the Viewer is added to the Timeline it will be placed on V1 and A1/A2. If we now want to add a second clip to V2 and A3/A4, the Source tabs must be moved to the new track, shown below center. With the Source tabs now connected to the Destination tabs V2 and A3/A4, below right, the clip from the Viewer will be added to the correct tracks.
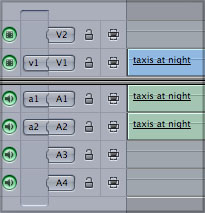
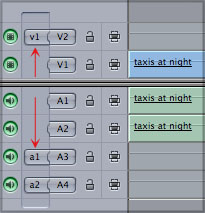
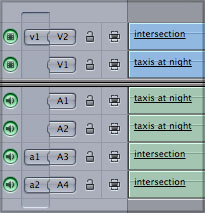
The process of patching the Source and Destination tabs to 'target' video and audio tracks is pretty straight forward. This feature gives complete control over track assignment of video and audio originating from the Viewer (Source). If you do not want the audio of a clip in the Viewer placed on the Timeline, you can drag apart the audio patch tabs, no audio will be applied.

Conversely, you can place audio only into the Timeline by disengaging the video patch. Excellent feature, it lets you 'target' video and audio tracks independently. The Patch Panel controls the following functions.
Auto Select
![]()
If you are working with just one video track, Auto Select has little impact. When working with more than one video track, Auto Select controls which tracks will be effected by certain editing functions applied to clips on the Timeline. Auto Select controls the following functions.
Learning to use Auto Select will require some study as it is very different from the way that things were done in FCE 1. There is an excellent article by Andrew Balis Targeting and Auto-Select. While this article is for FCP 4, it is applicable to FCE 2.
Buttons
In FCE 2 there is a new item in the menu bar, 'Tools'. Buttons List is a new tool and activating it will produce a button menu that contains all menu items sorted by function. At the top of the button menu is a search box to quickly locate the item you are looking for.
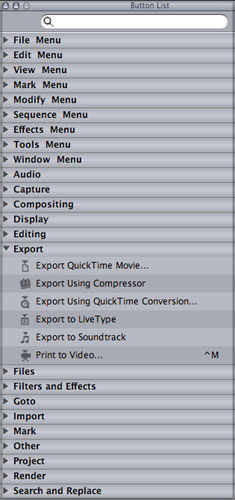
Each FCE function has an associated button. If you will look at the top right of the Viewer, Canvas and Timeline windows you will see two little half circle shapes called bookends.

Drag a button from the Button list and drop in between the bookends. You can put buttons in any of the windows and can put the same button in more than one window. Below, in my timeline, I have Item properties, Waveforms, Linking and Snapping buttons. To remove a button simply drag out of the bookends and it disappears in a puff of smoke. 'Buttons List' is a very useful tool, saving a lot of trips to the menu bar or User Preference window, speeding up your work flow.

Audio
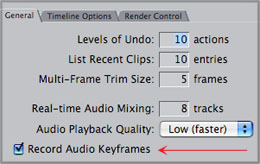
There have been several new audio capabilities added to FCE 2. The first is 'Record Audio Keyframes'. This feature enables you to do real time audio keyframing. You can play your audio and adjust volume on the fly, FCE will set the keyframes for you. This feature is found in the User Preferences, General tab and can be turned on and off from here. Going to User Prefs each time you want to turn this feature on and off is a hassle, this is where Buttons come in. Place the 'Record Audio Keyframe' button in the Viewer Window.
![]()
It is in the Viewer window that you can record audio keyframes. Double click to load the clip into the Viewer window and turn on Record Audio Keyframes. If your audio is mono then you will have to record your audio keyframes twice, once for each track. To make things easier, select the clip in the timeline and chose 'stereo pair' from the Modify menu. Now as you adjust volume both tracks will be keyframed. Move the playhead in the Viewer to the start of the clip and play. As the playhead moves down the clip, click and drag the level slider either left or right as needed, FCE will record the movements of the Level slider. Using the same process you can keyframe the Pan (Spread) settings as well.

As the clip is playing in the Viewer and you adjust the Level slidder on the fly, you will hear your volume changes. When you stop recording, FCE will add the keyframes.
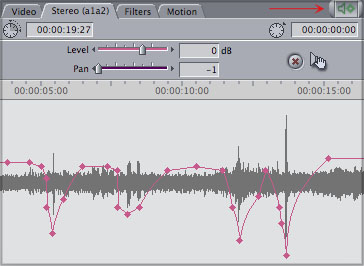
As you can see below, keyframes have also been added to the timeline as well. I find that dragging the Pan slider left or right in real time, a little cumbersome. You can click on any keyframe, in either the Viewer or Timeline, and reposition it for final adjustment, you will probably need to. Control clicking on a keyframe will allow you to 'clear' or remove the keyframe, but there is no 'smooth' function.
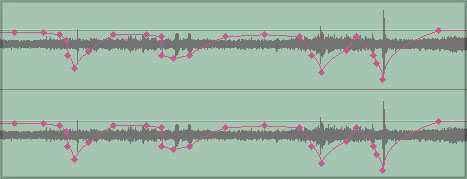
There are several reasons why the 'Record Audio Keyframes' feature is of questionable value. I found it extremely difficult to get good results using the Level slider, it is hard to make smooth subtle movements. The horizontal Level slider is too small and does not provide the finesse of the longer vertical sliders found in audio mixers. The main point of keyframing audio volume in real time, is to mix it with other tracks, maybe to lower and raise the volume of background audio (follies) or music in relationship with the dialog of a scene. As the 'Record Audio Keyframes' tool only works in the Viewer, the only audio tracks that play are the two associated with that clip, there is no way to hear the other tracks that are on the timeline, the ones you want to mix with.
Real Time Audio Filters
As exciting and powerful as the new RT Extreme feature is, this new ability is not limited to previewing video effects. The new rendering engine extends it's abilities to audio filters as well. In FCE you can now apply a filter to the audio of your clip and as the clip is playing, you can adjust the parameters of the filter and hear the changes to the audio as it plays. Set In and Out points around the section of audio you want to audition, from the Mark Menu > Play > In to Out, and turn on 'Loop Playback'. Now, as FCE loops playback, you can adjust your audio filter until you have achieved the effect you want. This is an amazing new feature.
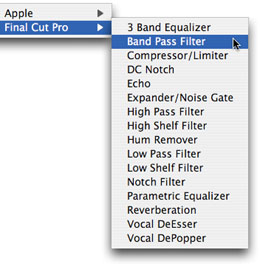
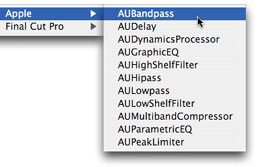
A new set audio filters have been added to FCE 2, Apple filters. The AU (Audio Units) filters are Apple's new file standard protocol for audio filters and plug-ins and are native to OS X. Even though none of these audio filters, shown below, are marked in Bold, denoting RT ability, the audio filters do work in real time on my G5 dual 1.8.
Additional New Features
A number of new features have been added. FCE 2 can now capture across gaps and breaks in Timecode, a welcome ability. When FCE 2 encounters a TC break during capture it will end the first clip at the TC break and create a new clip starting after the TC break. Asymmetric trimming, Dynamic (JKL) trimming in the Trim Edit Window have been added. You can now add chapter marker for DVD Studio Pro and iDVD, Compression markers and Scoring markers export for Soundtrack (sold separately). In addition FCE now imports layered Photoshop files and offers high-quality DV YUV-based effects rendering.
Conclusions
When FCE 2.0 shipped there were some major issues which have now been fixed with the Final Cut Express 2.0.2 update. FCE 2 is a major upgrade to the original package. The interface has been updated to reflect the changes made to the FCP 4 interface. A number of new features found in FCP 4 have made their way into FCE 2, thus insuring compatibility between the two applications. If nothing else had been added, the addition of 'RT Extreme' is worth the price of admission. Of course, a number of other features have been included, making this an important upgrade to Final Cut Express. The one thing to remember is that the number of audio and video filters and transitions that are available as RT preview is totally dependent on the power of your Mac. On my G5 dual 1.8, almost all video filters are capable of RT Preview as well as all audio filters.
Enjoy,
--ken
Review copyright © www.kenstone.net 2004
All screen captures, images, and textual references are the property and trademark of their creators/owners/publishers.