
Final Cut Pro 2.0 October 22, 2001
Updating the Mac OS, QuickTime Pro and Installing FCP 2.0 (2.0.2)
By Ken Stone

Final Cut Pro 2.0 October 22, 2001
Updating the Mac OS, QuickTime Pro and Installing FCP 2.0 (2.0.2)
By Ken Stone
Updating
We are going to set up our Macs to run FCP 2 and update to FCP 2.0.2. The Mac OS and QuickTime may need to be updated as well. QuickTime Pro needs to be enabled and then FCP installed and updated. We'll do this step by step. There is an order to all this. Mac OS first, QT Pro second and FCP third. The order is important.
QuickTime Pro and The Mac OS
While earlier versions of FCP could run on older Macs, FCP 2 requires a Blue and White G/3 or newer, 300 MHz or faster. You must be running Mac OS 9.1 or higher and QuickTime 5 RT or higher. Both the OS 9.1 updater and QuickTime 5 RT are available on your Final Cut Pro 2.0 installer/updater CD. There are now newer versions of the Mac OS, QT and FCP available as downloads. I would suggest that you upgrade both the Mac OS and QT before moving ahead with the installation of FCP. Download the Mac OS (if needed), QuickTime 5.0.2 and FCP 2.0.2 updaters and place them on your HD.
Apple Mac OS system 9.1 updater.
Apple Mac OS system 9.2.1 updater.
Apple QuickTime 5.0.2 stand alone installer.
Apple Final Cut Pro 2.0.2 updater
Updating the Mac OS
First you need to find out what version OS your Mac is running. From the Apple Menu > About this Computer. The full version number is listed after 'Version' (Red arrow). If you are running OS 9.1 or higher then you can stay where you are. If you want to update your system to OS 9.2.1 before proceeding then use the 'update software' link in the paragraph above. The 9.2.1 updater is an 85 meg download.

If your system is older than 9.1 you will need to update before you go on. On the FCP Installer CD is the OS 9.1 updater. Quit all applications, turn off anti-virus software, run the updater and restart your Mac.
Updating QT Pro
If you have a version of QuickTime older than QT 5.0.2 it would be a good idea to update QuickTime before you move ahead with the FCP installation. You do want to be using QT 5.0.2. To find out what version of QT you are running; Apple Menu > Control Panels > QuickTime Settings. From the drop down menu select 'About QuickTime'. You will be shown the QT Version number (Red arrow).

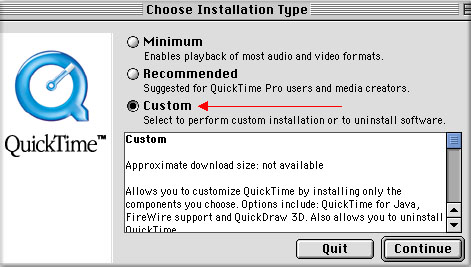
1) Open the QT updater. From the 'Choose Installation Type" box select 'Custom' (Red arrow). Click on continue.
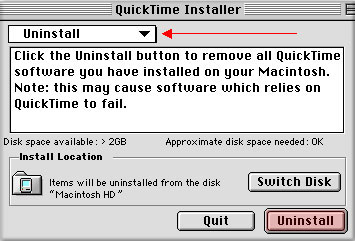
2) From the 'QuickTime Installer box select 'Uninstall' from the drop down menu (Red arrow) and click on the 'Uninstall button'. This will remove all of the old QT software. Restart your Mac.
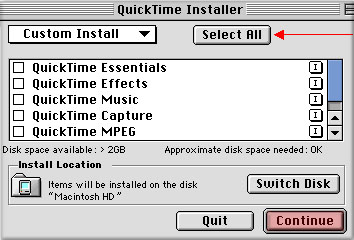
3) Return to the 'Custom Install' box and 'Select All' (Red arrow) and click on the 'Continue button'. This will complete the installation process. Again You will be asked to restart your Mac. After restarting you will be greeted with a QT assistant Settings Box. Just click through it.
4) Registering QT Pro. FCP will run without registering QT Pro however the Pro version gives you the ability to 'Export' from FCP and you will probably be needing this feature. You may get the QT Pro registration box on your screen. If you do not, go to the Apple Menu > Control Panels > QuickTime Settings and use the drop down menu to select 'Registration'. Enter the QT Pro serial number that comes with FCP. The serial number should be on the same sheet of 'peel off' labels as your FCP serial number. Do not use your own name in the 'Register to:' box. On the sticker with the QT Pro serial number will be the proper 'name' to enter into the 'Register To:' box. This name changes with each new version of QT Pro. When I last did this I entered "QuickTime Pro" in the registration box. Check your serial number label for the correct 'name'. QT Pro will now be in place.
Configuring your Mac OS
With QuickTime Pro installed there are several Mac OS settings that need to be checked. From the Apple Menu > Control Panels > Memory. You will want 'Disk Cache' at default, Virtual Memory turned off and Ram Disk turned off.

Apple menu > Control Panels > Energy Saver should be set to 'Never'.
Apple Menu > Chooser. In the lower right hand corner of the box is a button to make Apple Talk 'Inactive'. If your Mac is not on a network, Ethernet, then you might want to make Apple Talk inactive as Apple Talk can interrupt the processor during capture or when Printing To Tape.
Final Cut Pro 2
We are now ready to install FCP 2.0 from the CD. You can be updating FCP or installing it for the first time. Click on the Installer Icon and install FCP 2.0. When installation is complete, quit the installer and eject the FCP CD. Do not launch FCP yet. Now open the FCP 2.0.2 installer that you downloaded. Run this installer to update FCP.
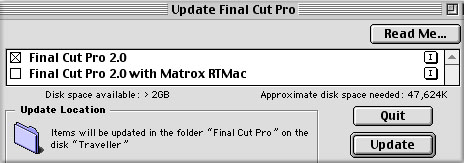
During this process you will get a dialog box. Choose either FCP with or without the Matrox RTMac and continue the installation. This setting can be changed later if need be.
Now FCP has been updated to version 2.0.2. But don't launch FCP yet, there is one more chore to do first. We have to allocate Ram to FCP. Open your HD and look for the FCP folder, open it and find the FCP application which will have a 'clap stick' icon. Click on the 'clap stick' icon once to select it, it will turn black. Then from the Menu > Get Info > Memory. This will open the FCP info box. In the 'Preferred Size' box enter the amount of Ram that you want to assign to FCP.

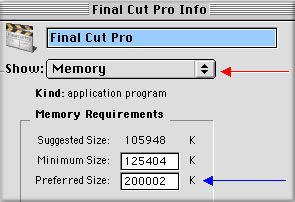
The amount of Ram that you assign to FCP will depend on how much Ram you have installed in your Mac. Quit all applications. From the Apple menu > About this Computer. This will open the box shown below. Look first at 'Built - in memory' (Red arrow). This will be the total amount of Ram installed in your Mac. In my case 384 megs. Next look for the blue bar that shows how much Ram the Mac OS is using, for me 66.5 megs. The difference between these two figures is what you can assign to FCP. The amount of Ram that the Mac OS system uses can fluctuate so I would recommend subtracting 80 to 90 megs from the total amount of Ram.

How much Ram does FCP need. If you plan to be working on Projects that are an hour or less then 180/200 megs of Ram will be plenty. If you are doing longer projects or plan on having a number of Projects open at the same time then you can give FCP up to 400 megs of Ram. FCP really does not benefit from more Ram than this.
Okay, now launch FCP
When you launch FCP you will get a registration/serial number dialog box. Enter the information and continue. When FCP opens the first time you will get the 'Choose Setup' box. This box offers a limited choice of set ups for FCP. I am not sure that this Setup box is helpful at this point unless one of the few options offered is exactly what you want. Don't worry, you can and probably will change these settings later. In 'Setup For' get as close to your planned system as possible. In the 'Primary Scratch Disk' drop down choose your 'Media' drive. If you do not have a second HD to use for media/capture the only option offered here should be your main internal HD. In the 'User Mode' drop down select 'Standard'. Click 'Okay'.
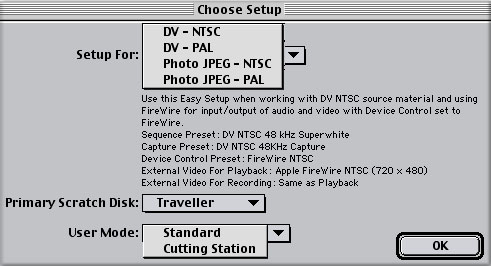
If you are DV then you will want to have your camera/deck/device attached to the Mac via FireWire and turned on before you launch the program.
Finally, FCP is on your screen. Now that FCP is running on your Mac the next step will be to setup FCP. This is the necessary last step before you go to work using FCP. Setting Up Final Cut Pro 2.0
Enjoy,
--ken
copyright © Ken Stone 2001