
October 23, 2012
Download the ePub iPad/iPhone version of this article.
Ripple Training - Final Cut Pro 10.0.6 In Depth Tutorial
By Steve Martin
Final Cut Pro X was released on June 21, 2011 amid much anticipation and pre-buzz largely due to Apple's sneak peak of its new software at the NAB show two months earlier. Within hours of it's release however, the tone changed and Apple found itself under withering fire for reasons you may or may not be sympathetic to depending on your level of emotional and/or financial investment in Apple's original version of the software. It's been nearly a year and a half, and like all things in technology or politics, a lot has changed.
For the record, when I wrote my original First Look on Final Cut Pro 10.0, I expressed some of my initial misgivings with Final Cut Pro X's radical UI departure from its predecessor, but I was never in doubt that Final Cut Pro X is where the puck is going.
With the release of Final Cut Pro 10.0.6, my conviction has been cemented. So indulge me for a moment as I do a quick rundown on what we've learned in the past 14 months:
We've learned that Apple's has kept its word and added significant new features with every other release of Final Cut Pro X - and all for free.
We've learned that Apple does not just add features, they actually re-imagine them, rethink them, and in typical Apple fashion, redefine them. Look no further than Final Cut Pro's Multicam editor as the best example of this.
We've learned that Apple listens to its customer base. When you read the list of what has been added to Final Cut Pro 10.0.6, you'll see that almost all of them came from direct editor feedback.
We've learned that Final Cut Pro X is being used in many professional productions around the world and the list is growing.
We've learned that there is a growing third-party development community - a healthy indicator that Final Cut Pro X is at the center of a robust creative ecosystem.
We've learned that Final Cut Pro is wicked-fast on the latest Mac hardware with Thunderbolt peripherals.
We've learned that despite the initial launch brouhaha, many editors are giving it a second look. I'm consistently hearing from people that have switched to Final Cut Pro X as their editing tool of choice.
We've learned that some editors still hate Final Cut Pro because: a) they still feel betrayed by Apple b) they hate the UI c) both a and b apply. Even if their Mac belched out gold bars every time they used it, nothing would sway them from this conviction.
With that rather lengthy introduction, I'm now ready to lay out why I believe Final Cut Pro 10.0.6 is the most important version since its introduction. For specific questions you may have, I've included my email address at the bottom of this article.
Unified Import Window
Let's start with importing. Apple has greatly simplified the import process by providing a single unified interface. In previous versions of Final Cut Pro there were two separate import options - one for cameras and one for files. Because media files can exist on both the camera and on the computer, it's easy to see how two import options might create some confusion.
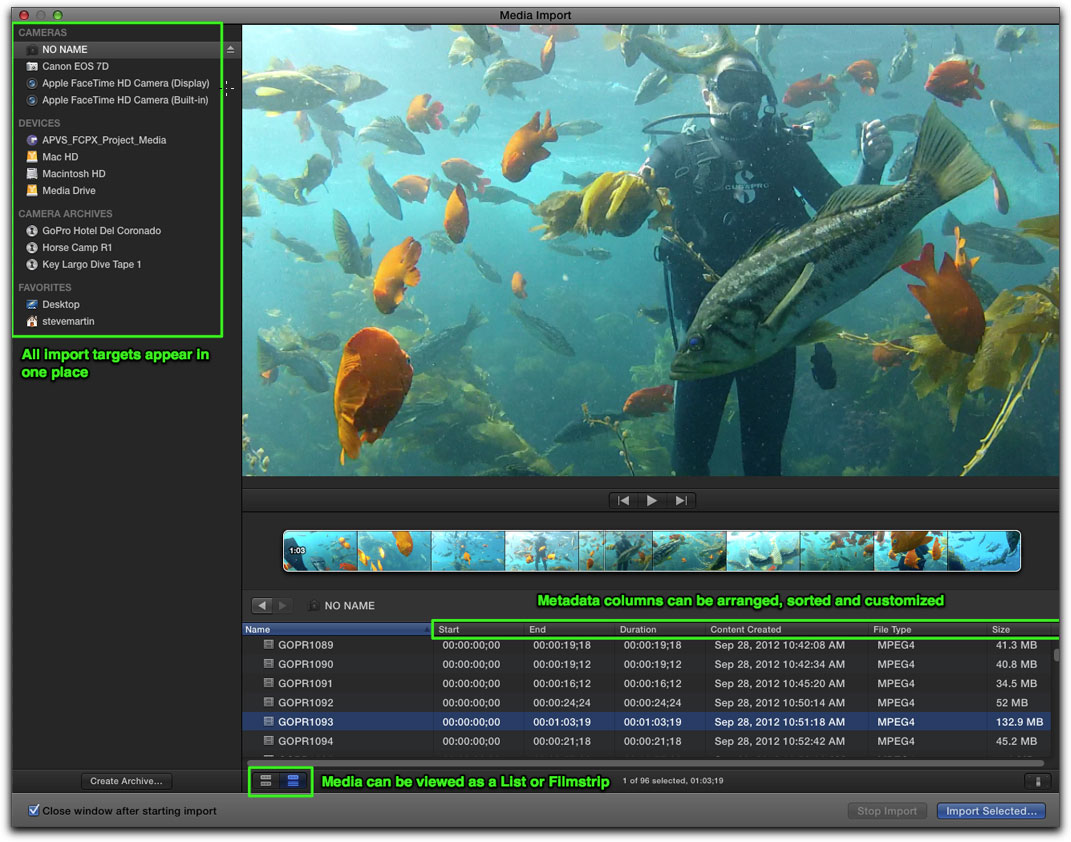
In FCP 10.0.6 the Media Import Window is summoned by clicking the new Import Media button on the Toolbar or pressing Command-I.

The upper left of the window lists all your connected cameras; devices such as hard drives and flash memory cards; camera archives and a new Favorites section where you can store frequently accessed folders and other import targets.
By selecting a camera from the list, its clip media will appear in the Browse List directly below the Viewer. Clip media can be viewed in either List or Filmstrip layouts. When a clip is selected in List View, a filmstrip appears below the Viewer for Skimming and making selections. Metadata columns allow for sorting and arranging your media prior to importing.
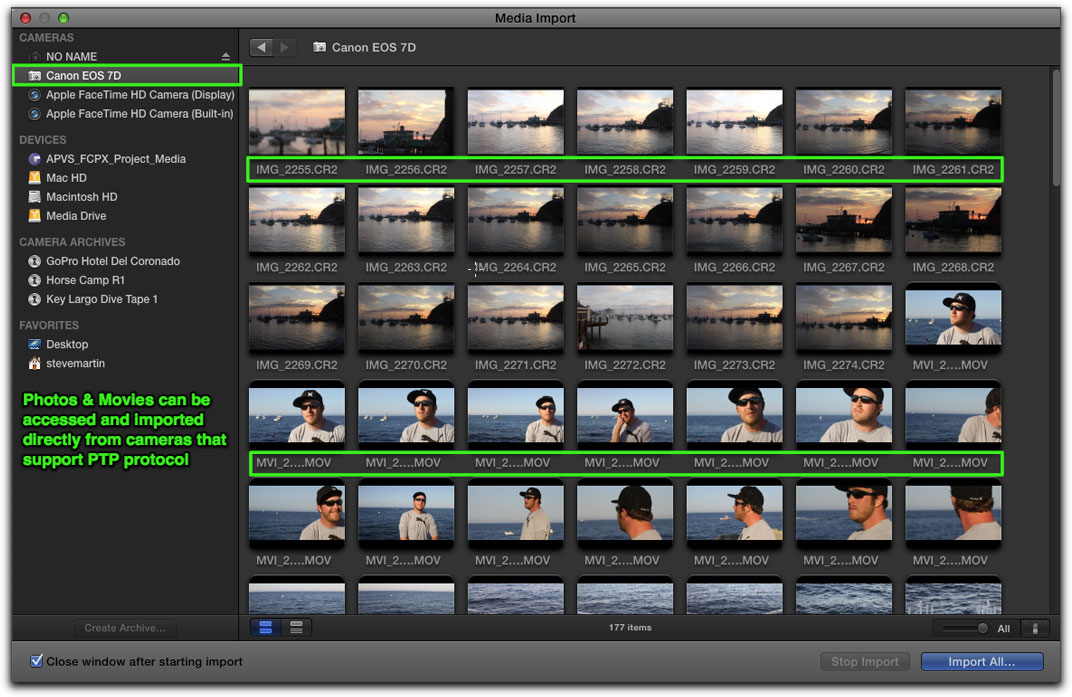
PTP Import from DSLR Cameras
Many cameras use PTP or Picture-Transfer-Protocol to communicate with the host computer. In Final Cut Pro 10.0.6 you can now connect your DSLR camera directly to your Mac using a USB cable and all the photos and movies recorded on your camera appear in the Browse area ready for selecting and importing. Previously, the only way you could view your media on a DSLR camera was using Apple's Image Capture App or a Finder window. With PTP support built into FCP X, importing media from DLSR cameras is now a 3-step process: 1) connect your camera 2) select your clips 3) import your footage.
Persistent & Multiple Selection Ranges
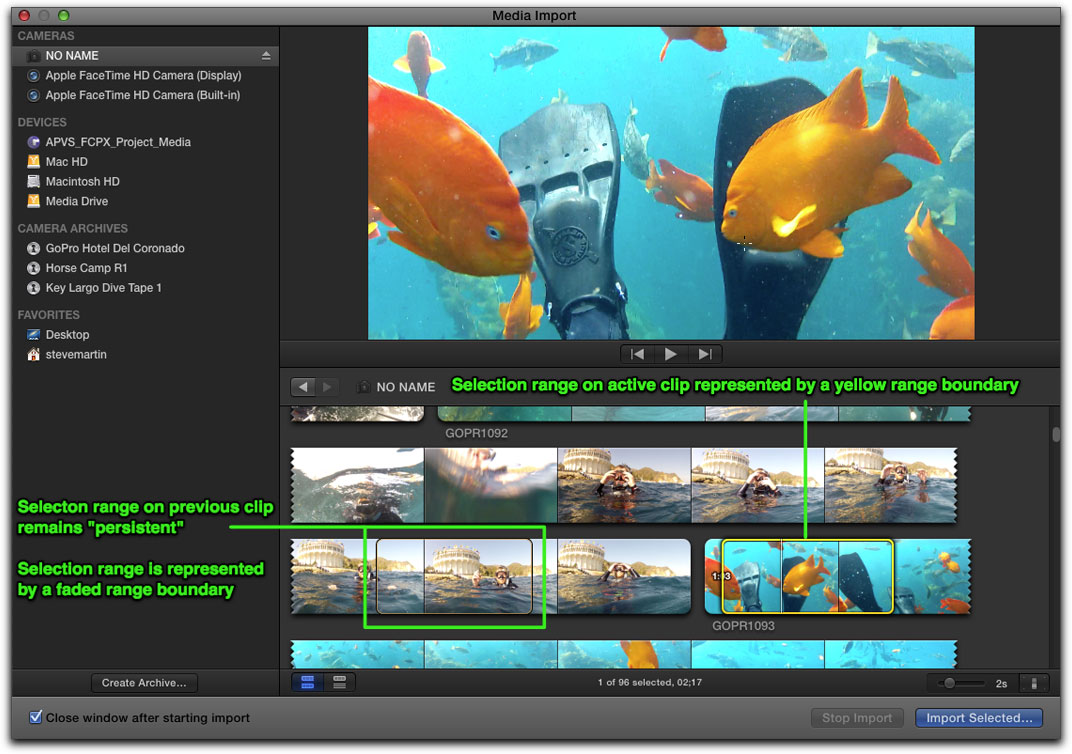
One feature that has repeatedly made it into every Final Cut Pro editor's wish list is what I refer to as persistent selection ranges . If you create a selection range on a clip, then click away from that clip to work on another clip, you expect your original selection range to be there when you return to it. Until now, this wasn't the case and we had to find less than optimal work arounds to get Final Cut to remember our original clip selections.
In this release, not only does Final Cut Pro remember your selections, but it goes one further and allows you to make multiple selections on a clip in both the Media Import window and the Event Browser.
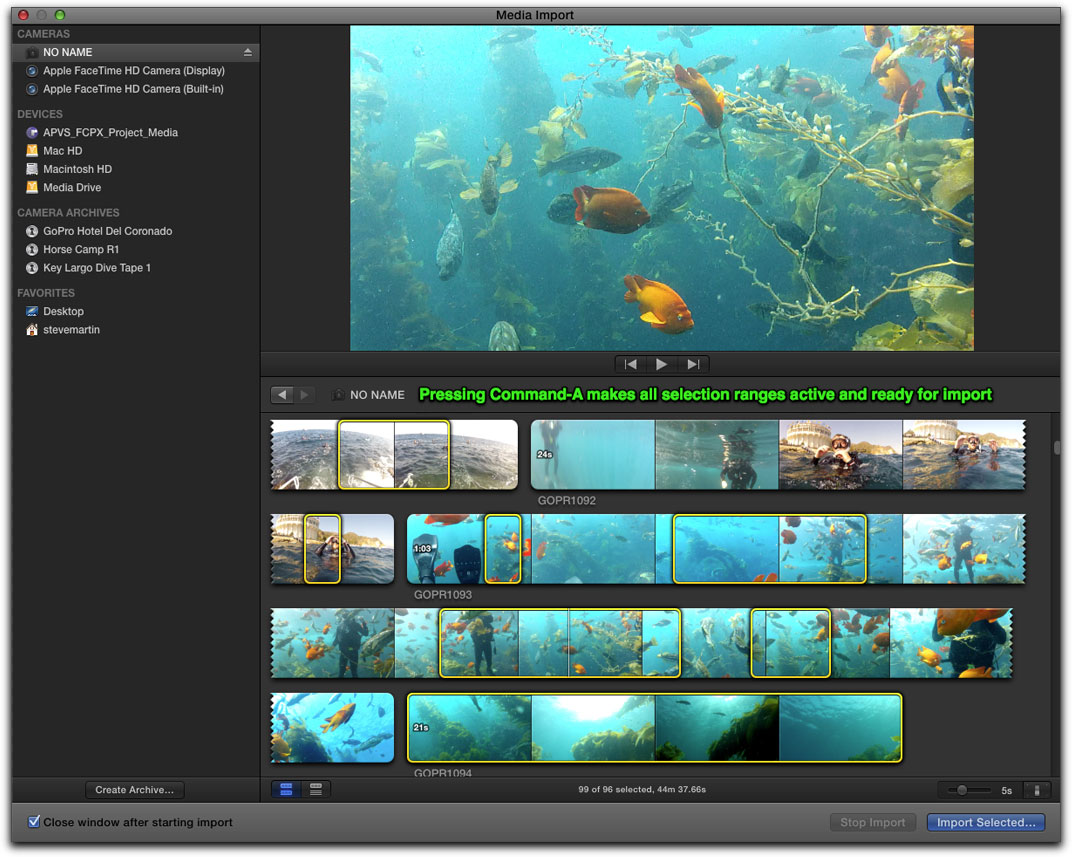
To create multiple selection ranges on a clip, just Command-drag across the filmstrip at the Skimmer position. You can also press Command-Shift-I and Command-Shift-O to create multiple ranges. In the image below, there are 3 active selection ranges on GOPRO1093 and a few persistent selections on other clips.
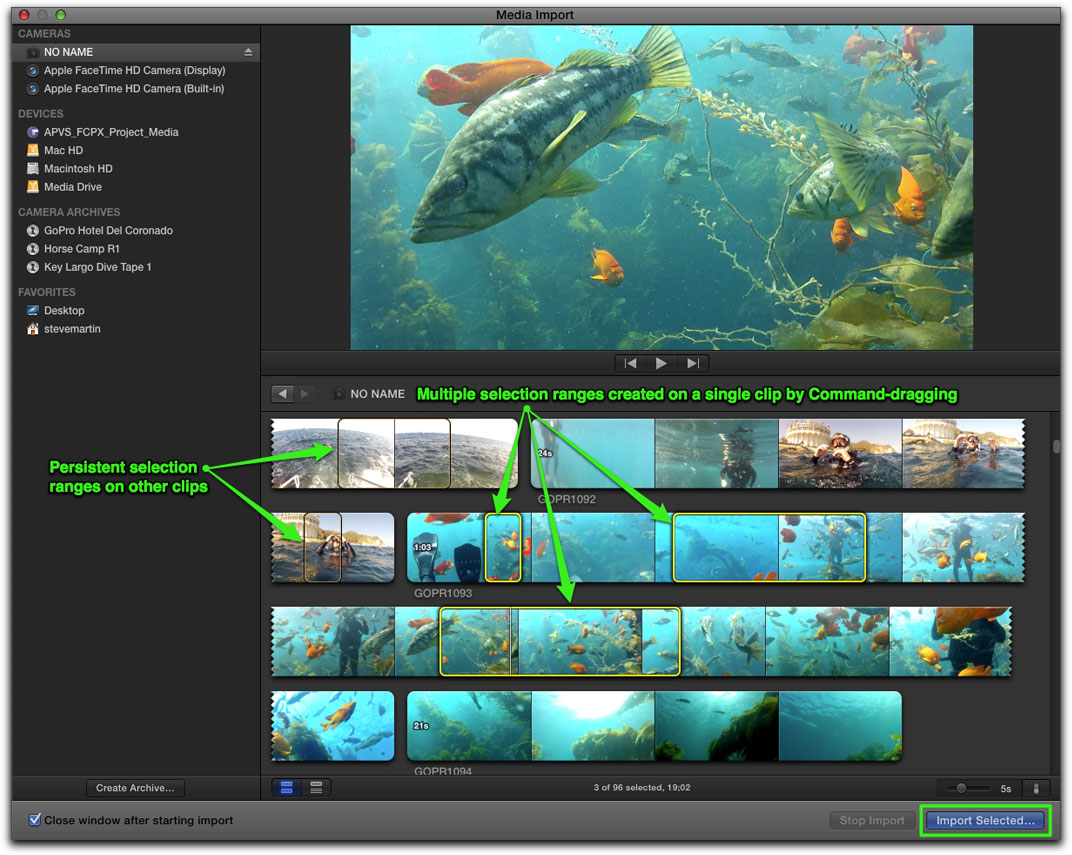
Without taking any further action, clicking the Import Selected button would import only the content within the active selection ranges and 3 separate clips would be imported into the Event Library. If you wanted all the ranges imported from every clip on the camera, press Command-A before clicking the Import Selected button. To clear out all ranges on a selected clip or clips, press Option-X.
When you import media from the Mac's Finder or a PTP Camera, you will not be able to create selection ranges prior to importing - you can only import the entire media file.
Importing & Working with RED Media
Over the past several years, the RED Digital Cinema company has produced extremely popular cameras for use in professional productions due to their relatively low cost and uncompromising image quality. RED cameras record files in a format called R3D, or RAW image format that cannot be played back directly on many software based editing systems without first transcoding the files - a process often referred to as debayering .
The reason working with RAW files is the holy grail of image editing is that you have access to all the 12 bit camera data when you need to adjust the exposure or perform color grading on the image. In previous versions of Final Cut Pro X, your only option was to make these adjustments using RED's free REDCINE-X software then spit out ProRes files for importing and editing in Final Cut Pro.
Thankfully, this in no longer the case as you can now import and work with R3D files natively. For the purpose of keeping the terminology simple I'm going to henceforth refer to R3D files as RED RAW or just simply, RAW.
RED media is recorded to Solid State Drives or SSD's for short. As an editor you may be handed the camera-original SSD from the production company, or you may be handed a clone of the camera's SSD by the production company's Digital Imaging Technician.
A side note here: On low budget productions, where the DIT and editor are one and the same person, the editor is responsible for making a clone of the camera's SSD and transcoding the media for editing. Editors typically do not want to be involved with DIT tasks - if a camera's SSD is not cloned properly, or if during transcoding, the files are not named properly, or any other snafu arises, the editor will be held responsible. Most editors just want to focus on storytelling.
In order to ingest RAW media you'll need to install the RED import plug-in, available as a free download from Red.com.
With the SSD or other drive connected to your Mac, press Command-I to call up the Media Import window. If you have a mounted SSD, the drive will appear in the Devices section of the window. The drive's hierarchical folder structure appears in the Browse area where you can peruse the RDM (Red Digital Magazine) folder and all the RAW (R3D) files nested within it. Selecting a RAW clip will display its filmstrip for Skimming and making selections.
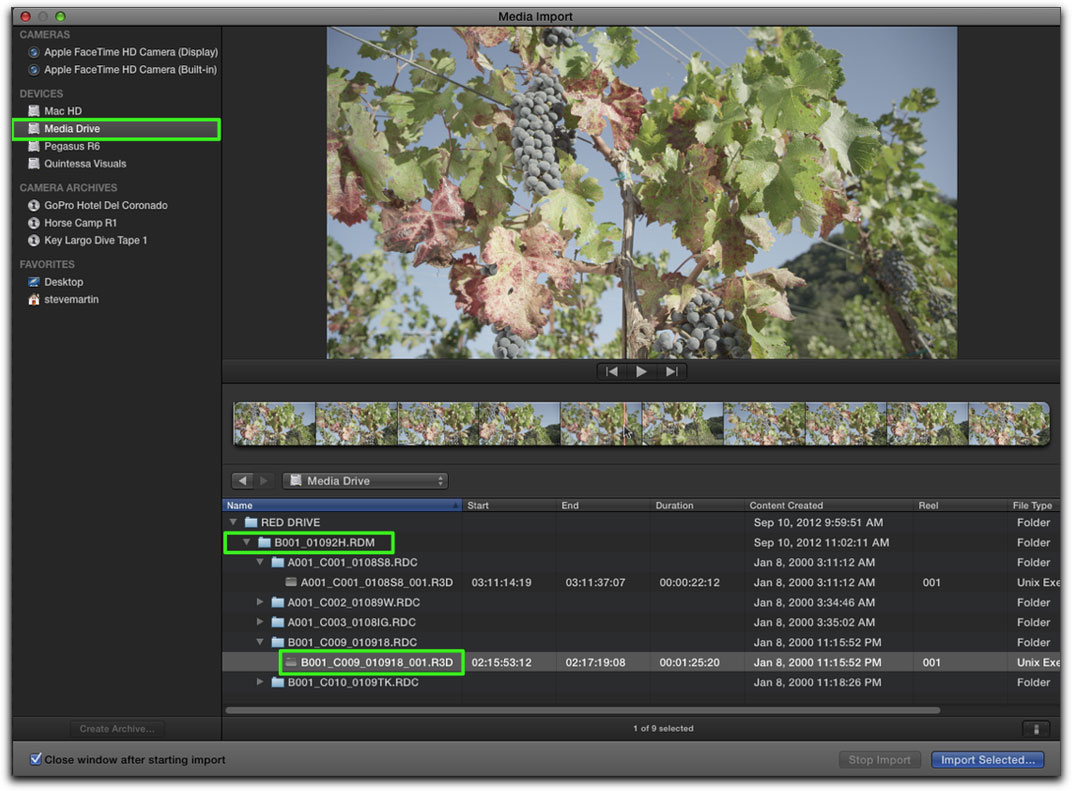
Depending on the RED camera model you are shooting on, resolutions can vary from 2K to 5K with variable frame rates. Playing back these files is therefore challenging on even the most robust Macs. The biggest contributing factor in determining playback performance is your drive setup. Unless you have a RAID system connected over Thunderbolt or Fiber Channel, you'll most likely be unable to achieve anything close to real-time playback.
That said, you can still open RAW files on your laptop or desktop Mac, make adjustments to the RAW data, and even transcode them to ProRes or ProRes Proxy media to improve playback performance.
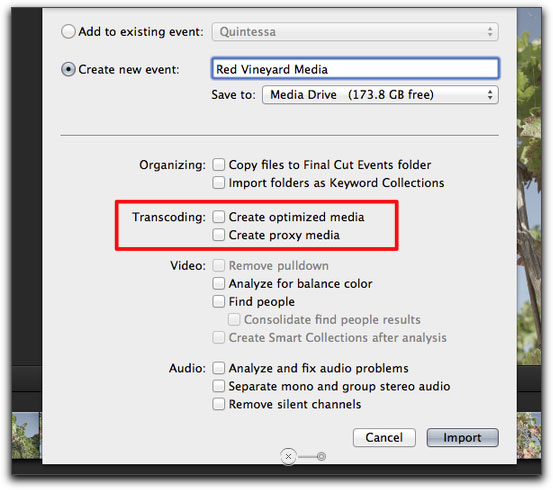
By choosing Create Optimized media, Final Cut Pro will generate Apple ProRes 4444 media in order to maintain the maximum color and image fidelity of the RAW media for editing, grading and final output. If drive space is at a premium, you'll want to choose Create proxy media which creates 1/4 resolution files. If you have a RED ROCKET card installed, Final Cut Pro X will take advantage of this card's dedicated chipset to reduce transcoding time.
The thing to remember is that you always have access to the RAW media if later you decide you want to color grade your project in DaVinci Resolve or Smoke through the magic of XML.
There's one caveat here: If you do decide to transcode during import, you won't be able to manipulate the RAW image data within Final Cut Pro after it's imported. This is because RAW image manipulation such as exposure control, gamma and other metadata driven changes must be baked into the Transcoded file. If you don't plan on changing the look of the RAW files and want to rely entirely on the colorist at the end of the pipeline, then the best option is to transcode during import.
Modifying the RAW Camera Data
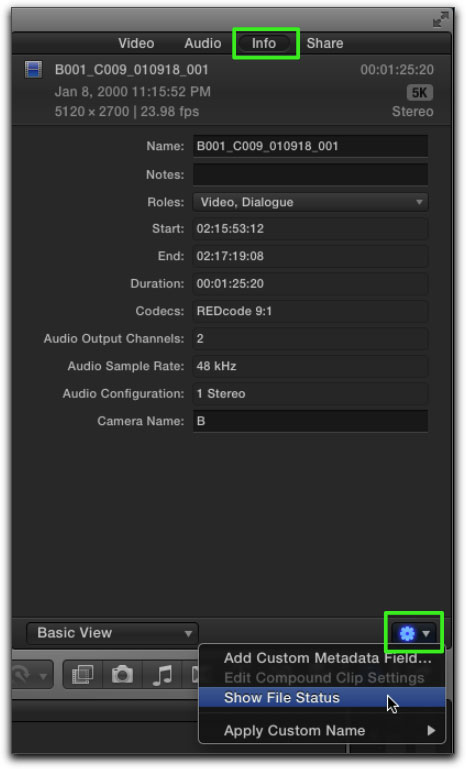
Assuming you do want the ability to modify the RED RAW metadata, follow these steps:
- Select the RAW clip in the Event Browser you want to modify
- Press Command-4 to reveal the Inspector
- Click the Info button
- Click the Gear menu and choose > Show File Status
- Click the Modify RED RAW Setting button
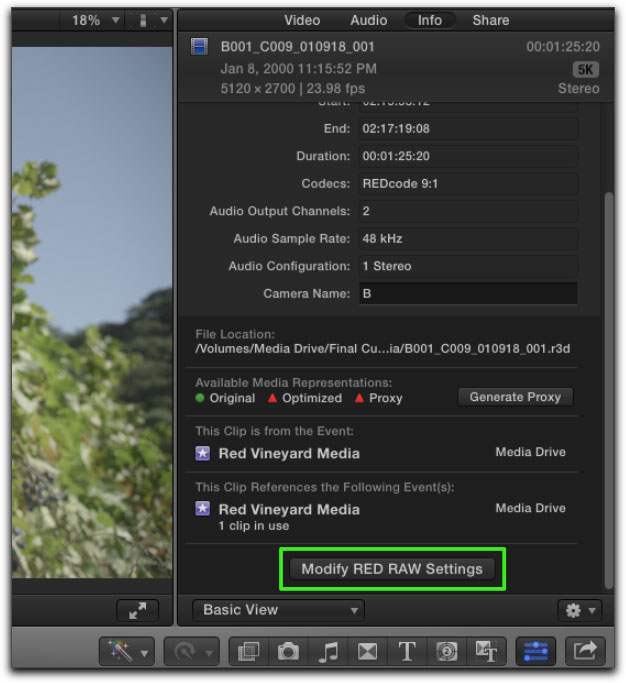
The RED RAW settings window appears allowing you to alter the Color Space, Gamma, ISO, Exposures and other global image settings. In a nutshell this window takes advantage of the RAW capabilities of the native R3D media allowing you to create specific looks in the metadata that are saved as Red Metadata files - also called RMD files. Changes you make here are completely non-destructive to the RAW media as you are only changing the instruction set of how to interpret and display the media.
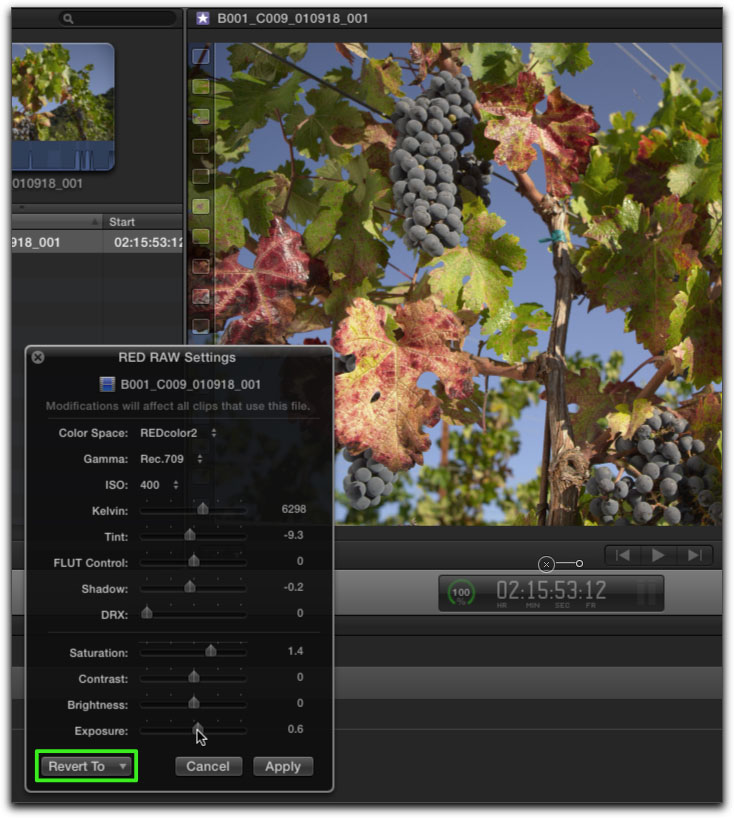
At any point you can revert to the original camera settings or neutral values using the menu in the lower left of the window. Keep in mind that this window is a much smaller subset of the controls you will find in the REDCINE-X software, but most of the broad brush controls you would need access to are found right here. To apply the settings, click the Apply button.
Baking Your Modifications into the Optimized or Proxy Media
Once you're satisfied with your image changes, you can then transcode your files to optimized or proxy media to bake the changes into the media. In the Inspector, click the Generate Proxy button to create ProRes Proxy media.
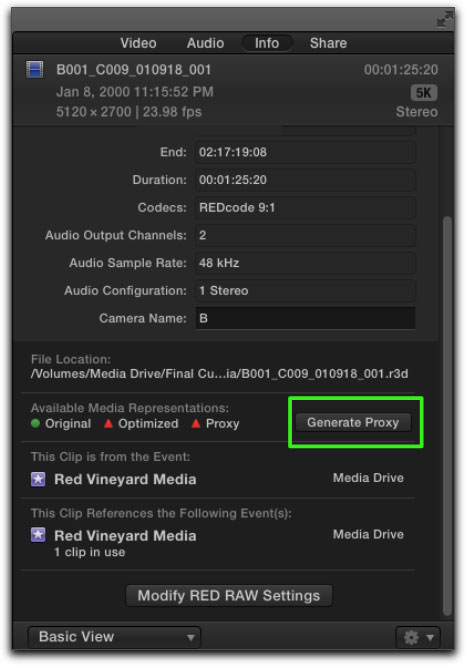
Another option is to select the clip and choose > Transcode Media from the File menu, where you have the options to create both optimized and proxy media. Once the optimized and/or proxy file has been generated, you wont be able to use the Modify settings window and you'll be flagged about this with a dialog.
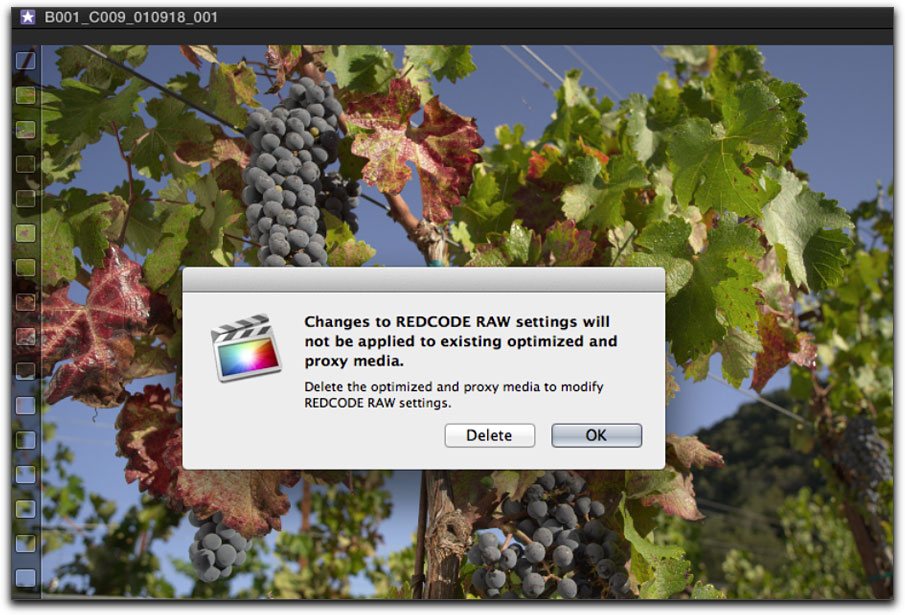
In order to access the RED RAW settings again and make changes to the metadata, you'll need to remove the optimized media by clicking the Delete button. Of course you'll need to optimize the media again with the new settings in order to bake your changes into the file.
Audio Component Editing
Of all the new features in Final Cut Pro 10.0.6, none in my opinion is more important than audio component editing. On many productions, audio is recorded to multiple channels from multiple mic sources. In previous versions of Final Cut Pro, viewing and editing these audio channels (or components) was not intuitive and required you to break your clips into independent connected audio clips in order work with them. Not only did this method clutter up your Timeline, but it introduced the potential for lost sync.
Final Cut Pro now allows you to view and edit the audio components directly in the Timeline. To view the audio components, right-click on a clip and choose > Expand Audio Components.
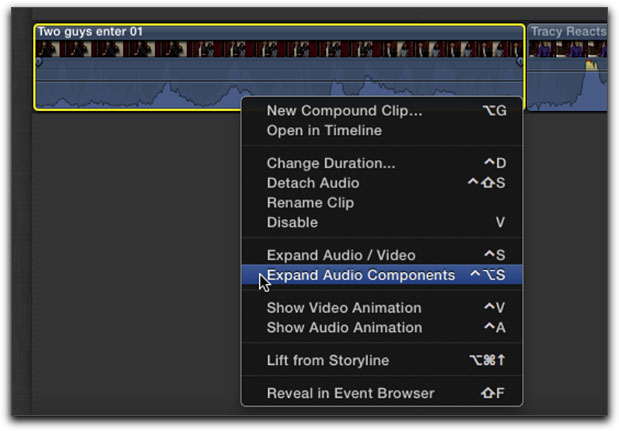
Additionally, you can Option-double click on the audio waveform to expand them. In the image below, a clip has been expanded to reveal 4 discreet mono channels.
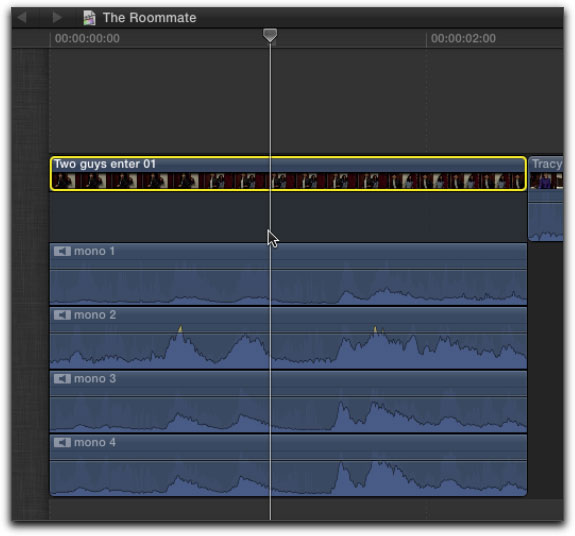
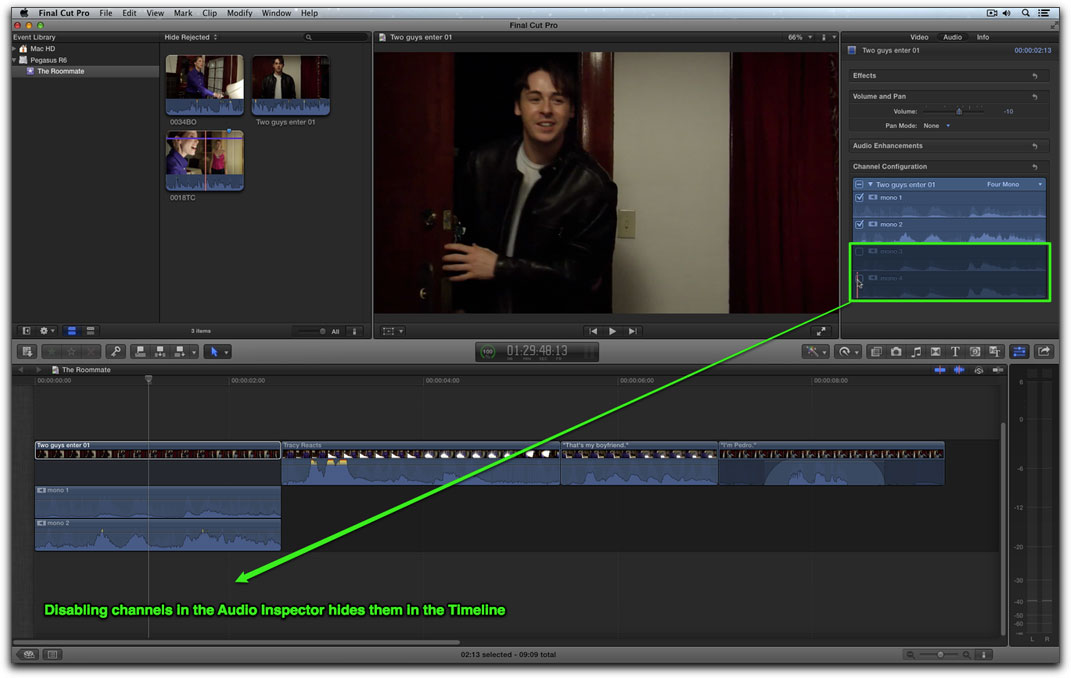
Each channel can be independently skimmed, trimmed, volume adjusted, panned, enhanced, effected, and keyframed. You can also hide the channels you don't want to work with. For example, channels 3 and 4 are the reference audio channels recorded by the camera's mic and won't be used in the edit. With the clip selected, un-check the box next to the channel (or channels) you want to hide in the Audio Inspector.
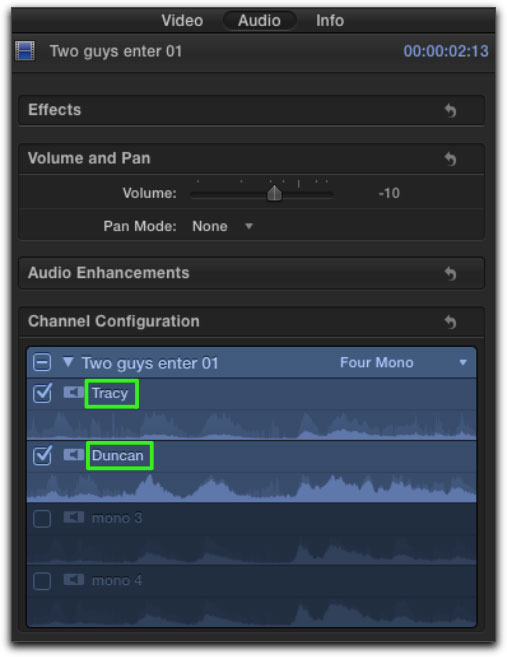
To rename your channels, double-click the channel name in the Inspector. In the image below I've given channels 1 and 2 the names of the characters in the scene to make them easier to identify in the Timeline.
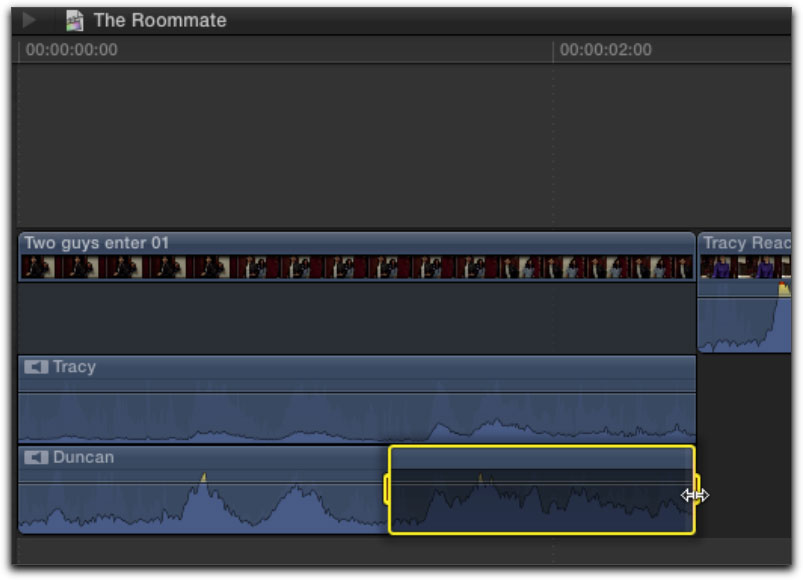
You can create selection ranges on audio channels for the purpose of disabling or keyframing the audio. In the image below, a selection range has been created on the second half of Duncan's audio, then the V key was pressed to disable the audio within the range.
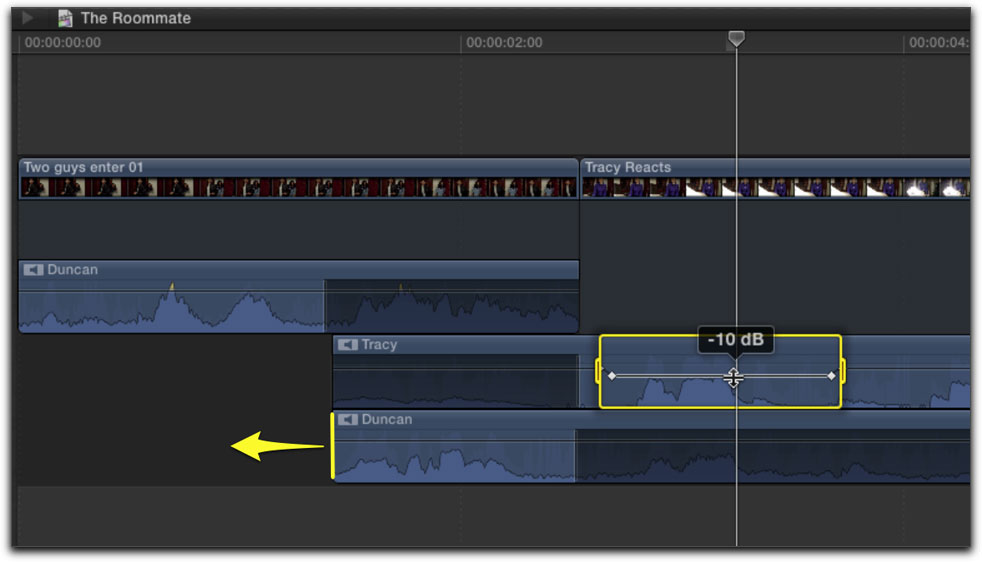
Selection ranges also allow you to duck the audio within range; volume keyframes are automatically created at both ends of the range boundary. In the image below, Duncan's audio channel has been trimmed earlier to create a J-cut.
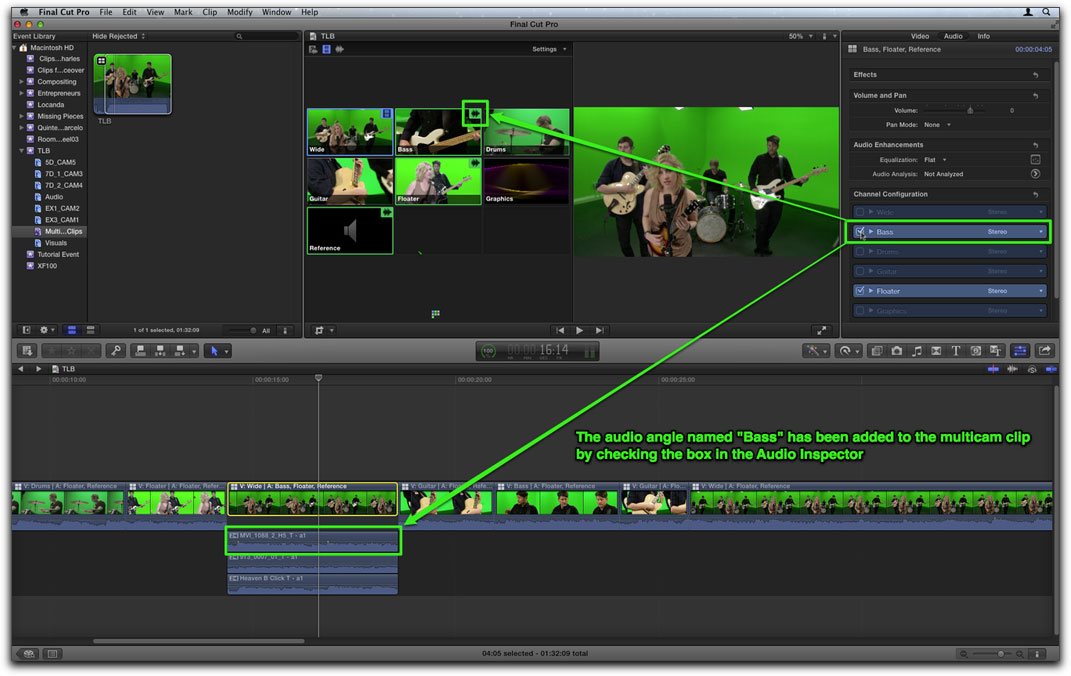
The new Audio Components feature in Final Cut Pro X really shines when it comes to multicam editing. In 10.0.6, you can now add multiple audio angles to the same video angle making the best multicam editor in the industry (IMHO) even better.
In the image below, the audio components have been expanded for a single multicam clip in the Timeline. In the Inspector, simply choose which audio angles will be included and played back with this clip. As previously mentioned, you can make audio enhancements, add effects and adjust the volume on each channel directly in the Timeline.
Flexible Clip Connections
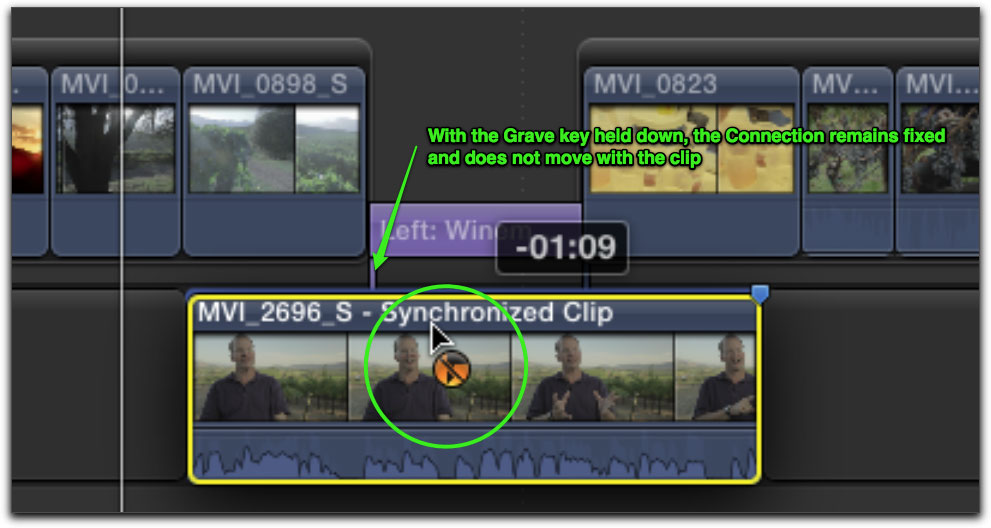
Final Cut Pro is now more flexible when it comes to working with Connected clips. Below is an interview clip on the Primary Storyline. Connected to it is a Title clip and a Secondary Storyline. If I move the interview clip later in time, the connected clips move with it. This is the expected behavior because the connection is established at an absolute frame.
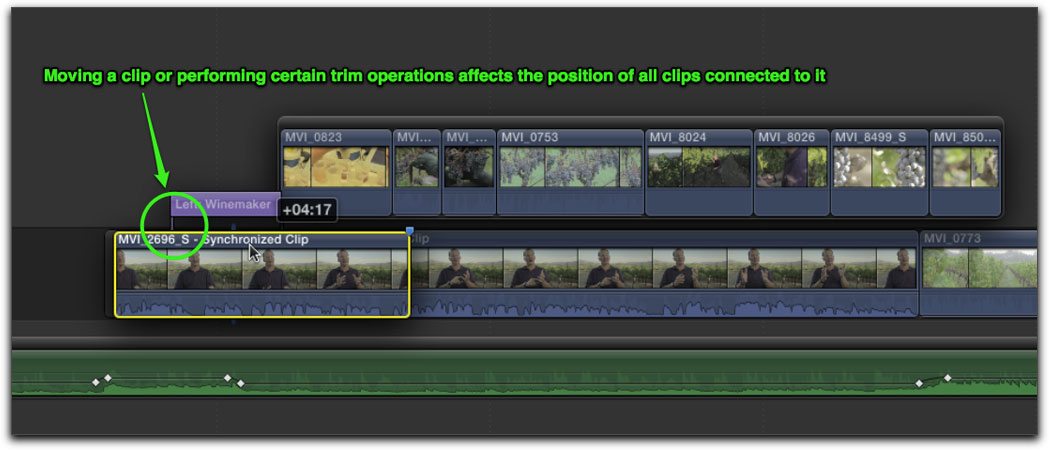
However, there are occasions where you might need to temporarily break the connection during certain types of edit operations. To override the absolute clip connection, hold down the Grave key before moving the clip or performing slip and slide trims.
The Event Viewer
One of the most surprising features of Final Cut Pro X when it was first released was the single Viewer window. Editors like myself who had used legacy versions of Final Cut Pro and other editing applications found it difficult to imagine how you could work with a single window - but in practice, I found it actually worked quite well most of the time.
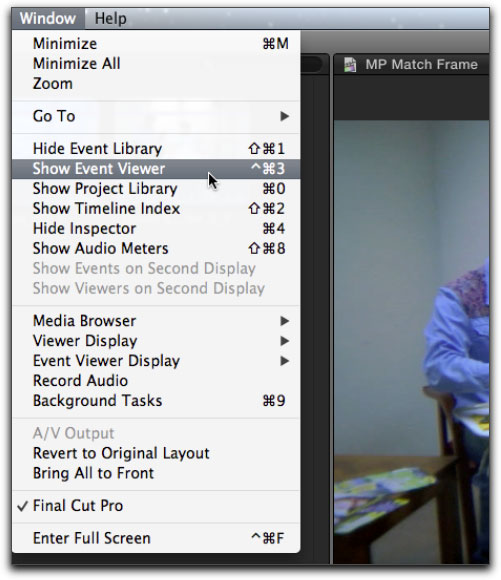
But there were still times when comparing shots, or trying to precisely match the action or color between two shots, that I wanted a second Viewer. Well, my wish and perhaps yours, has been granted in the form of a new Event Viewer, which can be enabled from the Window menu, or by using the keyboard shortcut Control-Command-3.
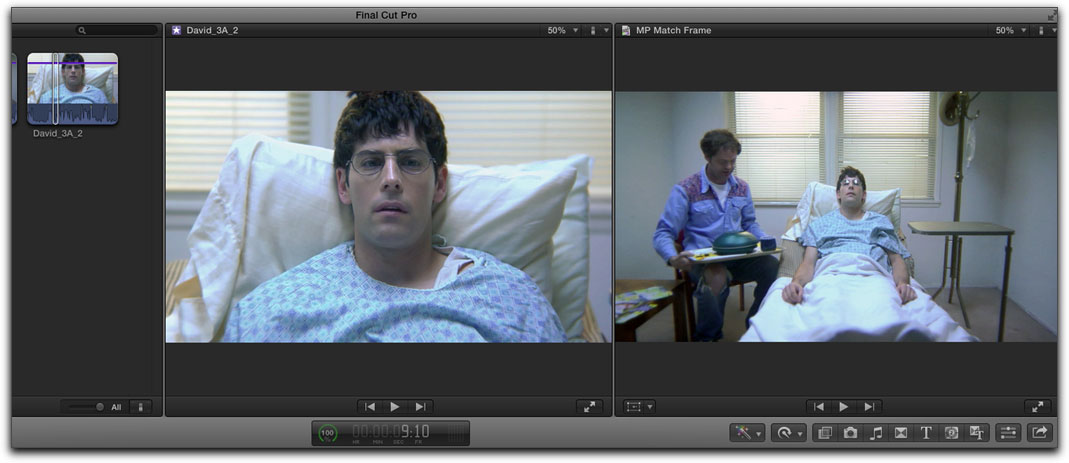
The Event Viewer always appears to the left of the Main Viewer. It's called the Event Viewer because only clips from the Event Browser are displayed. Each Viewer functions independently and has the identical controls for playback, zooming, resizing and toggling title and action-safe zones.
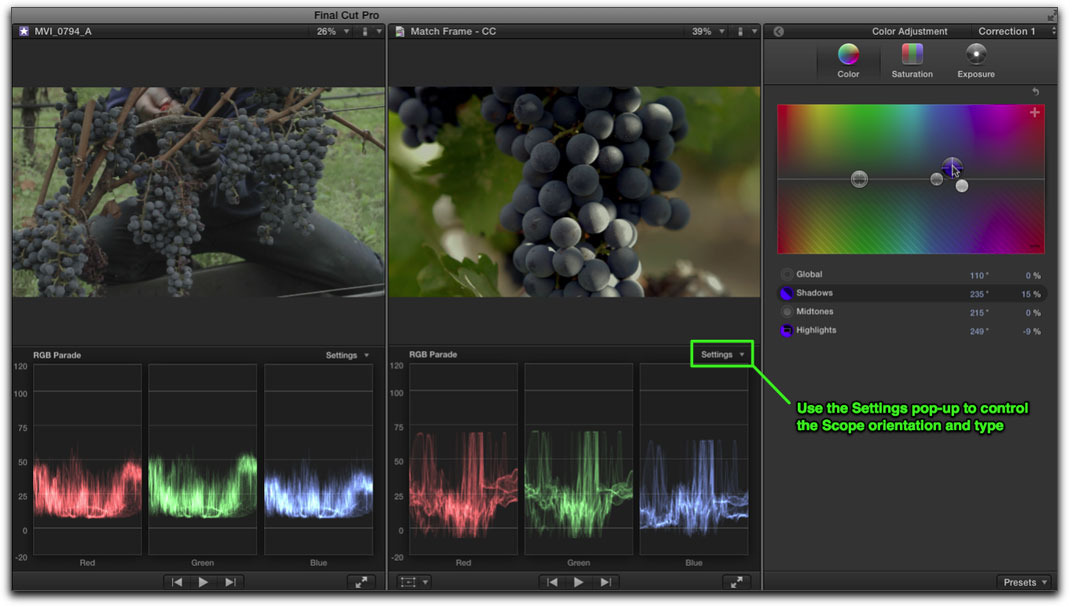
You can also use the Event Viewer to assist in matching the color of one shot to another. Each Viewer had independent scopes that can be enabled and placed in either vertical or horizontal orientations. I prefer the vertical layout because the scopes read the image from left to right and there's more of a direct visual relationship between the traces in the waveform and the image in the Viewer.
If you have a second monitor connected to your Mac you can show both Viewers on that display by choosing > Show Viewers on Second Display from the Window menu.
Paste Attributes
Final Cut Pro 10.0.6 brings a variety of workflow improvements and additions to how you work with effects. The biggest one in my book is Paste Attributes - a feature that legacy Final Cut Pro users had grown to love, but was absent in the initial release of Final Cut Pro X. In a nutshell, the Paste Attributes command allows you to selectively paste specific video and audio attributes from a target clip to a single clip or group of clips. As with all things in Final Cut Pro X, it's crazy simple to use.
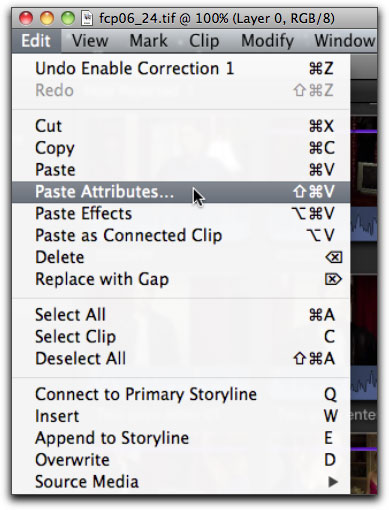
With a target clip selected in the Timeline, press Command-C to copy it. Then from the Edit Menu choose > Paste Attributes or press Shift-Command-V
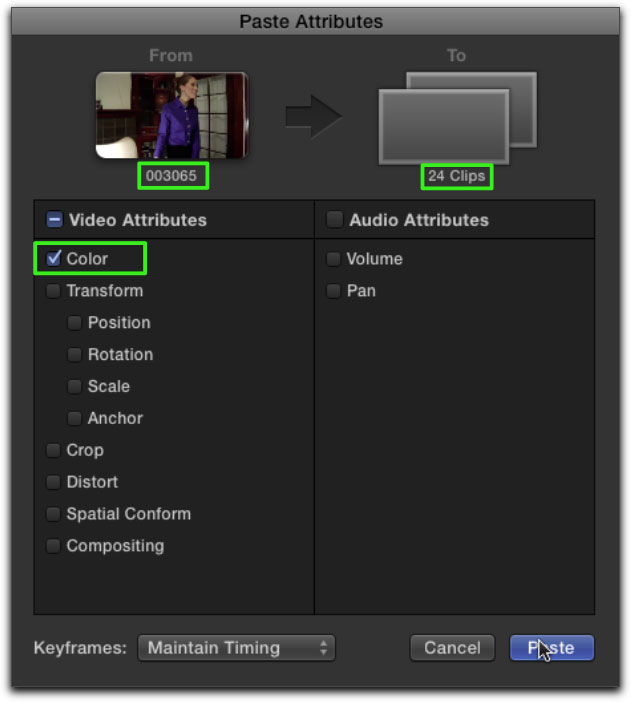
The Paste Attributes window reports the name of the clip you are copying from, and how many clips you are pasting to. If you were only pasting to one clip, the target clip's name would appear as well. By the way, you can only copy from one clip - if you have multiple clips selected when you copy, only the first clip is used.
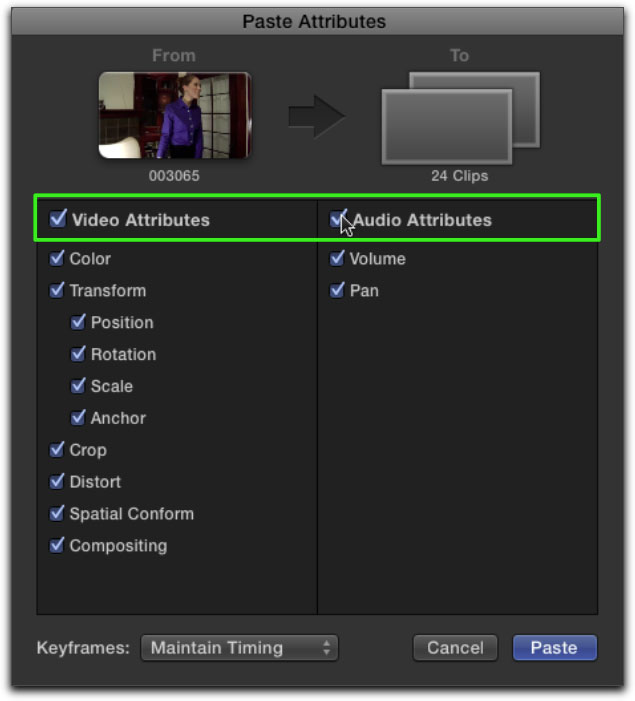
As you can see in the image above, you can selectively paste individual Video and Audio Attributes. By choosing the top level checkbox, you can paste all the attributes for both Video and Audio.
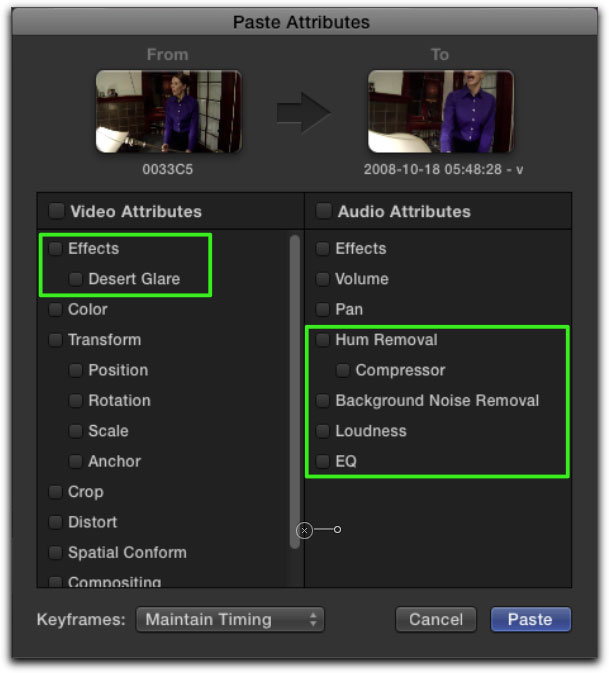
If you have individual video or audio effects applied to a clip they can be pasted as well. In the image below, a clip was copied that had a Desert Glare effect and some Audio Enhancement effects applied. When the Paste Attributes window is called up, those individual effects are available for selective pasting. The new Paste Attributes command is a textbook example of Apple's commitment to improving a feature and not just mimicking what they've done in the past.
Creating Freeze Frames
Before Final Cut Pro 10.0.6, creating simple freeze frames did not exist. Of course you could apply what Final Cut Pro calls a Hold Frame, but doing so would apply a retiming effect to the entire clip and you couldn't reuse that Hold Frame anywhere else in your project. Thankfully, you can now easily create Freeze Frames from Event or Timeline clips and edit them to your project as Connected clips.
Before creating a Freeze Frame, move your Playhead to the location you want the freeze to occur. In the Event Browser, skim to the frame you want to use, then from the Edit Menu choose > Connect Freeze Frame or press Option-F.
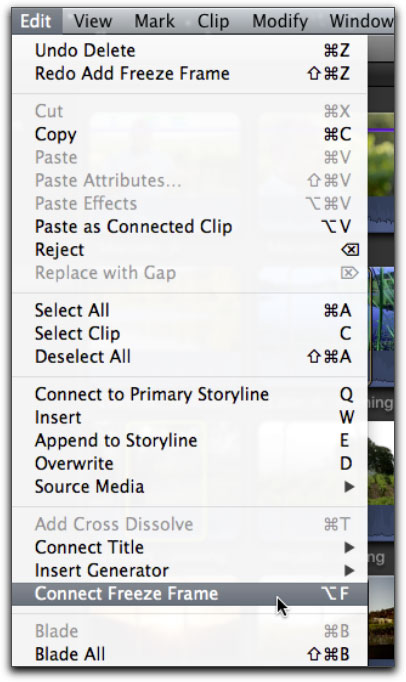
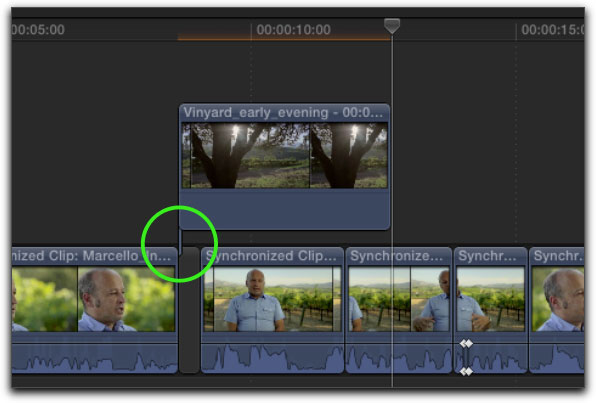
The Freeze Frame is edited as a Connected clip at the Playhead location with a duration of 4 seconds, which can be changed in Preferences.
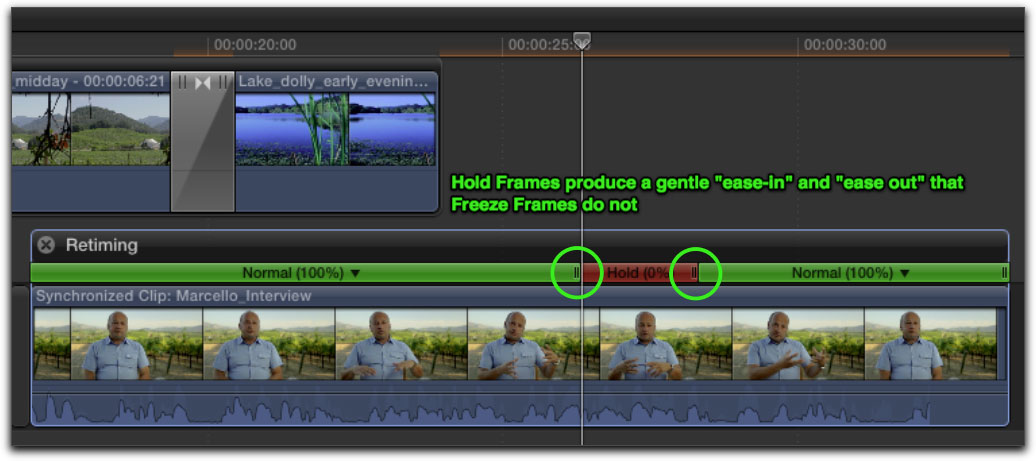
Freeze frames can be copied, pasted, trimmed and color graded. Freeze frames are not meant to replace Hold Frames introduced in FCP 10.0. The primary difference between a Hold Frame and a Freeze Frame is that Hold Frames are always created in the context of a retimed clip. Because a Hold Frame is part of a retimed segment , the speed algorithm creates a smooth "easing" in and out of the Hold segment where the Freeze Frame provides no easing and as a result, can often appear abrupt when the freeze is extracted and played back from a Timeline clip.
Even so, Freeze Frames are a simple and very useful new addition to Final Cut Pro X, and I expect we'll all be using them quite often.
Improved Compound Clips
In Final Cut Pro 10.0.6, Compound Clips have changed, resulting in dramatically improved performance and making it much easier to make changes to multiple Compound Clips at once. One thing that is important to understand is that these changes only affect Compound Clips created in 10.0.6 or later . Compound Clips created in earlier versions of Final Cut Pro will work the way they used to.
In the image below, the Compound Clip on the Primary Storyline has been split into three separate clips so that transitions could be added. In the pre-10.0.6 world, when you split a Compound Clip like this, you actually create multiple instances of the same Compound Clip. As you can see in the image below, with two added edit points, there are three instances of the same Compound Clip - which increases the project size and impacts playback performance.

Side note: this is the main reason many people early on, had playback issues especially when Compound Clips were placed inside other Compound Clips .
Because splitting a Compound Clip in earlier versions of Final Cut Pro made full, separate instances, any changes to one Compound Clip would not be reflected in the others.
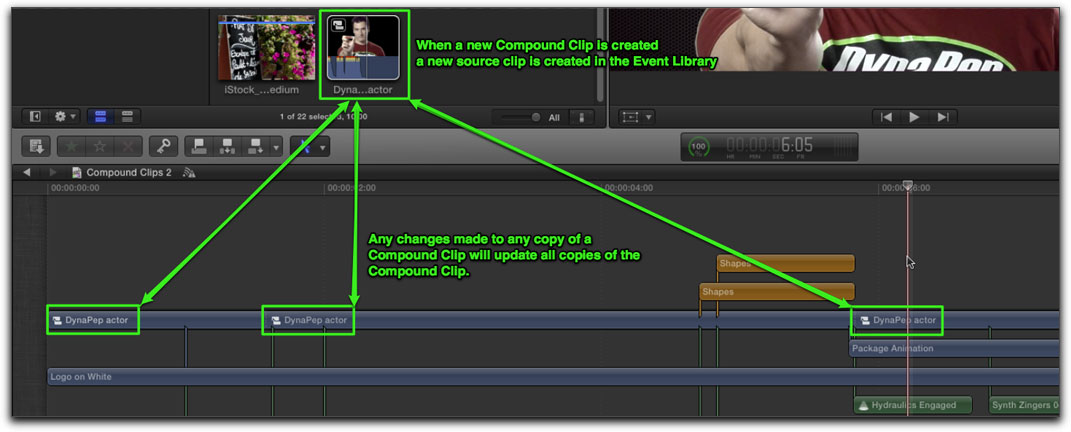
In Final Cut Pro 10.0.6, this is no longer the case - only one instance of a Compound clip is created and Compound Clip copies are simply the same instance appearing in multiple places. But most importantly, changing one instance of a Compound Clip changes all copies - instantly . Whenever you create a new Compound Clip in the Timeline you are prompted to create new Source Compound Clip in the Event Library that will reflect these changes.

With a single-instance Compound Clip, any changes you make to copies in the Timeline (like adding an effect), are reflected in all copies in the Project and Event Library. And because there is only one instance of the Compound Clip (even though there may be multiple copies) playback performance will not be adversely affected.
New Drop Shadow Effect
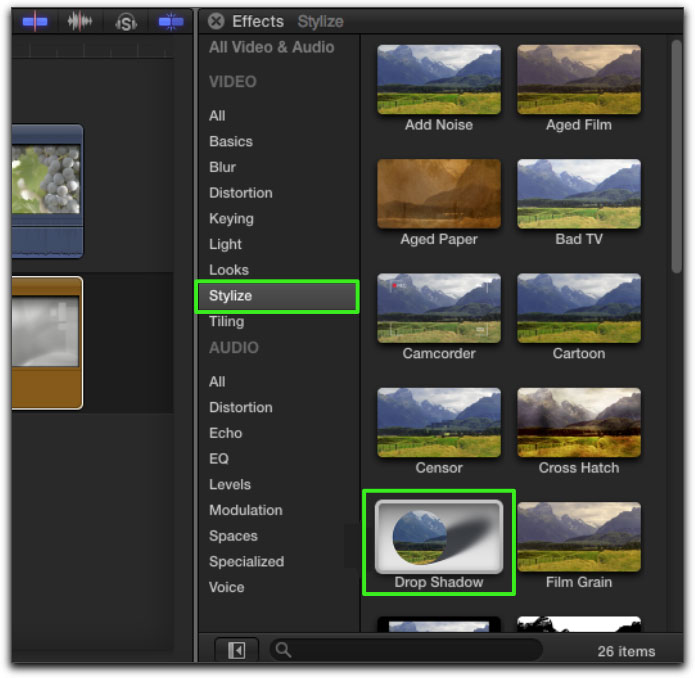
In earlier versions of Final Cut Pro X, you had to roll your own drop shadow effect using Motion, or rely on a third party to provide one - but now, it's built right into the application. In the Effects Browser in the Stylize category, you'll find the new Drop Shadow Effect.
The Drop Shadow effect includes several intuitive on-screen controls. You can drag anywhere inside the outline to reposition the shadow; dragging the blue square skews the shadow to create a perspective effect, and dragging the white corner squares changes the perspective amount.
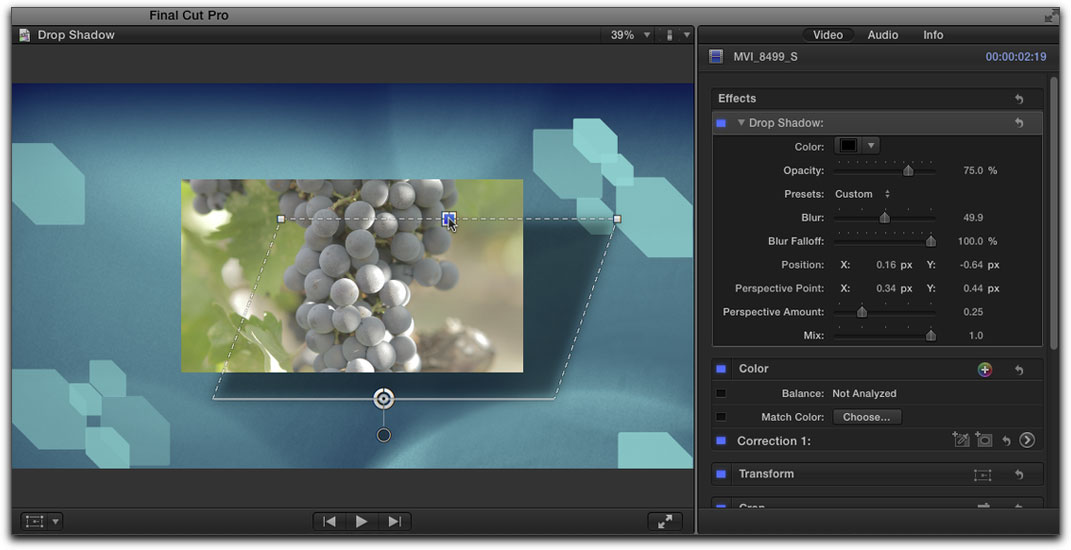
In the Inspector all the parameters are keyframe-able so you can make your drop shadow move over time. Overall, the Drop Shadow effect is a nice implementation of a much needed feature.
Set Default Transition
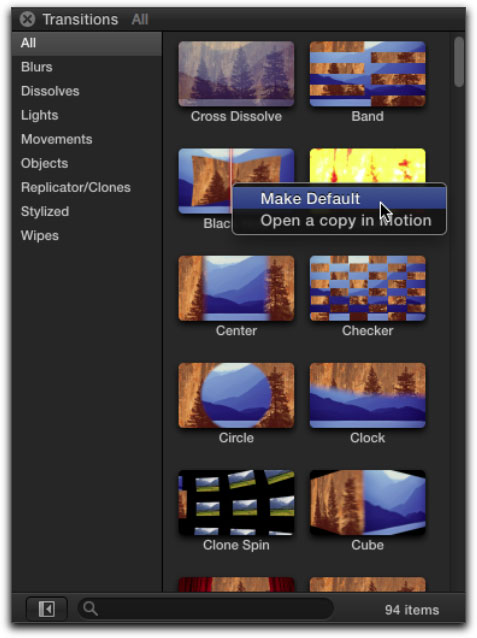
You can now set any transition as the default transition simply by right or control-clicking on a transition in the Transitions Browser and selecting Make Default.
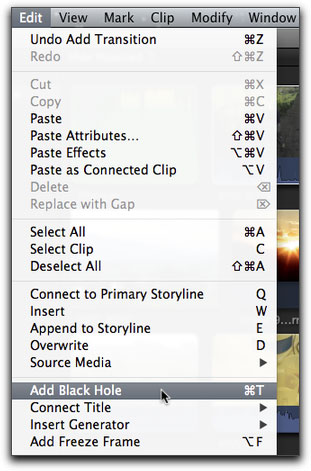
Also, under the Edit menu, the name of the default transition has changed to the current selection - very useful.
Blading Multiple Clips
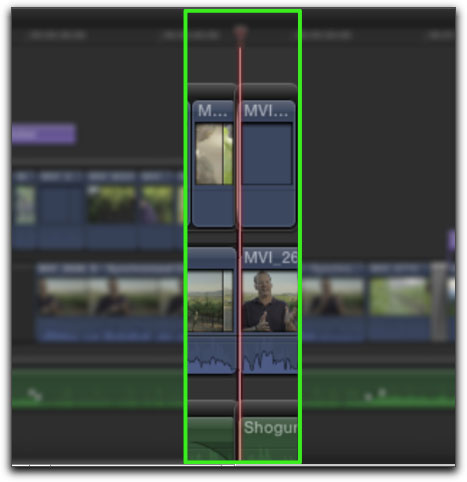
There's one more small feature I want to point out before we move on. You can now blade across multiple connected clips under the playhead by pressing Shift-Command-B. This is a great feature for cleaning up the head or tail of a stack of Connected clips or the head or tail of a Project that includes multiple Connected clips.
Streamlined Sharing interface
Final Cut Pro 10.0.6 has a new streamlined Sharing interface that makes exporting your movies to a wide variety of delivery platforms easier than ever. To share a movie, select a Project filmstrip in the Project Library or open a Project Timeline. Click the Destinations button on the Toolbar to bring up the Share Project window. This window presents the most common delivery targets you're likely to use for exporting or sharing your movies.
You can customize the delivery targets by clicking the Add Destination Button to call up the Destinations Preferences.
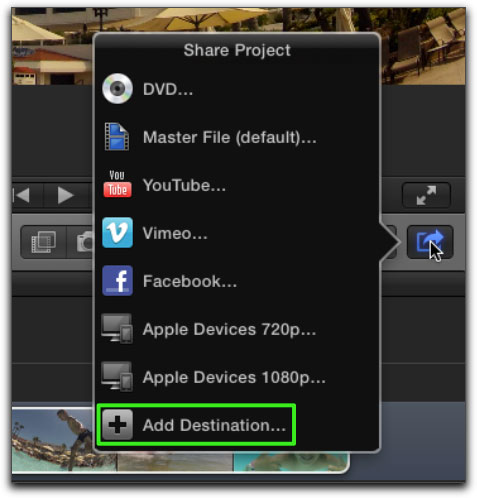
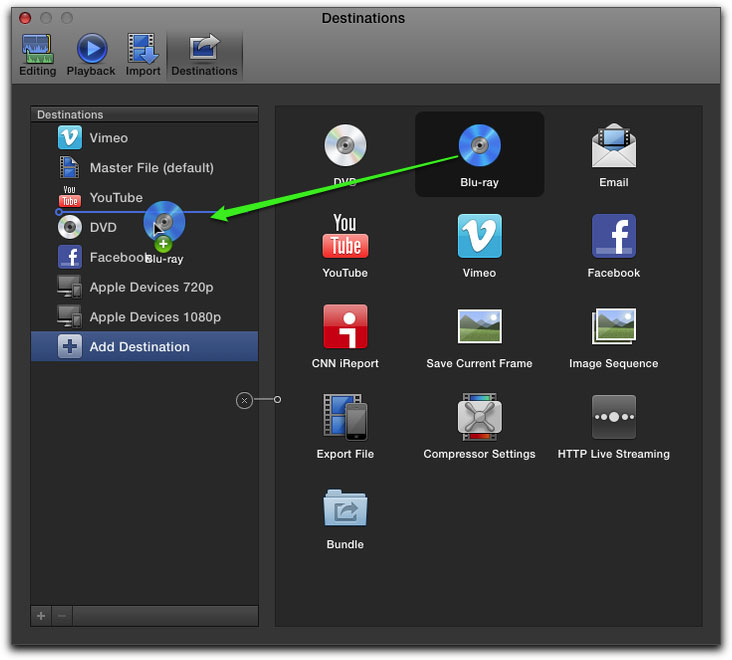
A pane will appear revealing even more destinations such as DVD, Blu-ray, Email, etc. and a new item called a Bundle that will allow you to set up a multi-target export. But more on that in a shortly.
To add a Destination, simply drag a target icon from the right pane into the left pane, then close the window.
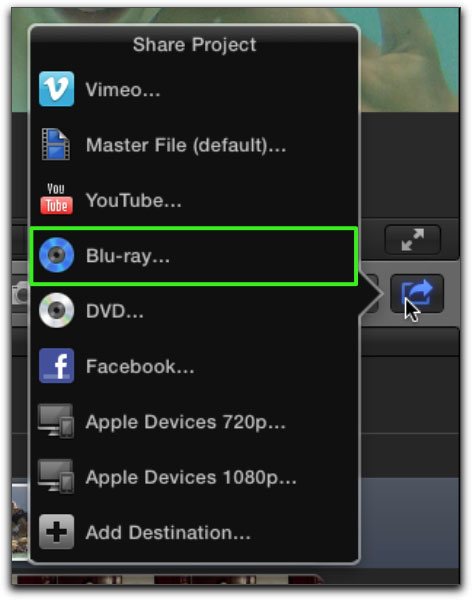
The next time you access the Destinations menu from the Toolbar, your new destination target will appear in the list.
Once a Destination is chosen from the Share window (in my example, an Apple Devices 1080p Destination was chosen), an info window appears that presents a summary of your movie's export settings. Moving your mouse pointer over the Devices icon will bring up a window that displays all the hardware your exported movie will be compatible with.
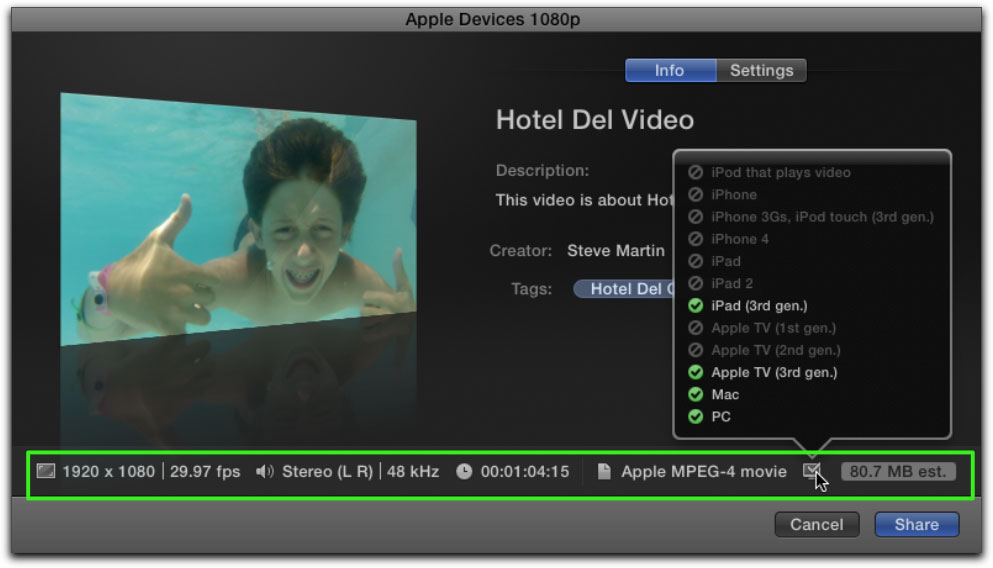
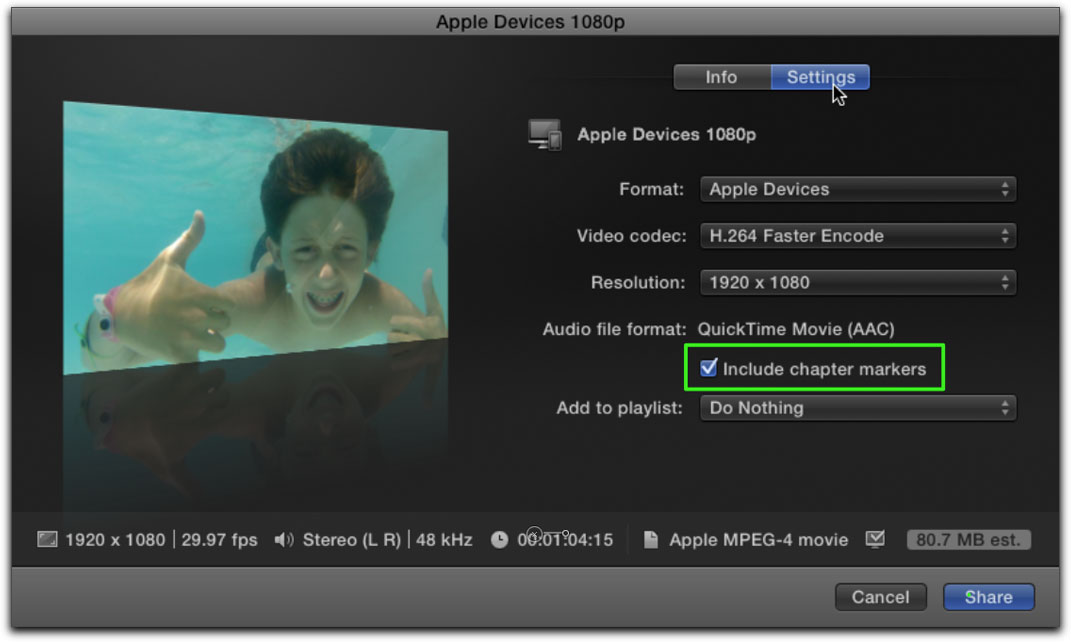
You can override any of the default Destination settings by clicking the Settings button and choosing options from the various pop-up menus. Also noteworthy, you can now export Chapter Markers - a much requested feature that is an essential navigational tool for delivering DVD's, Blu-ray Disks, or QuickTime movies.
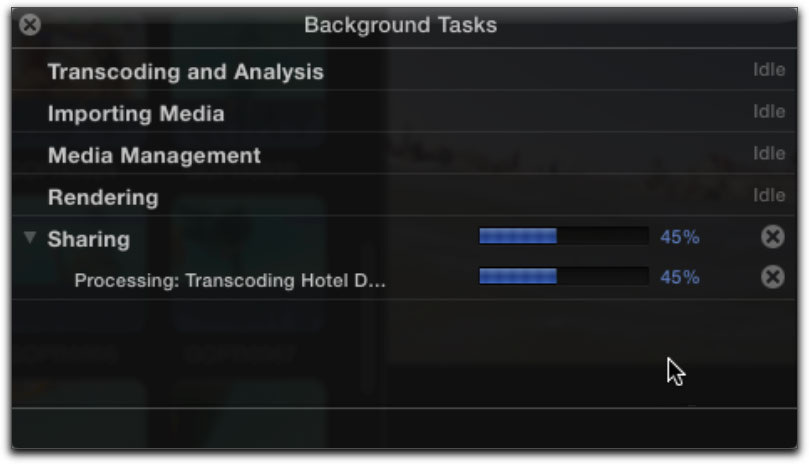
After naming and saving the movie to your hard drive, you can monitor the export progress by pressing Command-9 to call up the Background Tasks window. Because sharing is a background task, you can continue editing without having to wait for the export to finish. This was something that wasn't possible in previous versions of Final Cut Pro X.
Exporting Bundles
Bundles are Final Cut Pro X's new export paradigm that allow you to share your movies to multiple destination targets. Because your movies may be played back on any number of platforms that include, but are not limited to, a Mac or PC, an iDevice such as an iPad or iPhone, DVD or Blu-ray discs, or the web - having the option to publish your movies to some or all these destinations with one click really streamlines the delivery process.
To create an export Bundle, call up the Preferences window by pressing Command-comma. Drag the Bundle folder icon into the left pane, then drag the Destination targets you want included in the Bundle into the folder.
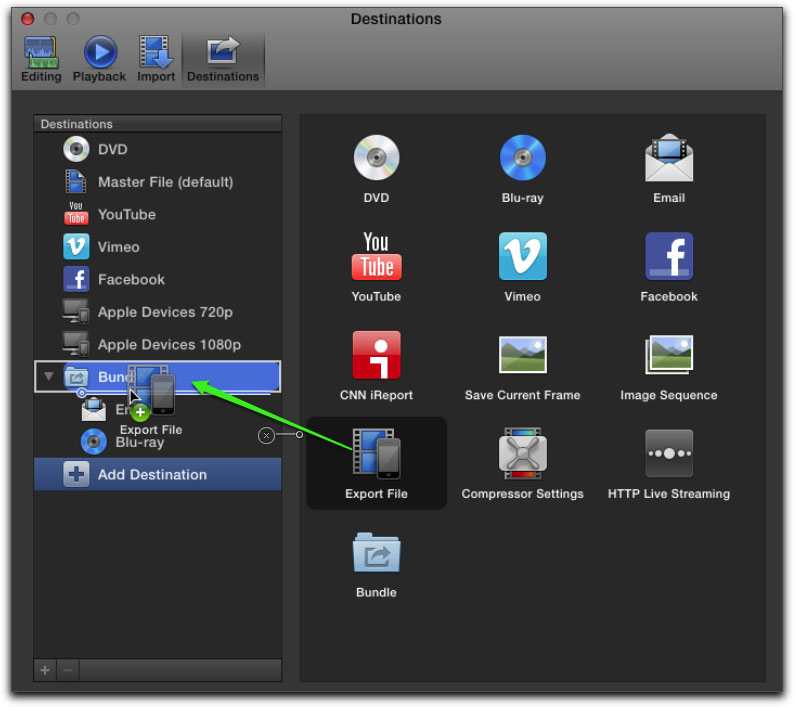
Bundles can also be given custom names that will appear in the Destinations window or the File menu when you share your movies. The Bundle I've created includes 3 different Destination targets.
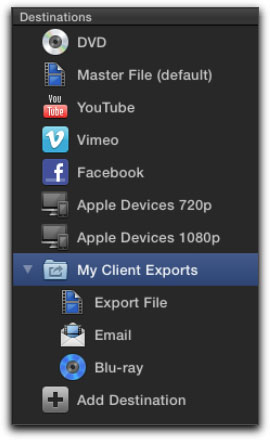
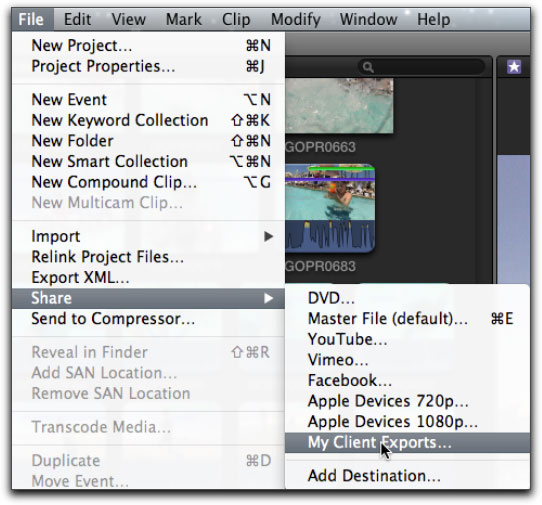
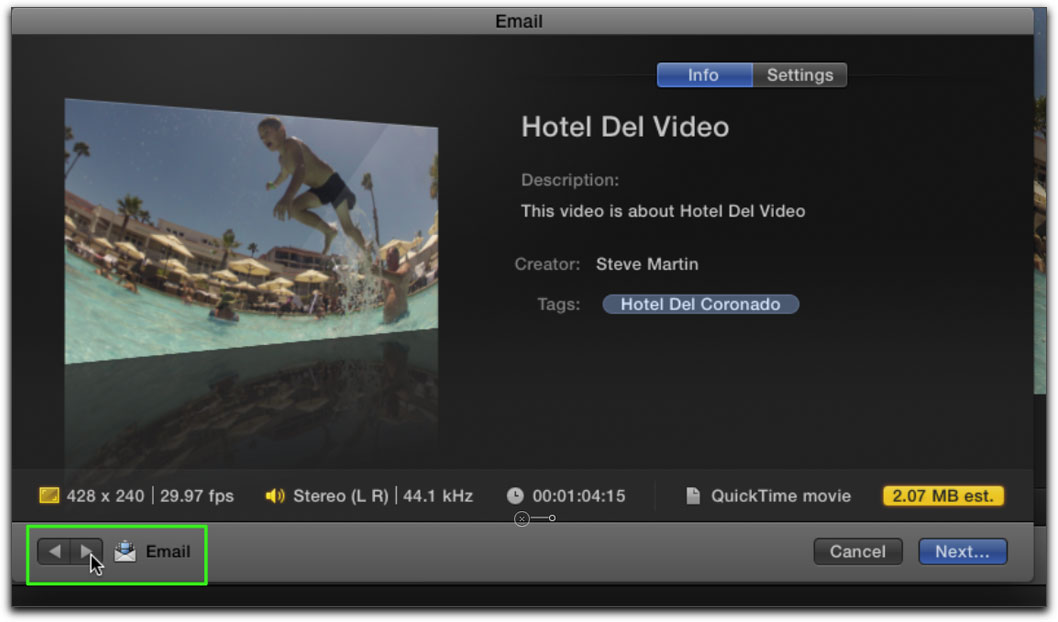
When a Bundle is chosen as your sharing destination, you can change any of the default settings for each of the targets by clicking the buttons in the lower left of the Info window.
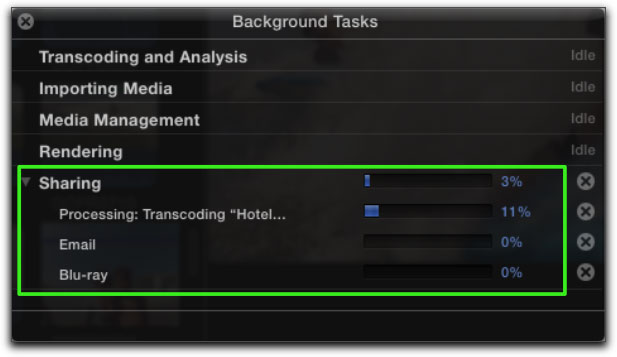
Once you name and save your movie and call up the Background Tasks window, you'll see all your Destination targets queued up and exporting. In the example below, 3 separate movies will be exported - an Email, Blu-ray disk and Master File version. With so many ways to view content these days, it's nice to know that you can cover all your delivery bases with only a few clicks.
Exporting Keyword Tokens
With so much video being made available online in the past few years, locating content in the vast sea of content is like looking for a piece of hay in a needle-stack. This is why meta-tagging has been the buzzword in the past few years as it relates to content delivery, archive and curation. So crucial is metadata in fact, the two major sharing sites, YouTube and Vimeo, have robust tools for adding metadata to your movies so they can be searched.
Final Cut Pro now has built in meta-tagging tools that will automatically add these tags in the form of keyword tokens to any video you export to these sharing sites. In the Project Library, select a Project filmstrip, then press Command-4 to reveal the Inspector. By clicking the Share button you will see an area called Attributes that includes a default set of keyword tokens that will be exported with your movie.
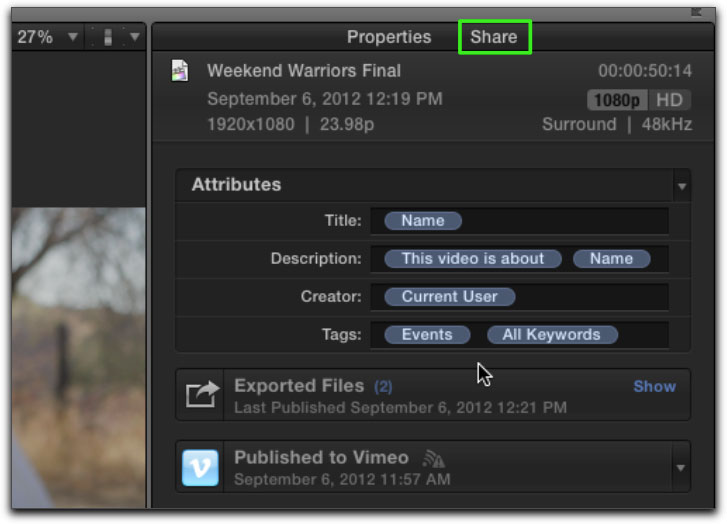
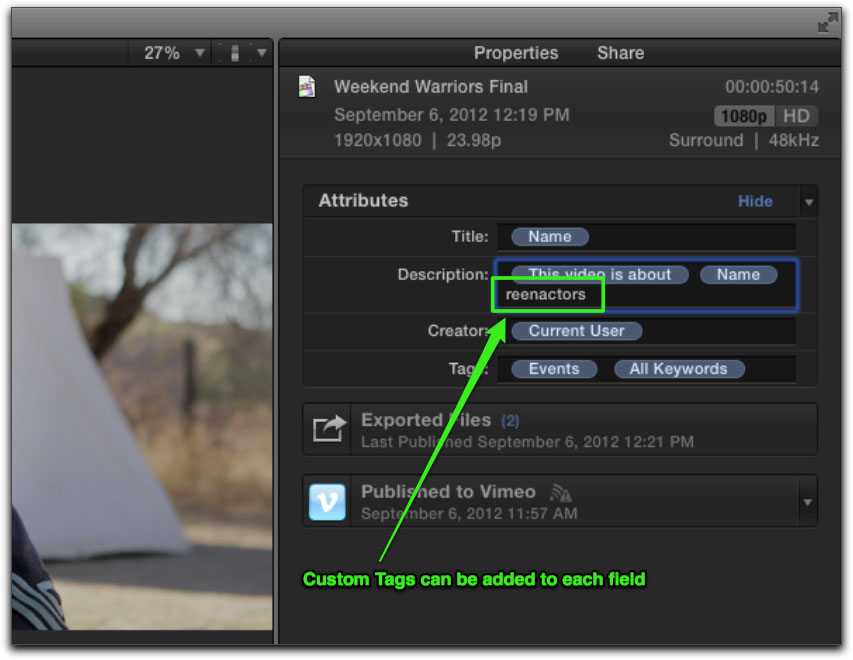
Each token represents a string of text that a search engine will parse. The Name token for example will create a search string that includes the title of your project. This token will extract the name of your project for the keyword automatically, so you don't even have to type it out. In the Description field, a token labeled this video is about will create a searchable text string that ties the search query to the name of your project, but you can also add your own custom keywords to the string.
For example, I've added the keyword reenactors so that if someone looking for a video on reenactors types in a search query using that word, my video can be located. The Creator token will create a search string that includes your name (if in fact you are the currently logged in user of Final Cut Pro) and the Tags tokens will create keywords based on your Event name and the individual keywords assigned to each clip.
Once the movie is shared to a Video Sharing site like YouTube or Vimeo, your keyword tags will be uploaded along with your movie. Very cool.
Exporting XML 1.2
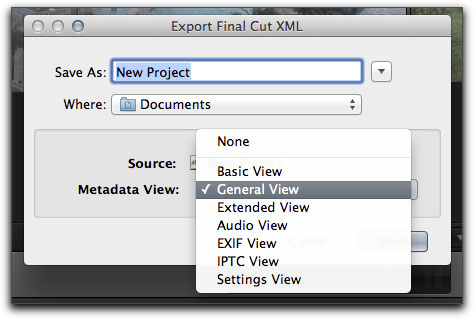
XML has been enhanced in this release providing richer integration with third party apps. When you export an XML file you'll see new options for exporting Metadata sets that will be embedded in the XML data. Third parties that wish to access Final Cut Pro's clip and Project meta-structures can now more easily do so.
Exporting Ranges & Chapter Markers
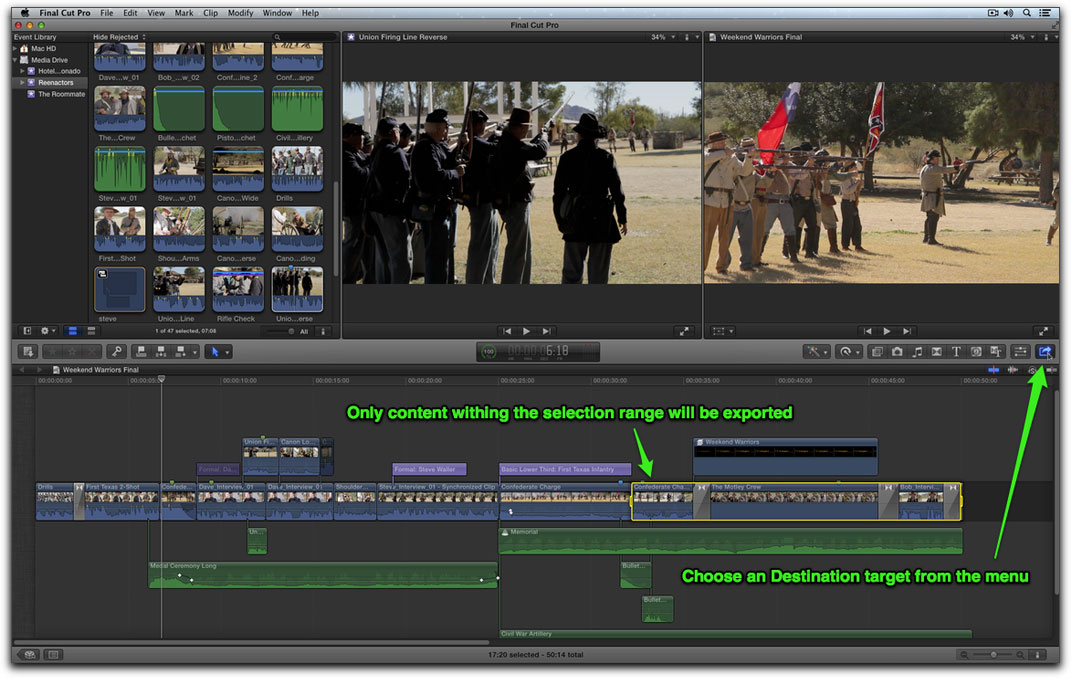
With regard to sharing and exporting, two items that have consistently appeared on many an editor's feature request list is the ability to export selected portions of a project and the ability to include and export chapter markers from a project. We'll look at range-based exporting first.
In the image below I have a finished project that is ready for export. However my client wants to see only the editorial changes I made at the end of the project. Simple enough. I'll Skim to the frame I want my exported movie to start from, then press I to set the range in-point. Then I'll Skim to the frame I want the movie to end on and press O to set the range out-point. Finally, I'll choose a Destination and export.
To create chapter markers for your exported movies that will be recognized by DVD and Blu-ray players and QuickTime movies you'll need to Skim to the frame in your Timeline you want the chapter marker to appear and press MM to create the marker and call up the Edit Marker window.
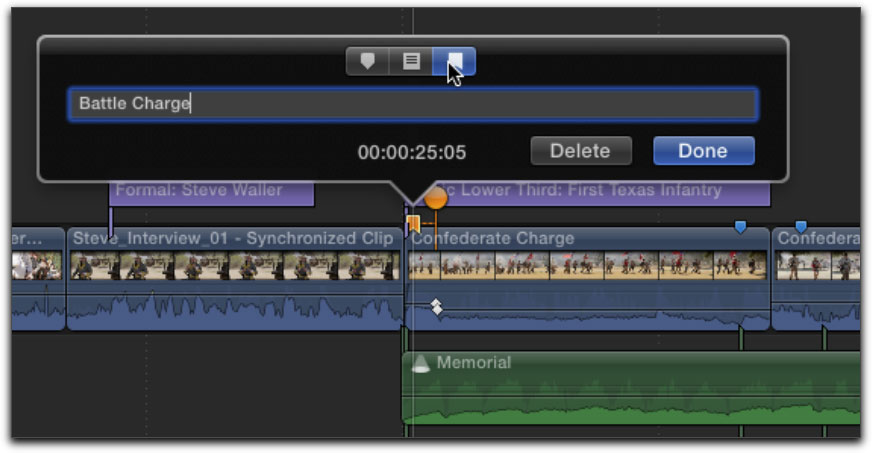
Final Cut Pro X now presents you with 3 types of markers - Standard markers, To Do markers, and Chapter markers.
Standard and To Do markers existed in previous versions of Final Cut Pro, so I'm not going to cover them here. To turn a Standard marker into a Chapter marker, click the right-most button. The marker turns orange in the Timeline to indicate its new status. Also new is a moveable "pin" allowing you to choose a poster frame. If you want your Chapter marker to appear with a custom name other than the generic chapter 1, chapter 2, etc, enter it into the field.
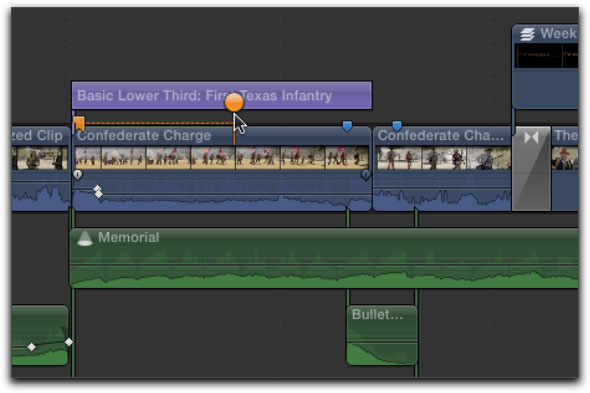
The orange pin represents the poster frame of the Chapter marker. A poster frame is a representational frame from the movie that will visually represent that Chapter marker once the movie is opened in QuickTime Player or iTunes. If you are exporting to a DVD or Blu-ray disc, the name of the chapter will appear, but poster frames are not supported.
In the image below, the poster frame pin has been moved to a frame where the soldiers are in mid-charge to more accurately reflect the action the chapter name.
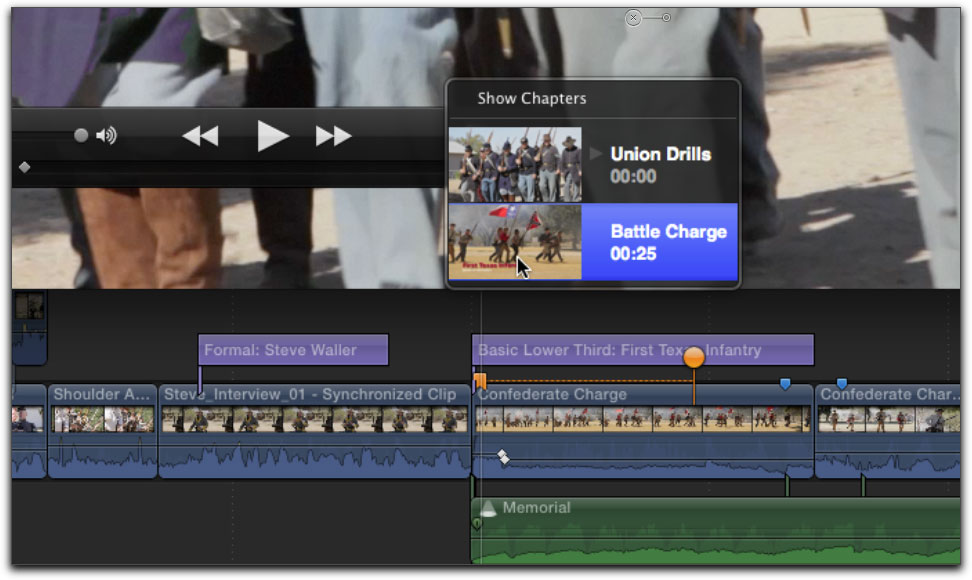
Once the movie is exported, it should automatically open in the default application - in this case, Apple's QuickTime player. Clicking the chapter button reveals the two chapter markers I named in Final Cut Pro and if you look at the poster frame for the second chapter heading, it's the poster frame I picked using the poster frame pin prior to export.
So that about wraps it up. There are still some small features I did not include in this article as I'm sure you'll discover them for yourself. Final Cut Pro 10.0.6 is a major step forward because more than previous releases, this version focuses almost entirely on improving efficiency and workflow. The great news is, this article is relevant to anyone whose already purchased Final Cut Pro X as the upgrade to Final Cut Pro 10.0.6 is free. For those of you who are still curious about Final Cut Pro X, you can download a free 30 day trial version.
And lastly, we have 2 new tutorials on the new Features of Final Cut Pro 10.0.6.


If you are new to Final Cut Pro X and want to learn it from the ground up we have a 5 hour tutorial called: Apple Pro Video Series: Final Cut Pro X.
If you are already familiar with FCPX and want an in-depth look at the new features we've produced a 2 hour tutorial called: Final Cut Pro 10.0.6 In-Depth. You can purchase this tutorial by clicking here:
All our tutorials come with the media for following along and can be synced with your Apple iPad.
Finally, check out all our free weekly MacBreak Studio podcast on all things Final Cut Pro by clicking here:
If you would like to contact me regarding anything in this article, please use the email below:
[Top]
copyright © www.kenstone.net 2012
are either registered trademarks or trademarks of Apple. Other company and product names may be trademarks of their respective owners.
All screen captures, images, and textual references are the property and trademark of their creators/owners/publishers.