
December 5, 2011
Updated for FCP 10.0.3
Download the ePub iPad/iPhone version of this article.
By Ken Stone
What are Transitions?
When working on a Project in FCP, clips from within a scene are often put end to end, in what we call straight cuts; this creates the feeling that the scene is happening continuously. However, when a scene ends, we may want to convey to the audience, a passage of time, location or even mood. This is most often achieved by using transitions. Transitions are an effect by which the end of the out going clip is merged or blended with the start of the incoming clip, often with both the out going and incoming video seen on screen simultaneously for a short period of time. There are a number of different types of transitions, most common are, cross dissolves, fades and wipes. Fades, like 'Dip to Color' (fade to black) are often used to denote a passage of time, Cross Dissolves can help denote a passage of time as well. The second type of transition, the Wipe, has a very graphical look to it like a Clock Wipe, Page Peel, or a Cube Spin. Think of the old Batman TV show with all of of its over the top graphical wipes. FCP has some 90 different transitions to choose from.
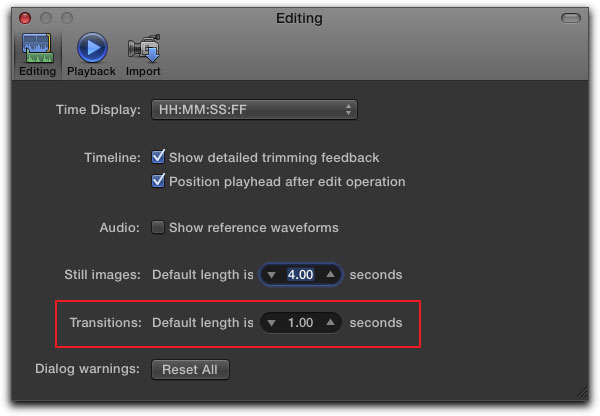
Up until the 10.0.3 FCP update there were two different types of transitions. 'Full Overlap' which is how iMovie handles transitions and 'Available Media' which is how legacy versions of FCP handled transitions. 'Available Media' is now the method that FCP 10.0.3 uses to apply transitions between clips, utilizing media that falls outside the clips In and Out points. If there is not enough Available Media to perform the transition, FCP will now ask you if you want to use the '(Full) Overlap' method for your transition. These two different methods of 'Applying' a transition work very differently so we'll look at each one separately. You can set the default transition length in the FCP Prefs in the Editing tab, shown below with a default transition length of 1 second.
Available Media
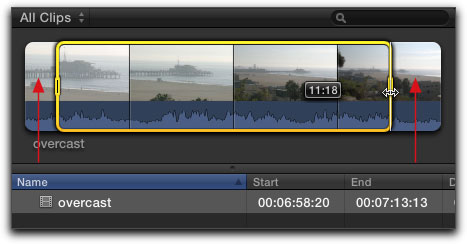
For those of you coming from legacy versions of FCP, 'Available Media' is what you will be familiar with. When using 'Available Media', the video used in the transition is drawn from the clip handles. A clips' handle is the video that falls outside of a clips In and/or Out points or Range, as it's called in FCP X. The Range of a clip is set by dragging the ends of a clip in the Clip Browser, denoted by a yellow box. The red arrows below show the clips handles, those parts of the clip that are outside of the Range or In and Out points of the clip. You can also set In and Out points for a clip in the Clip Browser by positioning your playhead in the clip and hitting 'I' or 'O' from the keyboard. So, in practice, the media to be used in the transition comes from the ending handle of the outgoing clip along with the beginning handle of the incoming clip.
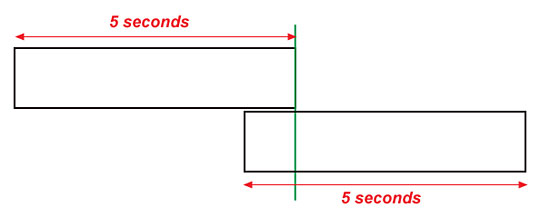
A graphic representation of two clips in the timeline is shown below. You can see that to use Available Media for a transitions, some prior planning is required. You will need to create handles for your outgoing and incoming clips, either in the Clip Browser using the Range select tool, or by rippling the Out or In point of the clips in the timeline to create handles.

When using 'Available Media', you must have a minimum handle of 2 frames each for the outgoing and incoming clips (talk about a very short transition). If you have no handles or handles shorter than 2 frames, when you apply a transition, you will receive a warning dialog box telling you that there is not enough media to create the transition. You can choose to 'Create Transition', which will then draw the media for the transition from the head of the incoming clip. This process was called 'Full Overlap' before the 10.0.3 upgrade. Now it is refered to as simply 'Overlap'.
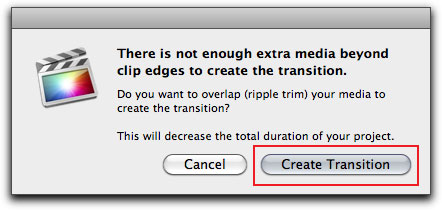
You can Cancel the operation and then use the Ripple tool in the timeline to change the lengths of the out going and incoming clips to create handles, so that you can apply a transition using Available Media.
Overlap
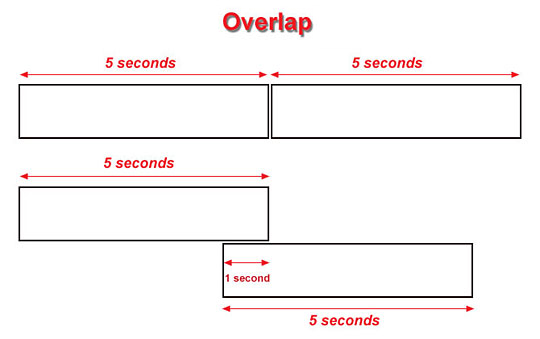
iMovie has always used the Overlap method of applying transitions. For those of us coming from legacy versions of FCP, Overlap is a new concept. As I mentioned, a transition works by mixing video from the end of the out going clip with video from the start of the incoming clip. As shown below I have two clips, each 5 seconds in duration for a total of 10 seconds, our transition has a default length of 1 second. The Overlap transition draws it's video from the head of the incoming clip, so the first 1 second of video from the incoming clip is moved earlier on the timeline by 1 second, overlapping the last 1 second of the out going clip, shown below. It is in this overlap section that the transition is applied. Notice that with Overlap, the length of the project is shortened by the duration of the transition, in this case 1 second, so with Overlap, the total duration of the two 5 second clips will be 9 seconds.
Think about it this way. With the playhead positioned at the start of the Overlap, while both the out going clip and incoming clip are occupying the same space, the out going clips' opacity is at 100%, the incoming clips' opacity is at 0%. All we see is the video from the outgoing clip.
Shown below, the playhead (green bar), is at the start of the transition.
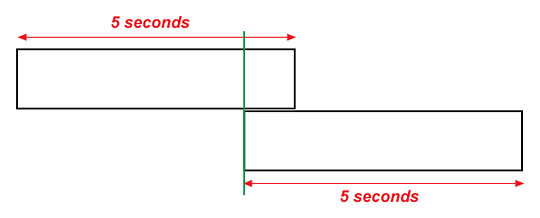
Playhead at start of transition in the timeline.
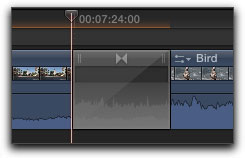
Playhead at start of transition in the Viewer. Out going clip at 100% opacity, Incoming clip at 0% opacity.

Below, the playhead, green bar, is at the middle of the transition. As the timeline plays, the opacity of the outgoing clip decreases as the opacity of the incoming clip increases.
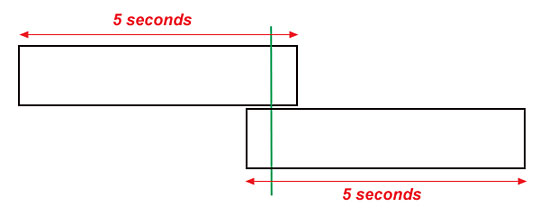
Playhead at middle of transition in the timeline.
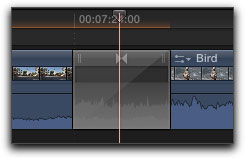
Playhead at middle of transition in the Viewer. Out going clip at 50% opacity, Incoming clip at 50% opacity.

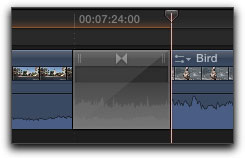
Below, the playhead, green bar, is at the end of the transition.
Playhead at end of transition in the timeline.
Playhead at end of transition in the Viewer. Out going clip at 0% opacity, Incoming clip at 100% opacity.

There is a major caveat with using Overlap. The transitions in FCP have built-in audio crossfades to help smooth the audio as it transitions from the outgoing clip to the incoming clip. However, when using Overlap, these Audio Crossfades are not available. More on this in the 'Audio Crossfade' section later.
Applying Transitions
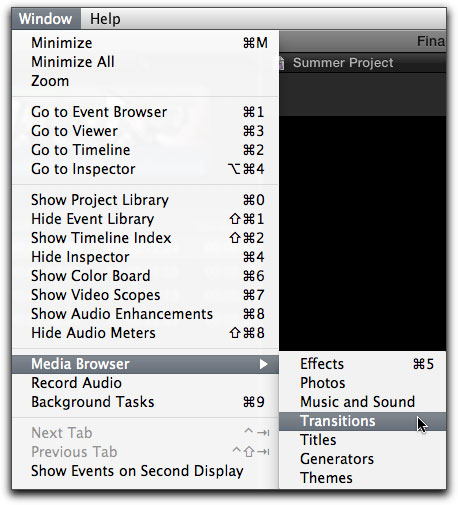
The FCP Transitions are found in the Media Browser, located lower right corner of the FCP interface. If the Media Browser window is not open, from the Window menu > Media Browser, or Command 5 from the keyboard.
With the Media Browser open, click on the Transition icon at the top of the Browser window to open Transitions.
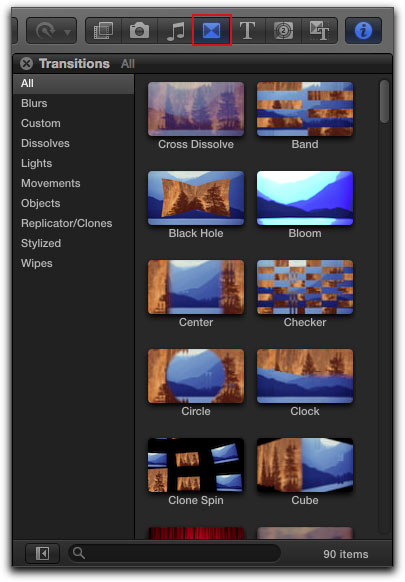
If you place your cursor over a transition in the transition browser and skim, the transition will display in the Viewer window.
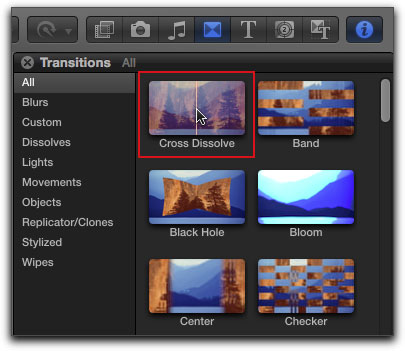
However, this skimming preview is limited. Unlike when skimming an Effects filter, where the effect is applied to the clip in the Viewer window, when skimming a transition in the media browser, only a graphical representation is displayed in the Viewer window. The start of the transition is shown below.
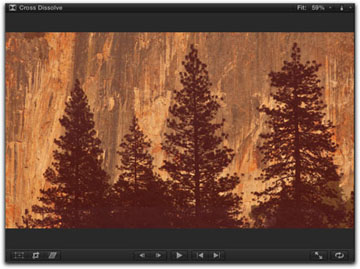
Mid point of the transition, below.
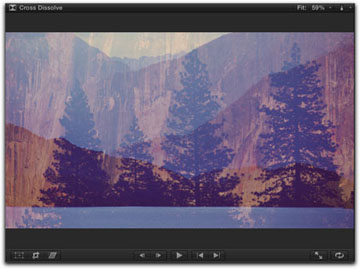
End of transition.
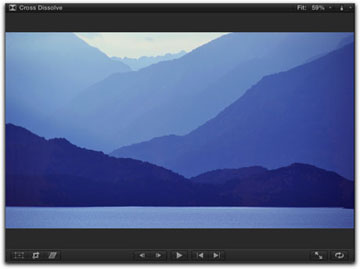
Transitions are applied to the edit point between two clips and there are several ways to do this. You can select the edit point by clicking between two clips, either the outgoing or incoming edit point is fine.
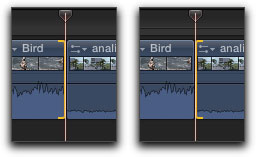
With the edit point selected, 'command t' from the keyboard will apply the default Cross Dissolve transition to the edit point. Unfortunately, there is no way to change the default transition from Cross Dissolve to a transition of your choice, like Dip to Color.
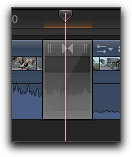
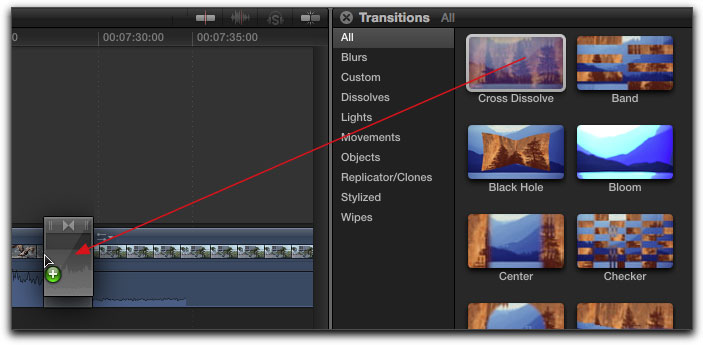
With an edit point selected in the timeline you can double click on a transition in the Transition Browser and it will be applied to the edit point in the timeline. You can also click on a transition in the Transition browser and drag it to an edit point in the timeline.
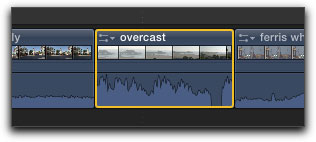
A transition can be applied to both edit points (ends) of a clip at the same time. Select the clip in the timeline.
With the clip selected, you can drag the transition onto the clip, double click on the transition in the Transition Browser, or 'command t' from the keyboard to apply the Cross Dissolve transition.
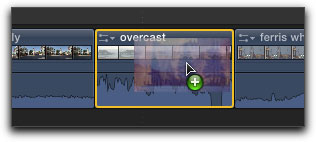
The transition has been applied to both edit points of the clip.
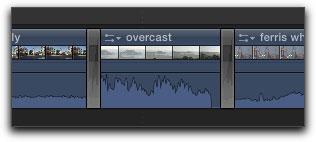
You can modify both transitions at the same time. Select the two transitions in the timeline.
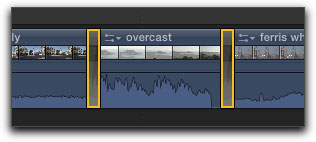
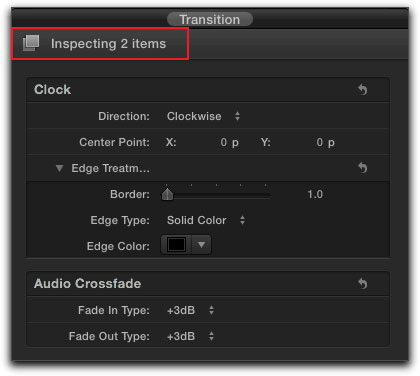
In the Inspector, at the top you'll now see, 'Inspecting 2 items'. Any changes you make in the Inspector will be applied to both transitions.
When a transition has been applied to an edit point there are several ways that we can modify the transition. To change the duration of the transition, select the transition in the timeline.
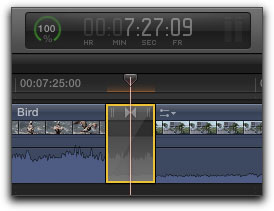
With the transition selected, hit 'control d' from the keyboard, or you can control or right click on the transition and choose 'Change Duration'. You will notice that the numbers in the Dashboard have changed to a blue color showing the default 1 second transition. Just to the right of the timecode there is a transition icon. If you change the duration of a transition in the dashboard and upon hitting return, the number does not hold, this means that you don't have enough media to extend the transition.
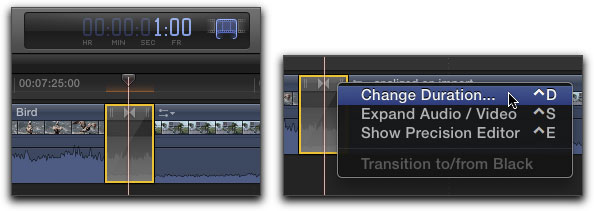
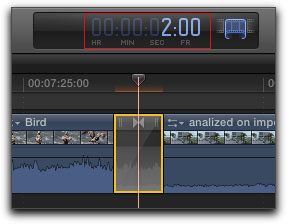
Do not click on the blue timecode number in the dashboard to change the duration but rather enter your new duration directly in the keyboard and hit return, the duration of the transition will be updated in the timeline.
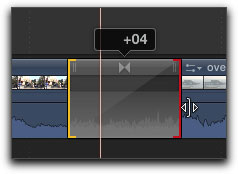
If you place your cursor on either edge of the transition it will turn into a left/right facing trim icon, below left. Click to drag left or right to change the duration of the transition. As you drag, a tool tip will appear denoting the change to the duration of the transition, below right.
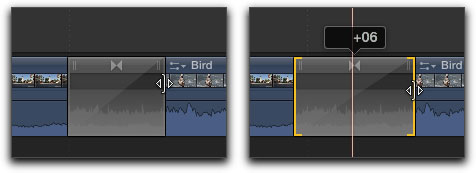
When adjusting the duration of the transition by dragging the left/right yellow end brackets, if the yellow bracket turns to red, it means that you have run out of media that the transition can use.
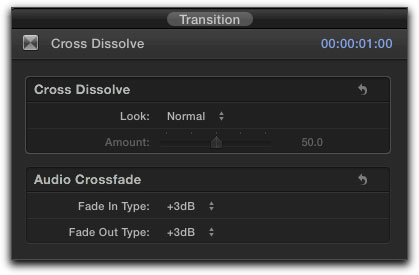
You can also select the transition in the timeline and the Inspector will display the parameters for that transition. If the Inspector window is not open, 'Command 4' from the keyboard to open the Inspector. The transition name and duration is displayed at the top of the Transition Inspector window. Different transitions have different parameters that you can control. In this case, the Dissolve transition has only one set of parameters called 'Look'.
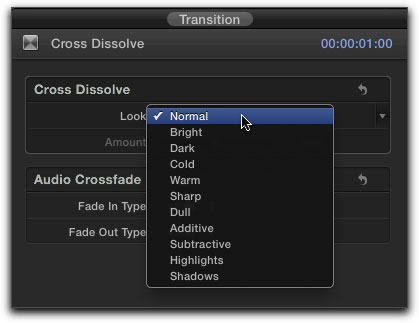
The 'Look' options shown below.
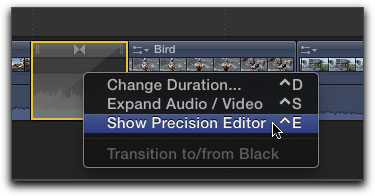
The Precision Editor
Control or right click on the transition in the timeline to open the 'Precision Editor'.
The Precision Editor splits the storyline with the outgoing clip on the top, the edit handle in the middle (red box below) and the incoming clip at the bottom. The parts of the incoming and outgoing clips that are dark (shaded) represent that part of the video that will be used by the transition.
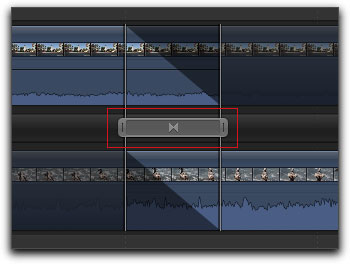
We can make two different types of changes in the Precision Editor. We can change the duration of the transition by clicking on either end of the edit handle and dragging left or right. A tool tip will show the change of the transitions duration.
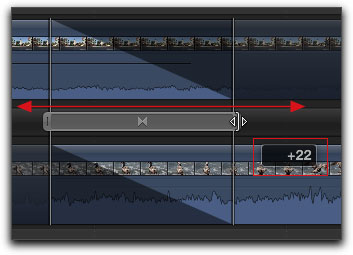
If you place your cursor in the middle of the transition icon, it will turn into a 'Roll' trim tool, to perform a two sided trim. Clicking and dragging will roll the end point of the outgoing clip and the starting point of the incoming clip in unison. A tool tip will display the number of frames that you have moved the edit point between the two clips either earlier or later in time.
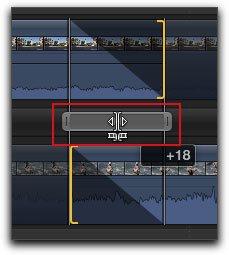
When the Precision Editor is open, the Viewer window will turn into a two up display showing the last frame of the outgoing clip and the first frame of the incoming clip. As you drag in the Precision editor the two up display in the Viewer will update in real time to show the new last frame of the outgoing clip and the new first frame of the incoming clip.

When you have finished with the Precision Editor, at the bottom right of the timeline is the 'Close Precision Editor' button.

It is not necessary to open the Precision Editor in order to preform a rolling edit beneath a transition. Top center of the transition are two inward facing triangles, below left. Place your cursor over the two triangles and it will turn into a roll tool, below right. Just as when you are working in the Precision Editor, you will get a two up display in the Viewer window as you trim your clips.

You can trim a clips edit point that has a transition applied to it without effecting the transition. Top right and left of the transition are the trim icons (handles). The upper left trim icon adjusts the incoming clip's starting point, the upper right trim icon adjusts the outgoing clip's end point.
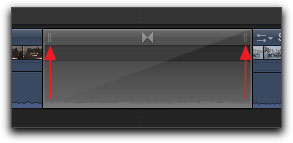
Place your cursor onto one of the trim handles and it will turn into a (ripple) trim tool.
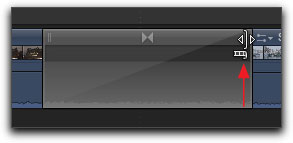
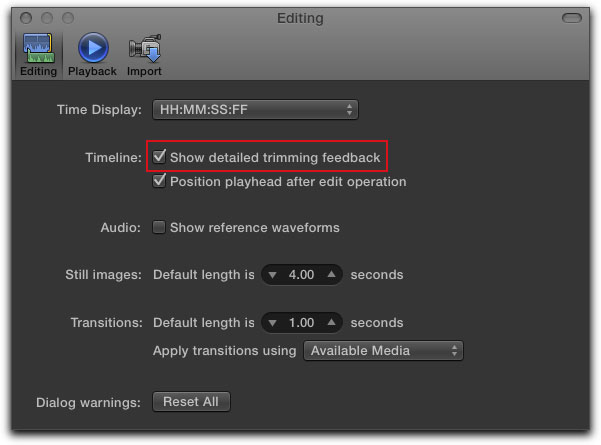
If you are not seeing the two up display in the Viewer window while trimming go to the FCP Preferences, Editing tab and check 'Show detailed trimming feedback'.
Wipes
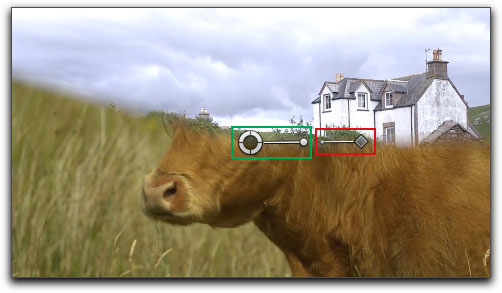
Wipe transitions are a bit different than the Dissolve or Fade transitions. Wipes are much more graphical in nature and should look familiar, for example, Clock, Circle, and Wipe. Like all transitions, there are parameters that you can adjust in the Transition Inspector, but FCP X offers us a new and powerful way to modify our transitions directly in the Viewer window. Below, I have applied a 'Clock' transition to two clips in the timeline. In the Viewer window, the Clock transition has two control handles. The outer most handle controls the amount of feather or the thickness of the border line between the outgoing and incoming clips, red box below. The inner handle controls the circular position of the border between the outgoing and incoming clips, green box below.
In the Viewer, dragging the outer control all the way to the left, will result in no feather or border applied, resulting in a very hard edge between the outgoing and incoming clips.
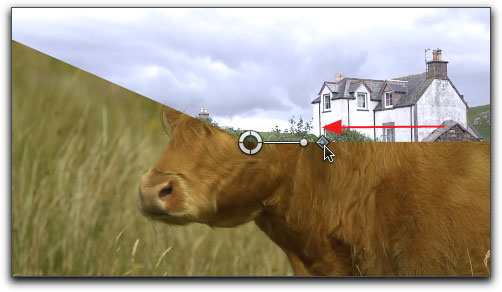
Dragging the outer control handle outward, in this case to the right, increases the amount of feather or border thickness. While you can only drag the feather handle so far in the Viewer, adjusting the feather or boarder softness in the Inspector allows for additional effects to be applied.
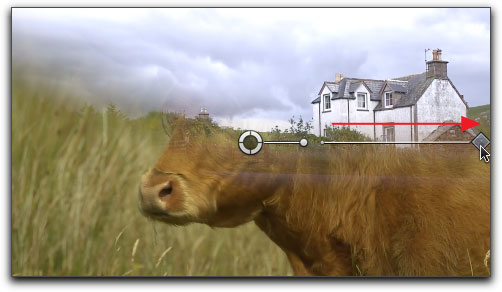
Click and drag the inner control handle in a circular manner to position the edge between the outgoing clip and the incoming clip.
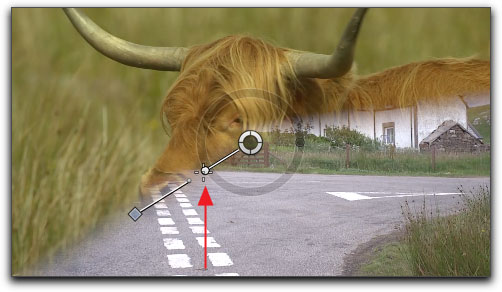
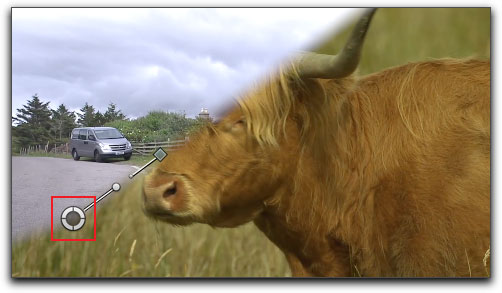
While the controls for the Clock wipe default to the center of the video clip in the Viewer, you can click on the center point of the controls, red box below, and drag to any position within the clip.
All of the aforementioned adjustments can also be done in the Inspector where there are some additional controls as well. At the top of the Inspector is the name of the transition and over to the right is the duration of the transition. It should be noted that you can not change the duration of the transition in the Inspector window. This can only be done in the timeline. Further down is the control for the direction of the wipe, either Clockwise or Counterclockwise. Just beneath this is the Center Point which we just changed, by dragging the center point, in the preceding image, (above).
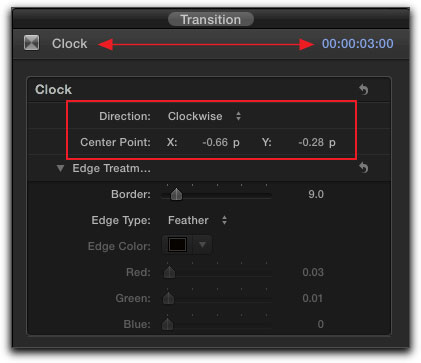
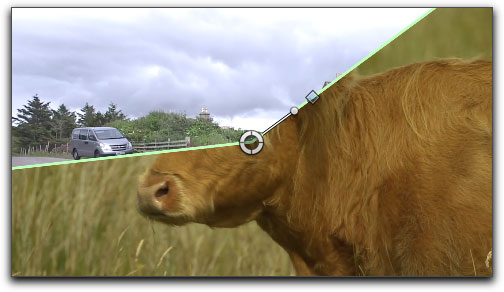
In the Edge Treatment section there is Border (thickness), which is the same as dragging the outer control handle in the Viewer. Next is 'Edge type', offering either a feather or a solid color.
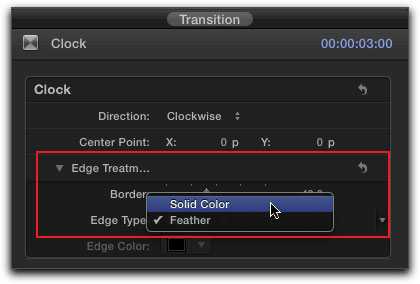
If you choose 'Solid Color' as opposed to feather, the Edge Color section, just beneath, will become active and you can choose an edge color for your wipe. Edge Color is not available when you have 'Feather' selected.
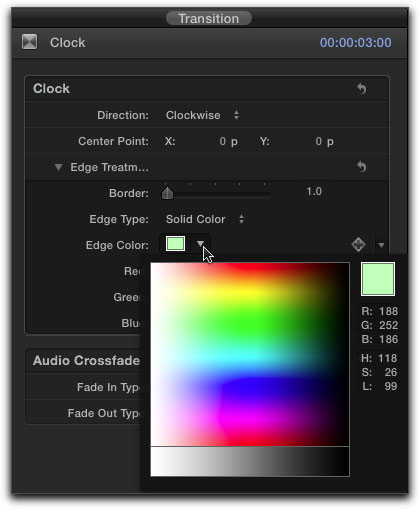
A border with a thickness of one and a light green color is shown below.
Stylized
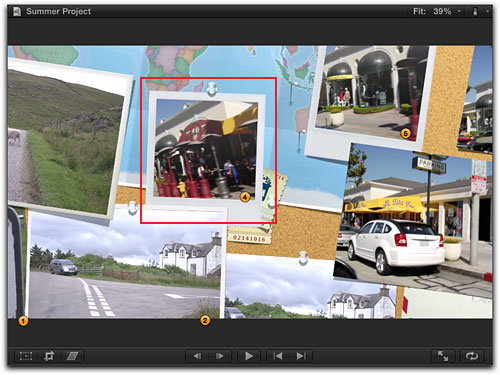
The Stylize section offers some interesting transitions. Several are based on a real world 'Bulletin Board', taking still video frames from both the outgoing and incoming clips and using push-pins to stick the still images onto the cork board. What is interesting about this, is the fact that we can choose which video frames are posted to the Bulletin Board. Below I have applied the 'Pan Far Right' transition on the timeline. The Viewer window shows a number of photographs on the bulletin board, all drawn from the two video clips. You can see that the still images are numbered. This transition pans across the bulletin board as it plays out, so not all number are on screen at the same time.
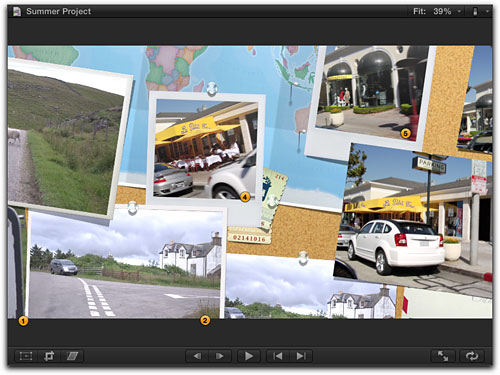
Looking at the timeline you can see that the selected frames for the bulletin board each has a numbered handle associated with it. These numbers correspond to the numbers seen in the Viewer window.
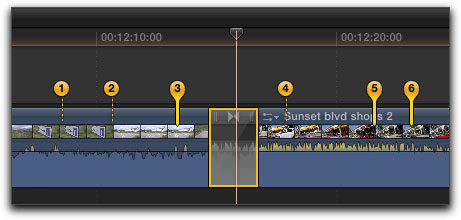
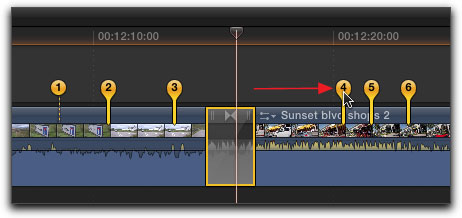
Now, here is the cool part. In the timeline you can click on a number and drag left or right to choose a different video frame for the bulletin board. In this example I have dragged number 4 handle to the right, thus replacing the image in number 4 in the bulletin board. If you look at the numbers you'll notice that some have a broken line underneath. When the line is broken it means that the number is at its default location. When you click on a number and move it to a new location, the broken line will be replaced with a solid line denoting that you have repositioned it.
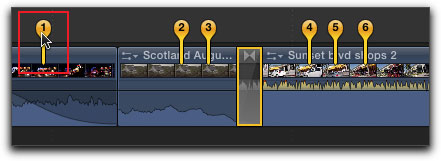
You can click on a number and drag it to a different clip for a different video frame for your transition. Below I have moved the number 1 to the preceding clip.
As you drag the number handle in the timeline, the Viewer will update in real time, displaying the current video frame. The Viewer now shows an updated number 4 in the bulletin board.
Audio Crossfades
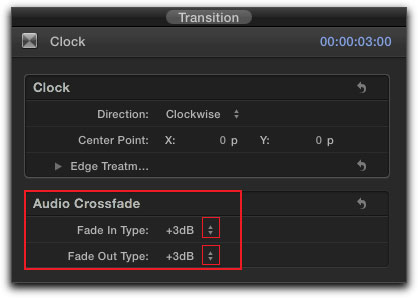
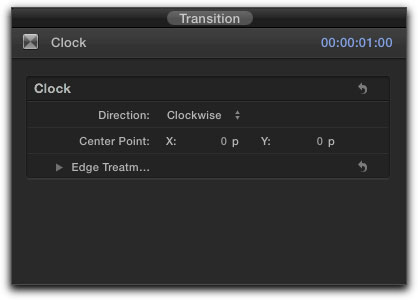
When working with 'Available Media' transitions (using handles), we can apply a transition to the edit point between two clips, and if the clips have attached audio, then Audio Crossfades are applied automatically, to help smooth the audio as it transitions from clip to clip and to keep the volume constant during the transition. When using 'Available Media' for our transitions, the 'Audio Crossfade' parameters are displayed in the Inspector, red box, below left. When using 'Overlap' transitions, no Audio Crossfades are available, as shown below right.
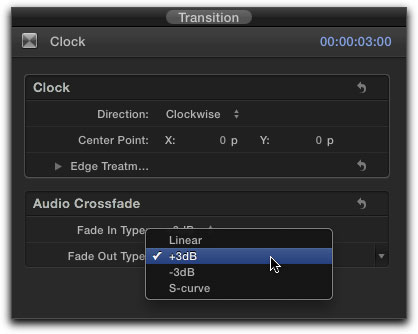
We can also change the type of the Audio Crossfade in the 'Fade In/Out Type' drop-down menus. Apple defines the different types of audio crossfades as;
You may want to experiment with these different options to see which one works best for a particular situation. While not really intuitive, selecting +3dB for both the Fade In and Fade Out type (the default) most often will create the smoothest audio transition between two clips with ambiant sound.Linear: Maintains a constant rate of change over the length of the fade. S-curve: Eases in and out of the fade with the midpoint at 0 dB. +3dB: Starts slowly and then moves quickly toward the end. This is the default setting and is best for maintaining a natural volume when crossfading between two adjacent clips. -3dB: Starts quickly and then slowly tapers off toward the end. This is the most useful setting for quick fades.
Often, the automatically applied Audio Crossfades do the job, but there could be times when the transition of the audio between the two clips just does not sound right. In this case you might be able to improve the audio transition by manually changing the trim of one or both of the audio tracks. Below I have applied a Cross Dissolve transition to two clips in the timeline. These two clips have handles and I'm using 'Available Media' with my transition.

Double click on the audio tracks of both clips to expand the audio tracks.
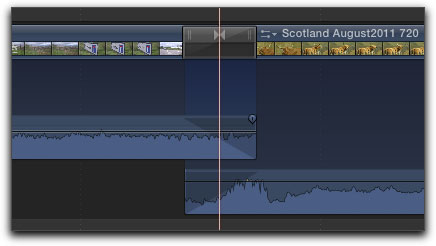
You can see the automatically applied Audio Crossfades on the audio tracks. The Crossfades are denoted by the shaded areas of the audio, red boxes below.
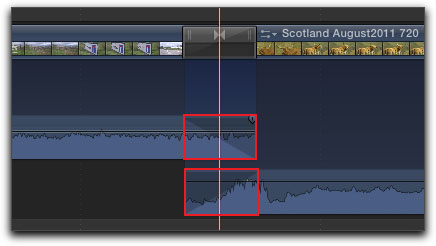
We can trim the end of the outgoing audio or the start of the incoming audio to improve the audio transition.
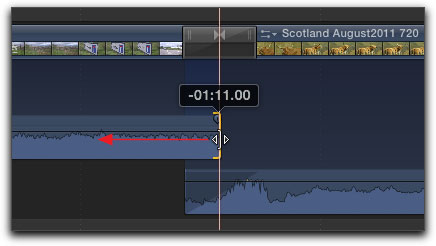
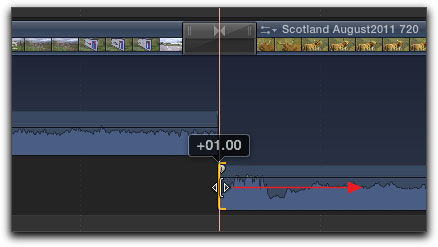
You can place your playhead at a particular location in the timeline and turn 'snapping' on, then drag the end of the audio to the playhead, for an exact trim. While in my example I show the trimming of the audio of both clips to the edit point, you can trim the audio of just one clip or trim to a different position in the timeline.
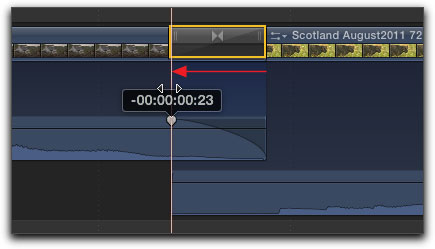
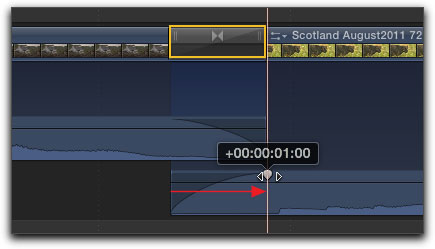
If you are using 'Overlap' then there are no Audio Cross fades applied with the transition. As shown below, there are no shaded areas denoting that an 'Audio Crossfade' is present. If you need to create a fade on one or both of the audio clips, you will have to do it manually. Place your cursor into the waveform of the clip and you'll see the fade handle.
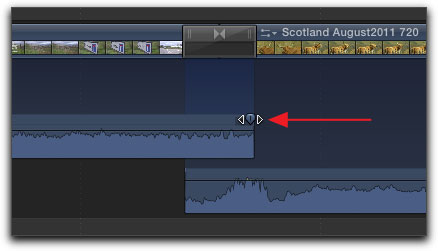
Now drag the fade handle to create a fade duration of your own.
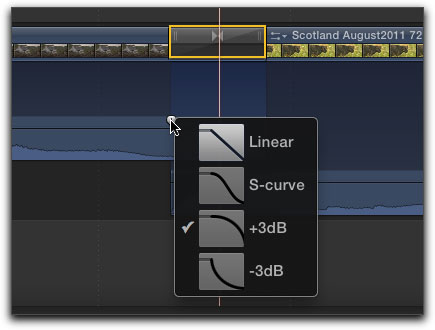
Control or right click on the fade handle to change the type of the audio fade.
Notes
If you have applied a transition and then wish to change the transition to a different one, there is no need to delete the old transition, simply apply the new transition and it will overwrite the old one. FCP will retain the duration of the original transition and apply it to the new transition.
Once you have set the parameters of a transition, you can select the transition and 'Copy'. Then select an edit point elsewhere in the timeline and 'Paste'. This will apply the transition to the new location with the parameters of the first transition.
If you hold down the Option key, you can click on a transition and drag it to a new edit point, with its settings.
To remove a transition, select the transition in the timeline and hit the 'Delete' key on the keyboard. Unlike filter effects, you can not delete a transition from the Inspector window.
Some transition parameters are keyframeable.
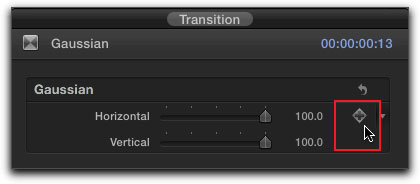
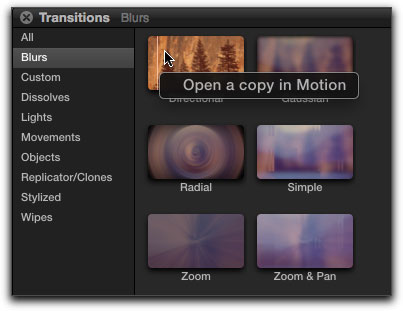
With 90 different transitions to choose from, you might want to take some time and explore what FCP X has to offer. You can build your own transitions in Motion and you can also modify existing transitions. Control or right click on a transition in the Transition Browser and 'Open in Motion'.
Enjoy,
--ken
copyright © www.kenstone.net 2011
are either registered trademarks or trademarks of Apple. Other company and product names may be trademarks of their respective owners.
All screen captures, images, and textual references are the property and trademark of their creators/owners/publishers.