
February 9, 2004
LiveType, SoundTrack and Compressor
Quick Reference Guide
By Darrin Sayewich
With the release of Final Cut Pro 4 came a whole new series of new tools to work with. LiveType Soundtrack and Compressor are the latest and most comprehensive additions to Final Cut Pro since Boris Calligraphy. One might say we are in a state of "software overload." So much to use, so much to learn, and so little time to do it. This quick reference guide to LiveType, Soundtrack and Compressor will hopefully get you through some of the finer points of how to use these tools effectively.
LiveType
LiveType is a text creation and animation tool that comes bundled with Final Cut Pro 4. It allows new editors and seasoned professionals the ability to create high quality, animated titles and graphics that they can import into Final Cut Pro. What, in the past, would take hours to create in complicated motion graphics software can now be created quickly and easily.

- LiveType has four primary windows that can be resized and repositioned like in Final Cut Pro.
- Canvas is a visual representation of your timeline, Inspector is where you select and customize your parameters for fonts, textures, objects and effects, Media Browser allows access to preset Livefonts, textures and motions, and Timeline works the same as Final Cut Pro being a visual representation of the overall program.
- Fonts that you see in the fonts list are fonts that are installed on your system. You can add to the fonts either through the User Fonts Library (USERS>HOME USER>LIBRARY FONTS) or the System Fonts Library (MACINTOSH HD>LIBRARY>FONTS).
- You cannot change the font type in the Livefonts selections.
- If you can't see the name on the track in the Timeline, click on the right of the Timeline Zoom to bring the whole title bar into view.

- If you want to restrict parameters and constrain adjustments when working, to the right or many numerical fields you will find a lock that can lock and unlock adjustment parameters.

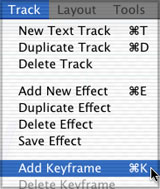
- To add a new text track or keyframe go to the Track pulldown menu or use the command modifier (apple key) with T (track) or K (keyframe).
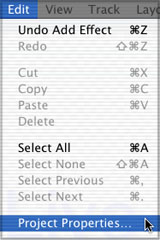
- Project Properties (preferences) are located under the Edit pull down menu. That is the location that you can adjust background colour and aspect ratio.
- To adjust duration of a clip you can change it by moving the cursor over the end of the clip in the Timeline and extend it like you would in Final Cut Pro. Duration can also be changed in the Timing tab of the Inspector window.
- You can adjust the playhead by frame increments by using the left hand arrow keys just as in Final Cut Pro
- The solid blue line in the Canvas window refers to the base line of the track that you create. The nodes on either end of the track can be moved to create an angle or slope. The line can also be "broken" by control clicking on it and selecting adds control point.
- Control points can be smoothed by control clicking on the point and selecting curve in. (Do the reverse to take a curve out)
- Effects can be added to individual letters or tracks and can be
selected or de-selected in the timing tab of the Inspector.

- If you want to remove an effect either: select it in the timeline and hit the delete key or select the effect in the Effects tab in the Inspector and hit the delete key.
- To add Live Fonts, Textures, Objects or Effects simply select the effect and click on the Apply button to apply it to the existing track. In some cases we may have to "Apply to Track" as the selected item either cannot be applied to the existing track or you want to create a new track with the properties of the selected item applied.
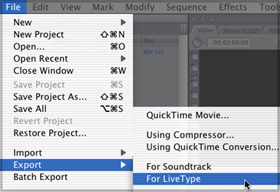
- To create text elements for use in Final Cut Pro you need to export for LiveType.
FILE>EXPORT>FOR LIVETYPE
- To add your Final Cut Pro export file to LiveType go to File>Place Background Movie.

SoundTrack
SoundTrack Audio is often the last item to be addressed in an edit session and many times it becomes a major task for an editor to find good music to add to their sequence. Royalty issues, composer costs offset with the expense and restriction of lengths makes music application difficult. With SoundTrack, it is no longer the incumbent task for the editor to have to find the right music either for treatment or final output, they can create it.
- SoundTrack files take up approximately 5Gb of hard drive space
- Audio files can be one of two types: loops or one-shots. A loop is a repeating musical pattern and a one-shot is a sound effect or some other audio sound that is not based on beats.

- Media Manager has three tabs: File Browser � provides access to your computer files, Favorites � provides access to the location of your favorite files, Search � allows you to search SoundTrack's installed audio libraries.
- The Search Tab in the Media Manager can be organized in various ways to facilitate searched of specific audio items. You can search for a specific sound by instrument, genre, descriptor, keywords or by all collectively.
- When you choose an audio track (click on it) it will automatically start to play. It will continue to play until you hit the stop button at the bottom of the screen or click on another sound file. (Notice each track has an indicator for the tempo, key and beats)

- Use the Add Favorite button to add any sound files you really like to the Favorites tab.

- There is a volume slider to the right of the Stop Play button that you can use to adjust the preview volume of the playback file.

- To add a track to the Timeline simply select a music track from the Media Browser and drop it into the Timeline.

- To add more to the loop that you brought into the Timeline, go to the edge of the loop and drag it right.
- Unlike Final Cut Pro, the playhead will not move to the end of a track when you bring a piece of audio into the Timeline.
- You can replace a track by selecting it and pressing the delete key. The Track Header will remain but it can be changed. Simply apply your new track to the empty spot in the timeline. You can change the name and instrument icon in the Track Header.
- To delete a track completely, control click on an empty space in the Track Header and choose Remove Track from the contextual menu that appears.
- The zoom controller is located at the bottom of the Project Workspace. You can adjust the amount of the Timeline with that tool or the up and down cursor arrow keys on your keyboard.

- To score your edited Final Cut Pro project you need to export for SoundTrack.
FILE>EXPORT>FOR LIVETYPE

- If you want to score a piece of video in SoundTrack, you must apply Scoring Markers in Final Cut Pro. Simply apply a Marker (m) and then choose Add Scoring Marking. To carry those markers to SoundTrack, in the export to soundtrack options make sure Audio Scoring Markers is visible in the Markers pull down menu .


Compressor
Compressor is Apple's multi-pass video encoder based on the Spruce encoding technology that they acquired a few years ago. Compressor gives added flexibility for Final Cut Pro users enabling them to compress their video and audio assets into formats that are compatible for both web and DVD distribution.
- To have compatible files small enough for the web or DVD you will need to export to Compressor. You can do this from within Final Cut Pro (FILE>EXPORT>FOR LIVETYPE) or you can launch Compressor as a stand-alone application and add QuickTime moves to it.

- Make sure that when you do your export from within Final Cut Pro that you have either the Timeline selected or the Sequence in the Browser.
- Batch Window appears at launch of program. If items have been imported from Final Cut Pro You will see the project name in the Source Media column. If you want to bring in additional media or do not want to import from Final Cut Pro, simply drag and drop your QuickTime movies into the empty space in the Batch window.

- It is a good practice to name your Batch. This can prevent accidentally encoding over previously encoded material.
- In the Preset column you can choose how you want to encode. If "All" is chosen every option under the selection will be applied to your asset.

- Multiple-encoding presets can be applied to the same asset.
- More-encoding presets means longer encoding time.
- It is important to make sure that you set your destination for your encode, otherwise it will go to the default source directory which may be your internal hard drive. After you have selected a Preset then you can select a destination for each.

- To set the Destination globally, select the Destinations icon in the Batch window. You can then add new locations to your destination list and set a new default location.
- You can change or add to Presets. Select the Presets icon in the Batch window. You can then add new presets to your Preset list and set a new default location.

- To change the out going filename, double click on the filename under the Output Filename column and type your new name.

- Click on the Submit button in the lower-right corner of the Batch Window to begin encoding.

Having started his career in the Film and Video industry eight years ago,
Darrin Sayewich has had an opportunity to experience many of it's different
facets. He started as a Chyron and graphics operator at a local sports only
television station. From there he moved to several
different production companies working on different jobs as either: P.A.,
camera assist, cable puller, grip and/or gaffer. Darrin moved into POST
production and found his niche in editing and
compositing. Presently Darrin working for an Apple reseller as the head of
their education and training department. He is an Apple certified trainer in
Final Cut Pro, DVD Studio Pro and Shake. Darrin is also actively freelancing
and recently has consulted on a feature film to be released later this year.
Darrin Sayewich lives in Toronto, Canada.
Review copyright © Darrin Sayewich 2004
[Top]
All screen captures, images, and textual references are the property and trademark of their creators/owners/publishers.


![]()


