October 20, 2008
Am I Rendering And Viewing At The Best Quality With FCP?
By Andrew Balis for Moviola

|
Visit the Moviola Resource Center for information on Final Cut Pro, Avid and general information about SD and HD video fundamentals. |
In the following article I'd like to address frequently asked questions about quality in Final Cut Pro- as it relates to rendering, real time effects playback and how and when we control factors that affect rendering quality. Just as important, sometimes it's hard to judge the quality of our work, as where we are viewing the results may be misleading. So we'll also explore where and how to properly judge the quality aspects of a program.
In summary, we'll look at the following:
- How to properly judge the quality of your real-time or rendered video
- Choosing render quality options for video and audio
- How to render video and audio
- When to choose "item level" or "mixdown" rendering options for audio
- How and when to render the specific formats of HDV or XDCAM natively or using the ProRes format
Real-Time Playback And Final Cut Pro
Before we dive into rendering quality options and how to view quality correctly, just a brief overview of real-time playback options for effects and other things that require extra processing, as well as real-time and render indicators in the Timeline and on clips.
Real-time playback refers to playing back more information than just simply accessing your captured media files during playback. Extra processing is involved to "compute" the result of the original media and how it's being affected in a Timeline (i.e. when applying effects). This extra processing is happening on the fly, and can be quite complex for your system to handle. The result is somewhat less than the best quality that we can achieve. So, as we'll cover in this article, although you can play effects in real-time as soon as you apply them, when you render the effects you will get higher quality.
First off, when video requires extra processing, the reasons could be divided into two categories:
- Mixed format editing- when a clip's frame size, compressor, frame rate or other attribute does not match the sequence
- Adding effects to sequence clips
- The audio sample rate does not match the sample rate of the sequence
- Audio effects have been added to the sequence clips
- In addition, there is the possibility that you are playing back more Timeline tracks than you have "allocated" or you have broken the real-time limit of your computer
- You have set audio playback quality too high for the particular sequence
- Audio file format is not native to Final Cut Pro. It is recommended you convert these files into the AIFF or WAV format before working with them in Final Cut
Timeline Indicators
Next is an overview of real-time and render indicators found in the Timeline and how to control just what will and will not play back in real time. If you are familiar with these things, skip on to the next section, "Determining How To View Quality Properly".
In the following screenshot, there are several colored sections in the bar at the top of the Timeline, referred to as the render bar or render status bar. These colors are found above certain clips in the sequence. As you may already be aware, different colors indicate different things. To keep this brief, if any area of the render bar is red, the clips can not be played back in real-time without first rendering. If any other color appears in the Timeline, then the clips can be played back immediately (but should still be rendered before output).
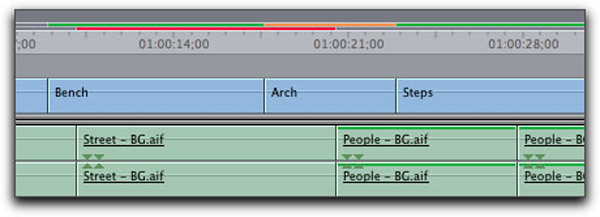
If video has a red bar over it, then we get the familiar blue screen in the Canvas with the word "unrendered" as we attempt to play the Timeline. If an audio clip has a red bar over it, then you will hear repeating beeps as you play that section of the sequence.
The render bar is divided into an upper and lower bar. The upper portion of the bar relates to the status of video items, the lower bar relates to audio.

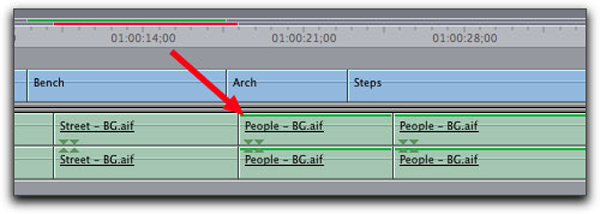
Although for audio, additional information can be found directly on the sequence clip itself. In the following screen shot, two audio clips have a green bar along the tops of the clips. This indicates that the clips have an audio sample rate that does not match the sequence. Although the clips will play in real time, they will not be playing at the best quality. Only once rendered will the clips be properly re-sampled at high quality to the sequence sample rate.
RT Pop-Up Menu
The little button labeled "RT" in the upper left corner of the Timeline controls several aspects of what will and what will not play in real-time.
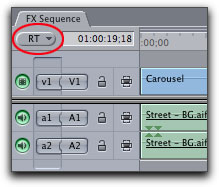
If video requires rendering (red bar over clips), then click into the RT pop-up button and change the top option from Safe RT to Unlimited RT.
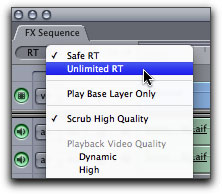
Video clips with the red bar in the video render status bar should change to an orange bar- indicating an "Unlimited RT" effect.

Although the clip will play back, you will probably encounter dropped frames, which may stop playback with a warning. To play back without being warned, turn off the option to warn you of dropped frames in the warning window.
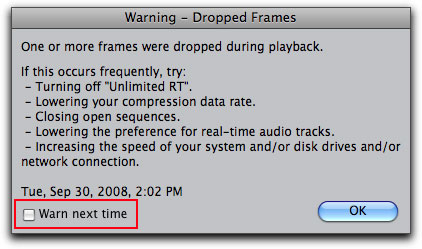
Uncheck the checkbox highlighted above to playback without dropped frame warnings.
Although this allows more effects to be played back, if you composite more video tracks than your system is capable of handling, the render bar will revert back to the red color. At that point, you would have to render to be able to play in real-time.
Determining How To View Quality Properly
No matter how we render effects or conform mixed format timelines, there are factors that can "fool" us into believing the quality is less than what it truly is. As long as we can view properly, we'll be able to better judge the results of our rendering.
The RT Pop-Up Menu And Quality
One of the main reasons for this article was to address quality concerns. When you click into the RT pop-up, as in the following screen shot, if Playback Video Quality is set to less than "High" and Playback Frame Rate is set to less than "Full", then "viewing" quality is impacted in different ways.
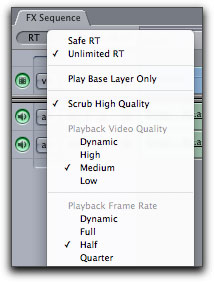
If these RT options are set to less than the best options, all methods of playback will show less than best quality. This includes all video, not just video with effects.
This display at less than best quality will be seen in the following places:
- The Canvas
- Digital Cinema Desktop (full screen computer playback)
- Out through external video (out through FireWire, through a capture card, etc).
Note: The fact that all video played out through external video is affected by the RT pop-up menu options is new to Final Cut Pro 6, to which is article is addressing. Earlier versions of Final Cut Pro affected external video differently- where only un-rendered real-time effects played at less than full quality to external video. Rendered video, or video that matched the sequence with no applied effects played through external video at full quality. This has changed in Final Cut Pro 6, where now all video is affected by the RT menu choices. In my opinion, the new approach is better because it's simpler. The way the RT menu affects playback is universal, so there's no need to remember that different things play in different ways. But hey, this is only my opinion.
RT Settings And "Full" Quality
Some effects are very well optimized, and before rendering they can be displayed at very high quality, very similar to the final rendered video. But unless we choose the best playback options in the Timeline RT pop-up menu, we won't be taking advantage of this higher quality playback.
The following screen shot shows a bright green bar over a clip, indicating it's playing back at the chosen playback settings in the RT pop-up menu.

This is a "preview" quality, and is only an approximation of the final results. In the RT pop-up menu, change Playback Video Quality and Playback Frame Rate to the best settings, shown next ("High" and "Full", respectively).
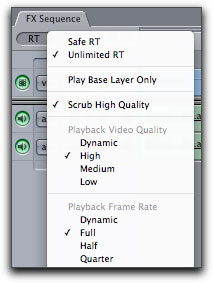
Once this is done, notice that the clip with the bright green bar has change to a dimly colored, olive green bar (I refer to this as the dark green color).

This color is difficult to see, but notice the slight difference between the steel gray of the render bar to the left of the center clip, vs. the subtle dark green of the center clip. This is the one color that denotes a specific quality level, what Final Cut refers to as "Full Quality" for the playback of real-time effects. I personally think Apple made this color subtle and difficult to notice because they don't want you to pay much attention to it. Since it denotes full quality, there shouldn't be anything about it to draw the user's attention to it.
This option, when available, is a great high quality preview. But although it may be close to full quality, there has been a lot of chatter among Final Cut users who point out that once these dark green sections are rendered, they can produce a better quality.
So even though Final Cut calls it Full Quality, you should still render these sections for the best results. Therefore you should render any sections of the Timeline that have any type of colored bar if you want the best output.
By the way, this render bar will not always change to this dark green color, only if your computer is capable of handling this format and the particular applied effects at "Full" quality. For example, depending on a specific computer model, you may be more apt to see the dark green bar more often on a MacPro then with an iMac.
Proper Viewing Conditions
There is only one option for viewing that will show you the true quality of your video- playback out through external video to a broadcast monitor. This output could be through a capture card to a monitor. It could also be an output through FireWire to a deck or camera, which is in turn connected to a monitor.
This is where video was designed to be played. Any other internal computer option will show potential artifacts that would just not be present once the video is displayed on TV (whether broadcast, DVD, etc). So the only way you will be able to judge quality, color correction, titles, graphics, effects compositions and even just raw video that has not been processed with effects is when you route the video out of the computer through external video (options are located in the View menu > Video Playback) out to a true broadcast monitor (even a standard TV will do in a pinch).
Display Issues That Impact Quality
But when viewing in the computer, we may be fooled into thinking there is something wrong with the video, when chances are, everything is fine.
These display "issues" will show up in the Canvas in Final Cut, or when viewing your high quality QuickTime video outputs directly in QuickTime Player.
Viewing The Canvas
When the Canvas window is set to "Fit to Window", the preferred method for playback, then video may appear soft or out of focus, and edges of objects in the frame may appear aliased (jagged). This is simply because of the scaling that is happening in the Canvas, and that the Canvas defaults to only showing one of the two fields for interlaced video.
If you currently don't have an external monitor attached or turned on, you can do a quick check of quality (at least for "sharpness"). In the zoom pop-up button in the Canvas, you will see the current Fit to Window scaling of the video on my screen, as shown next.

In this case, it happens to be 89%. But whatever the Fit to Window size, which is based on the media in question and your computer screen's resolution, there will always be some type of scaling of the Canvas to fit the video into the boundaries of the window, which can reduce viewing clarity.
If you change the Zoom pop-up menu to 100% exactly, then you will notice a potentially dramatic shift in quality. In the next screen shot, the Zoom pop-up is being set to 100%.
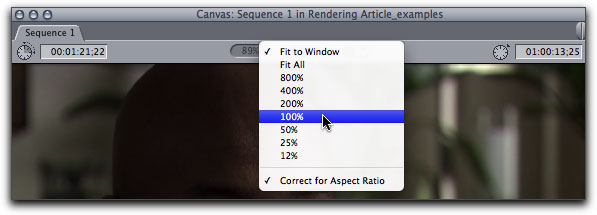
In the next two screen shots, the one on the left is set to Fit to Window, the one on the right to 100%. Although it's not that easy to see the difference here in the article because the images have to be made small to fit here, the image set to 100% is clean, sharp and in focus, and any aliasing artifacts have disappeared.
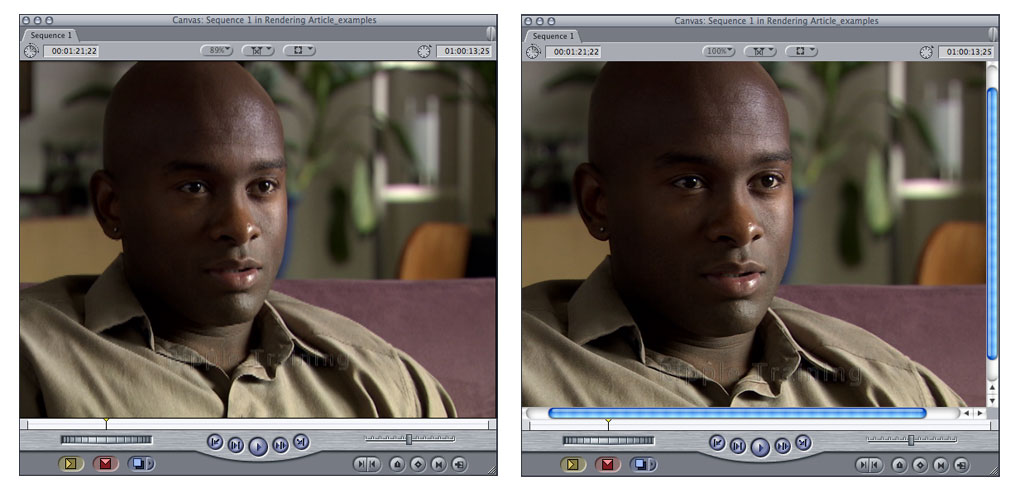
There are two downsides to sizing the Canvas to 100%. When working with interlaced video, you will now be seeing both fields of video, which will look like bad "tearing" of the image (there's nothing wrong, it's just you're displaying the video in a different way than it would display on TV). In addition, there may now be scroll bars in the window, indicating that you are viewing less than the full frame. This is obviously less than ideal as you're not seeing the whole frame, but more importantly whenever you are zoomed in past Fit to Window you increase the chances for dropped frames during playback. So zooming to 100% is a great way to do a quality check, but you'll then want to revert back to Fit to Window for playback (also available from the Zoom pop-up or the key command Shift/Z).
Viewing In QuickTime Player
When you output a full quality QuickTime movie of your program, and then view it in QuickTime Player, you may be horrified at the results. If interlaced video, it will display both fields of video, and it appears there is something "too interlaced" about the video as you see the tearing effect described in the previous section. Interlaced video does not display the way it does on TV. TV will display the video correctly, one field after the other. But QuickTime will display both fields together. Don't consider de-interlacing your video for distribution on any type of TV. This will lower the resolution of the video and it will still be interlaced once it goes out of the computer.
Also, for standard definition video (NTSC), the video will appear stretched. This just has to do with the computer displaying your non-square pixel video on a computer displaying in square pixels.
In addition, you may notice other artifacts as well- like aliasing (jagged edges), banding (stair-step effect from one shade to another), and overly low resolution of standard definition video. Although this is a high quality computer file version of your program, remember it is not designed to be played here.
Rendering Video And Audio
Now that we've covered the proper methods for viewing quality, now let's explore how to render video and audio, and what settings affect the quality of the renders.
Choosing Video Render Quality Settings
With the Timeline window active, or a sequence icon selected in the Browser, go to the Sequence menu > Settings. Next, we'll explore a few different factors that affect the quality of our video renders.
Choosing Bit Depth Processing
In the Sequence Settings window that opens, click on the Video Processing tab.
As we can see in the next screenshot, Final Cut breaks down the different color spaces of our video into RGB or what it refers to as YUV (the proper term is actually Y'CbCr which denotes digital component video).
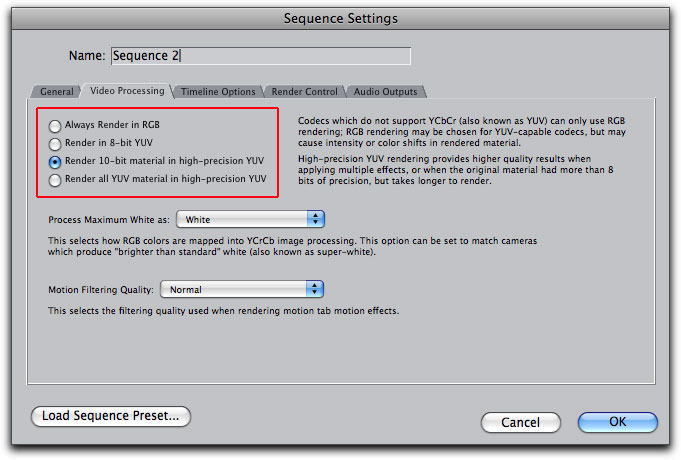
Almost all digital video we work with is Y'CbCr. This includes DV, Digital BETACAM, D5 and HD D5, HDCAM, DVCPRO HD, AVC-Intra, XDCAM, AVCHD and HDV.
For any format that is 8-bit video (like all native formats we work with- DV, DVCPRO 50, DVCPRO HD, HDV, etc), the settings will default to the option shown next "Render in 8-bit YUV".
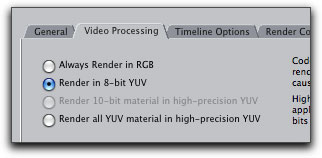
Although the format is 8-bit, and you will still output 8-bit video, you can process your effects internally at 32-bit, also referred to as floating point, which refers to floating point math used to calculate the effects. Although your final output will still be 8-bit, calculating the results in 32-bit may improve the final quality. Floating point rendering preserves fractional data during processing, which reduces "rounding errors".
This is most important when you stack multiple effects. This could come in the form of multiple effects filters applied to a single video clip, but it can also affect multiple clips composited together on several tracks above one another.
Choose the option "Render all YUV material in high-precision YUV" to take advantage of 32-bit floating point processing.
For any format that is 10-bit, the default option will be "Render 10-bit material in high-precision YUV". So for 10-bit material, there is nothing that needs changing for processing in floating point.
Motion Filtering Quality
Notice the section lower down on the Video Processing tab called Motion Filtering Quality. You have three options: Fastest, Normal (the default) and Best. These options affect how effects applied to clips in the Motion tab of the Viewer are processed. So this includes parameters like Scale, Center point, Cropping, Opacity, Aspect Ratio, etc.
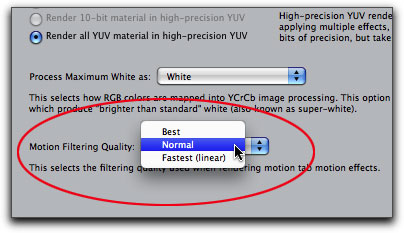
When working in mixed format Timelines, like mixing different frame sizes, or when you apply any effects here like creating split screens, bumping up the Motion Filtering Quality can impact the final result. This is especially important when scaling images above 100%.
There is one major caveat. If you adjust the motion parameter labeled Rotation, then all Motion Filtering Quality will revert to the Fastest option, which is the least quality. This means that even Scale is processed at Fastest, since Rotation is also adjusted.
Render Control Tab
Also in the Sequence Settings is the tab called Render Control, seen next.
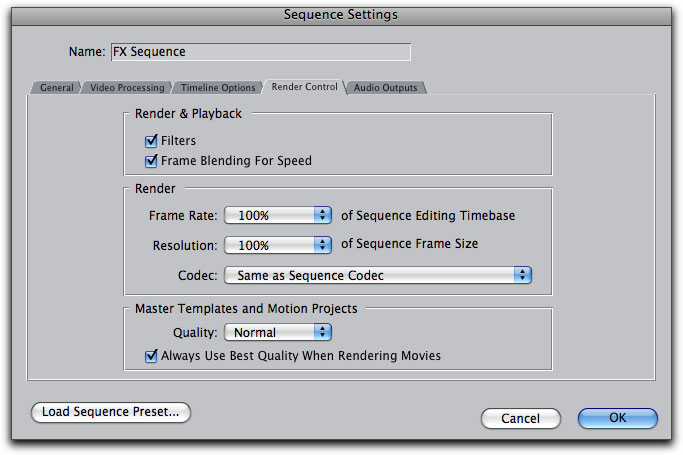
For the most part, you do not want to change any settings here as they make sure you are rendering at the highest resolution and normal frame rate (matching your sequence).
Rendering HDV and Sony XDCAM
Also on the Render Control tab is an option that relates only to working in native HDV or Sony XDCAM sequences. The option is labeled "Codec" and you have the two options shown next.

This option only applies to working with these two formats, and from the amount of questions that users are asking about this, it deserves some attention.
As some of you may know, Apple introduced a new high quality compression format in Final Cut Pro 6 called ProRes (the two variations are ProRes and ProRes HQ). ProRes, according to Apple is, "...indistinguishable from uncompressed HD". And it has started to become widely adopted as an alternative to working in uncompressed.
But it's important to understand that this is not how this format is being used when working in an HDV or XDCAM sequence. This is how it works:
- Setting the Codec to ProRes only affects sections of the sequences requiring rendering
- ProRes rendering is faster than rendering in HDV (or XDCAM) so it's a way to see rendered results quicker.
- When outputting a QuickTime movie or when recording back to an HDV deck or camera, the ProRes renders are discarded and the sequence is rendered/conformed to the same format as the rest of the sequence.
In addition, there is a misconception that rendering an HDV sequence as ProRes will produce better results for your effects since ProRes is such a high quality format. But again, since this option is temporary, only used while working in the sequence and not for output, you will still revert back to the render quality of HDV or XDCAM for final output.
Rendering Embedded Motion Projects
Another option found here in the Render Control tab is labeled "Master Templates and Motion Projects". When you have placed a Motion project in your Final Cut Timeline, whether you chose "Send to Motion...", chose a Master Template from within Final Cut, or imported a Motion project and placed it in a Timeline, this section deals with how the Motion project is rendered. You have a drop down menu offering differing levels of quality. Although Quality defaults to "Normal", you will still render out at the best quality if you check the box which reads "Always Use Best Quality When Rendering Movies".

Choosing Render Defaults
The things we just explored in the Sequence Settings only affect the current sequence. If you wish to change the defaults of render settings for any future sequences that get created, this would have to be done in the User Preferences and/or your Sequence Presets (part of the Audio/Video Settings).
User Preferences
If you go to the Final Cut Pro menu > User Preferences here you will find a Render Control tab that looks similar to the one in the Sequence Settings.
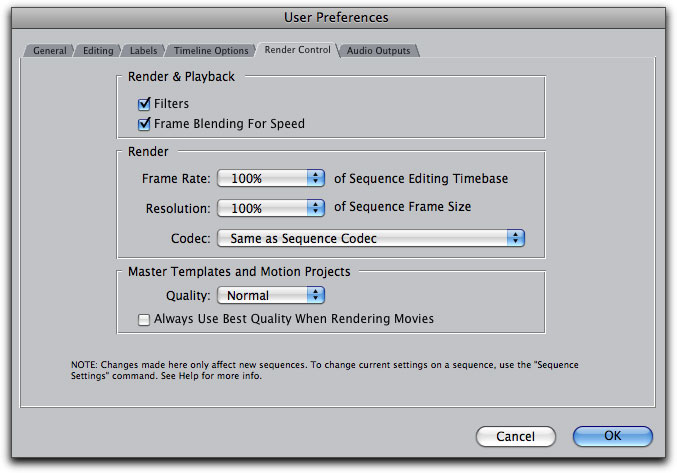
The only difference is that this tab only affects newly created sequences, and has no impact on sequences already created. In this case, notice that the option for "Always Use Best Quality When Rendering Movies" is not checked. If you want all future sequences to always render embedded Motion projects at the best quality, you would want to check this box.
Sequence Presets
The Video Processing tab we saw in the Sequence Settings only affects that one sequence. To change the defaults of newly created sequences, you would alter your Sequence Presets. After choosing an Easy Setup, go to the Final Cut Pro menu > Audio/Video Settings. Then click on the Sequence Presets tab and scroll down the list to find your current preset, which will have a checkmark next to it. Single-click on the setting to highlight it, then click the button labeled Duplicate.
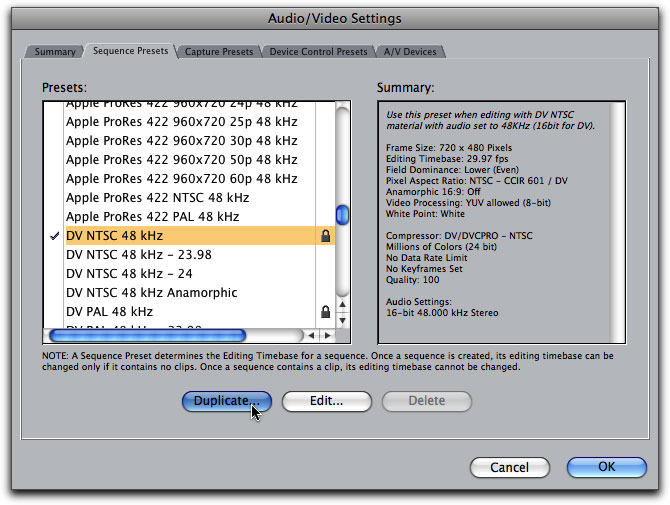
This will open a duplicate of your current sequence preset. Click on the Video Processing tab, which will show the current options for this preset.
Change the defaults as you desire, change the name of the preset and click OK to save this as a new preset. Now, whenever you have this sequence preset selected, anytime you create a new sequence it will use these settings.
Rendering Video
Chances are if you're reading this article you already know how to render video, but let's just cover the basics anyway.
- To render a select section of your sequence, highlight a clip or group of clips, or set an In and Out point in the Sequence for the range to be rendered. Then go to the Sequence menu > Render Selection > Video (or Command/R)
- To render all video in a sequence that requires rendering, go to the Sequence menu > Render All > Video (or Option/R).
Video Rendering Defaults
Just be aware that Final Cut's defaults don't let you render every "color" you'll see in the render bar by default. And you'll probably want to change these defaults to render what you want, when you want.
When you first open Final Cut after installing, or you've trashed Final Cut's preferences, notice how the two render menus will be set as seen in the next screenshots.

In the Render Selection menu, only the red color (Needs Render) has a checkmark next to it, so any other colored render bar in the Timeline won't be rendered when you choose Render Selection.
To be able to render any color in the Timeline, click into the Render Selection menu and click on each of the line items in the menu, one at a time, which will place a checkmark next to them. Then when you choose Render Selection, you will be able to render those Timeline sections.
As for the Render All menu, notice in the previous screenshot that everything is checked except for the option labeled Full, the one with the dark green color. As we mentioned earlier, even "Full" quality real-time effects would benefit from rendering, producing a potentially higher quality once rendered. In that case, it would be a good idea to place a checkmark across from "Full" as well.
Audio, Real-Time And Rendering
There are a couple things to mention about audio: how to get the best real-time performance and how to render audio using the two different options that we're given.
Real-time playback of audio differs from real-time playback of video. When you apply effects to audio clips, or layer multiple tracks of audio in the Timeline, you won't see any colored bars in the Timeline render bar unless you've broken the limit for real-time playback. When that happens, the render bar turns red. But when you get a red bar over a section of audio in the Timeline, it may or may not mean you need to render. The first thing to try is a couple options in the User Preferences.
Go to the Final Cut Pro menu > User Preferences. The two sections highlighted in the next screenshot have to do with real-time performance of audio.
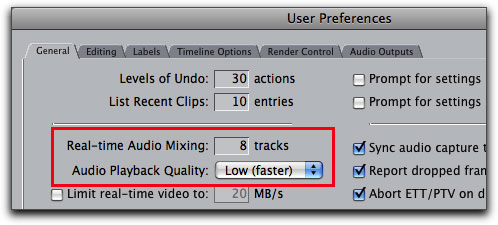
If you have more Timeline tracks than is listed here in Real-time Audio Mixing, then sections of your sequence can turn red. Upping the amount listed here may boost your real-time performance. Although at some point you will break the real-time limit of your particular computer if you have too many tracks.
Another option is the one in the User Preferences labeled Audio Playback Quality which defaults to "Low". This is a good starting point, as it allows you to play more tracks, more effects and audio with a sample rate that doesn't match your sequence. Even if you leave this setting at its default, you can always output audio at the best quality as long you render the audio as a "mixdown" before you output. We'll come back to mixdowns in a moment.
Item Level And Audio Mixdown Rendering
There are two different methods for rendering audio: item level and mixdown. When do you choose one over the other and what's the difference?
Item level rendering allows you to render a clip on its own, creating a render file for only the clip itself, whereas a mixdown is rendering all clips and tracks together into a single render file.
Both types of rendering create high quality results, but they are good for different things. As a general rule of thumb, while you're working and something requires rendering, you'll want to do an item level render. If the sequence is complete and ready for output, then you'll want to do a mixdown.
But why? That question will answer itself as we explore how to render as a mixdown or as item level, as we'll see what happens to the clips and sequence after the rendering takes place. Then we'll be in a better place to decide which form of rendering is better in one situation over another.
Let's take a look at the sample sequence we'll test out the differences between mixdown and item level rendering. In the following sequence, one clip has effects that require rendering before playback (the clip with the red render bar over it). Two audio clips have a green bar at the top of the clips indicating that their audio sample rate doesn't match the sequence sample rate. The audio clip labeled Soundtrack doesn't require any special processing for playback.

Performing a "Mixdown" Render
First off, make sure that you're Timeline is ready for final output. Make sure all leader and trailer elements (like bars and tone) are already in place in your sequence. Make sure you don't still need to shift around any audio clips. Once a mixdown is performed, its somewhat fragile, and if you move your sequence clips, the mixdown render will be permanently discarded by Final Cut and you'll need to mixdown again. Your only chance for recovery of a mixdown is to do an undo back to the point where the mixdown was done.
Next, make sure no clips are selected, and there are no In or Out points in the Timeline (otherwise you'll only mixdown a select section of your sequence). Then, go to the Sequence menu > Render Only > Mixdown (or Command/Option/R).
After the mixdown is complete, you'll see a blue bar (indicating a rendered status) across the whole bottom section of the render status bar, as seen next.

As mentioned earlier, if anything needs changing in the sequence after rendering, this affects the mixdown as it's a combination of all audio tracks together. In the following screenshot, the audio level for the Soundtrack clip is being altered. As a result, the mixdown over this section of the sequence is discarded, and the blue rendered status goes away. We can see now that the one clip that initially required rendering has gone back to an un-rendered state.

Performing Item Level Rendering
Using the same sample sequence, let's say we selected the three clips in the sequence that require special attention, the one clip that requires rendering for playback, and the two clips that don't match the sequence sample rate. In the next screenshot, the three clips are selected first.

Before we render, let's change the defaults for "Render Selection" and item level rendering. Go to the Sequence menu > Render Selection > and click on the option labeled "Item Level" which will place a checkmark next to it.
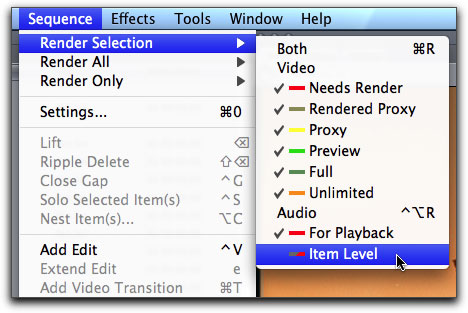
Next, to render, with the clips selected, go to the Sequence menu > Render Selection > Audio (or Command/R).
After rendering, the rendered status does not show up in the render status bar of the Timeline, but instead, notice in the next screenshot that the clips themselves have a blue bar at the top of the clips, indicating they have been rendered at an item level, not as a mixdown.

Even though all three clips were selected together, they each have their own render file, separate from one another. Because of this, affecting any other clip in the sequence will not have any impact on the rendered status of item level rendered clips. So, this time, if the audio level for the Soundtrack clip was changed, these three clips would remain rendered.
So, to put this all in perspective, item level rendering gives us flexibility to still change a variety of things in a sequence while we're still working. On the other hand, a mixdown is a great choice for output since all Timeline tracks are rendered together as a single render file, making it easier on the system to output at high quality without dropping frames.
Managing/Deleting Render Files
Just as important as rendering is to the final quality of our program, it's also important to delete un-needed or outdated render files filling up our hard drives. This is a pretty simple process when done from within Final Cut Pro using the Render Manager.
Go to the Tools menu > Render Manger.
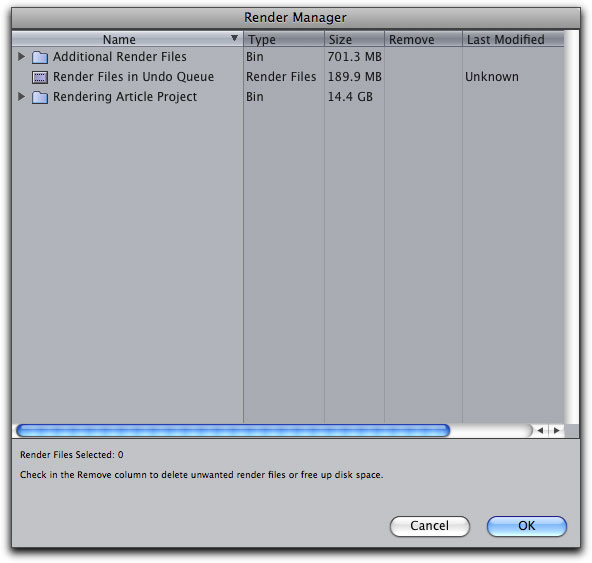
The window that opens allows us to manage the render files of the current project, or any other project we've rendered. We can delete video renders and audio renders separately or together. We can delete render files for one sequence or all sequences in the current project as well as delete renders for all other projects, either selectively or all together.
The current project is listed as its own folder, and all other projects are inside the folder "Additional Render Files".
If you want to delete all renders for the current project, you'd click in the column labeled "Remove" across from the project, which places a checkmark in the Remove column.

If you wanted to delete all renders for a particular sequence in the project, you'd twirl down the arrow next to the project name to reveal the different sequences, and then place a checkmark across from the sequence itself.

You can even delete just certain types of renders by twirling down the arrow next to a particular sequence. You may see up to three different items inside, as seen in the next screenshot.
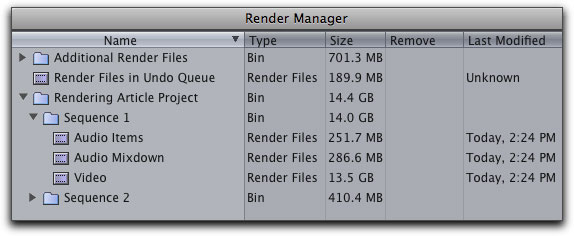
"Audio Items" stands for all item level rendering done in the sequence. Checking this option would clear all item level renders in the sequence, no matter how many renders were done in the sequence. "Audio Mixdown" stands for all mixdown renders done in a sequence and "Video" stands for all video renders in a sequence. There are not options for deleting individual render files, just categories of render files.
In addition to deleting renders for the current project, there is another option in the Render Manager called "Additional Render Files". Similar to what we just explored, you can place a checkmark in the Remove column across from "Additional Render Files" which would delete renders for all other projects rendered in Final Cut. You can also twirl down the arrow next to the folder to see individual projects to delete renders for only select other projects.
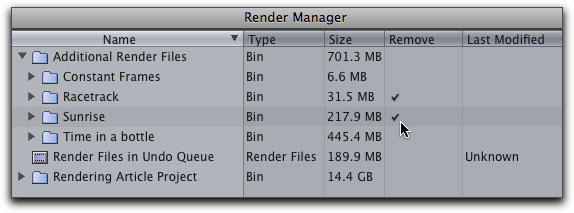
Whatever your choices, once you click OK in the window, you'll likely be prompted by the following warning, which is letting you know that this process also clears any "undo's" that are currently stored in RAM. Once you choose "Yes" the renders files selected will be deleted.

I hope this has helped clear up some of your questions regarding rendering and quality. Now, back to editing...

For more great free info like this, visit the Moviola Resource Center, which is divided into three sections, to help you locate the information that you need.

Final Cut Pro Resources
Workflows, tips, troubleshooting, links to important downloads, news, articles and more.

Avid Resources
Tips and tutorials, links to available plug-ins, late breaking news, user stories and more.

The Moviola Knowledge Zone
All the answers you need about SD and HD video fundamentals, different formats, compression, color spaces and much, much more.
copyright © Andrew Balis 2008
are either registered trademarks or trademarks of Apple. Other company and product names may be trademarks of their respective owners.
All screen captures, images, and textual references are the property and trademark of their creators/owners/publishers.