August 30, 2010
Stardom Storage Solutions
www.raidon-usa.com/
Review by Shane Ross
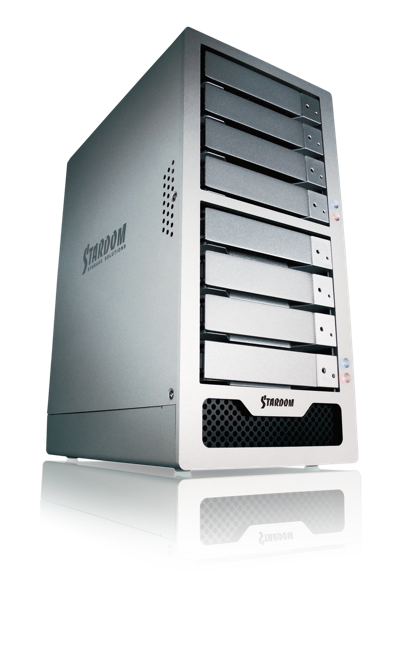
OK, here’s the deal. You want a RAID…a PROTECTED Raid, and you are a do-it-yourself kinda editor…really hands on. There are lot of choices out there for all-in-one solutions, but you, like me, might like to do things yourself. Or, you want to start small and add as you go…but not get too crazy with the cost. I think I found a pretty good solution to that. The SOHOTANK ST8 by RAIDON.
Lets get the technical details out of the way…
The SOHOTANK comes in a couple configurations, eSATA or mini-SAS. The eSATA model, ST8-S2P, works with the SJ20-x8 8 lane 4 port PCIe to eSATA card or any port multiplied eSATA card (including Express34 adapters for laptops). For this option you can only use the drives as JBOD (Just a Bunch of Drives). So they can show up as individual drives, or you can raid them via software using the Disk Utility. This method restricts you to Raid-0 and Raid 1. The mini-SAS option, ST8-U5, requires a third-party mini-SAS card, so for that you’ll need to get the ATTO R380.
The unit I tested had the Mini-SAS connection and was populated with eight 1TB drives for a total of 8TB (which works out to be 6.37TB RAID-5), and connected via mini-SAS via the R380. This configuration may sound pricy, but it is cheaper than you think…more on pricing at the end.
You can populate the unit as you go…start out with say four 1TB drives and set them up as a RAID 5. Or as a RAID 0…or RAID 1…or JBOD…whatever you want. For this you used the ATTO Raid software, and the interface was pretty straight forward, not too difficult to figure out. The unit did come already formatted and set up as a RAID 5, but I did it again, to see how difficult it was (it wasn’t), and to see how long it took to build the raid. It took just over two hours.
NUMBERS
Now the numbers. But fair warning…these numbers are wrong. Well, not wrong, but not as good as they could be. I’ll explain that in a bit.
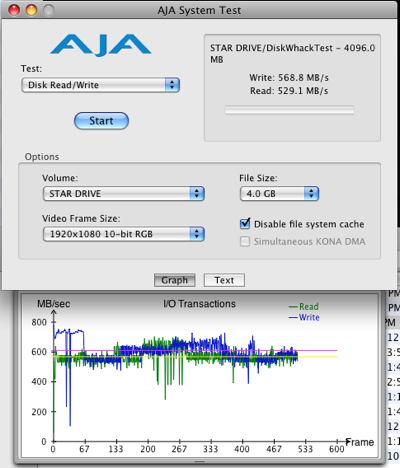
EMPTY: I got 569 WRITE, and 529 READ. Now, this seemed to be a bit lower than I was told this would run. I did contact the RAIDON guys and told them this, and they were working on getting me an answer when I filled up the unit to 25% and tested again.
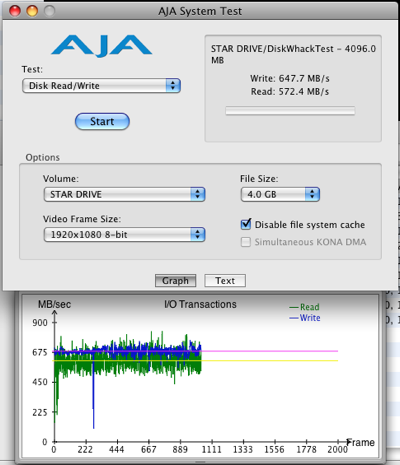
25% FULL: 648 WRITE and 572 READ. Wait…what? The numbers IMPROVED? Well, now they were in the range I was told to expect. Odd that empty it was so low. I asked Raidon why the numbers would do this. They checked with ATTO. More on the reply later. OK, adding more footage.
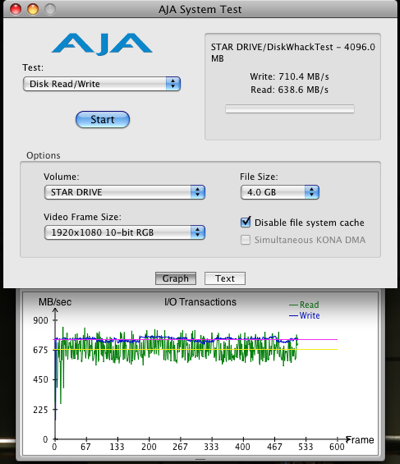
60% FULL: Just past half-full I got 710 READ and 687 WRITE. The speed is still increasing? This goes contrary to all the stuff I have learned about hard drives. They are supposed to get slower the more you fill them up.
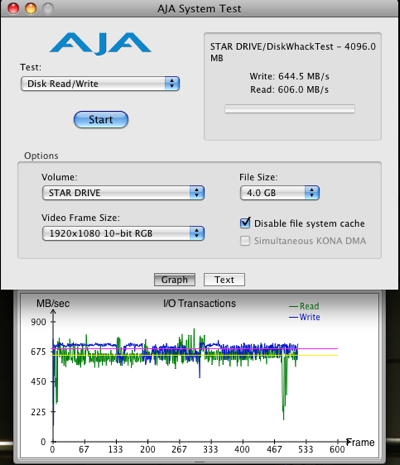
88% FULL: Pretty much the fullest people recommend to have drives…I got 644 READ and 606 WRITE. Now the numbers went down…but still hover in the range I got with 25%. So this seems to be the average speed. Darn fast too. But, I wanted to push things a bit. While it is recommended to stay around 80% – 85% empty, in the real world, we tend to fill the drives up a tad more. Let’s go to 95%.
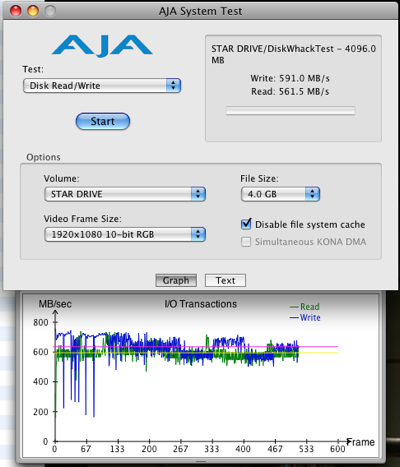
95% FULL: I filled this sucker to 95% capacity. What did I see? 591 READ and 561 WRITE. Dang…still blazing fast. Barely a dip. I didn’t want to push it much past that. That’s my limit.
Those are pretty good numbers. More speed that I’ll ever need really. With ProRes and DNxHD, you don’t need really fast speeds. Unless you like to layer your footage rather deep, or you work with RED or other 2K footage. But as I said, those were my initial numbers. The ones I got by using the default settings in the ATTO software. When I checked with Raidon and ATTO, just to verify that my numbers were what they expected, they said “those aren’t quite high enough.” And they gave me instructions on how to format the unit using the ATTO software. Here are those instructions:
- Build a RAID 5 group with a 256k interleave size
- Once the group is built, right click and choose “Properties”
- Enable “Speed Read” (change from auto to always)
- Change “Prefetch” = 3
- Test AJA using 2048 x 1556 10-bit RGB (Disk Read + Write Test)
Now, these settings were specific to the application and specific configuration used.
If using these settings under different configurations, results may vary. After having made these changes, I ran the tests again. And sure enough, I got far better numbers.
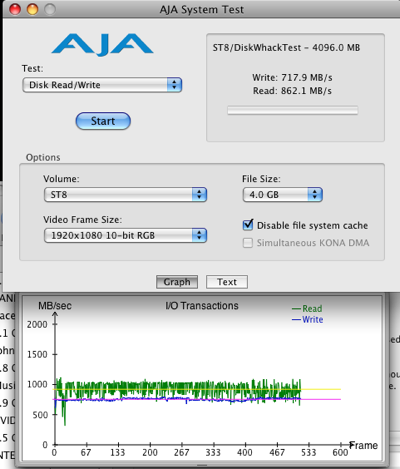
EMPTY: 718 Write, 862 Read. Nice, but an empty RAID is of use to no one.
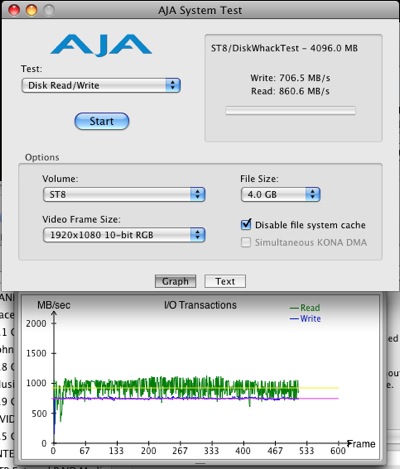
25% full: 706 Write, 860 Read. 860! That’s pretty impressive.
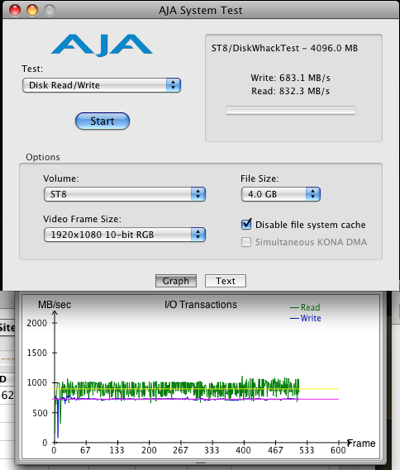
50% FULL: 683 Write, 832 Read. Half full and still above 800 Read.
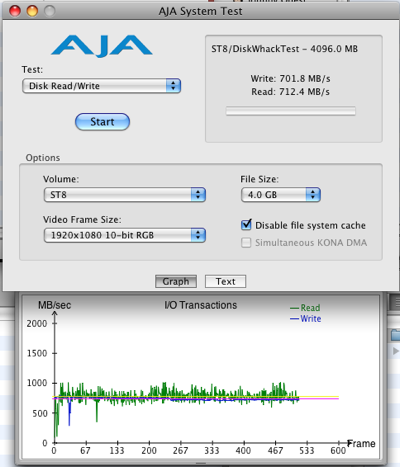
85% FULL: At the sweet spot…the fullest we are told to keep RAID units, 701 Write and 712 Read. Still way up there.
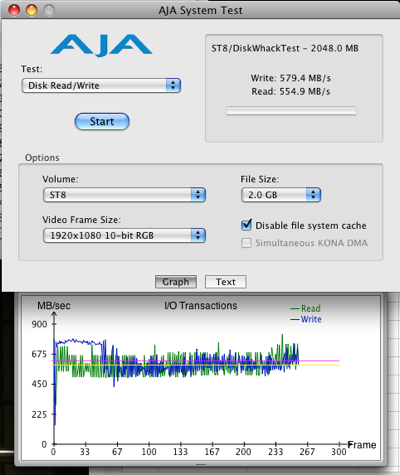
95% FULL: Again, I go to 95%. This, realistically, is about as full as I fill these things when I work on some gigs. I jam them full. This full I got 579 Write and 554 Read. Still very very good for the footage that I work with.
But lets look at the really high end stuff. The footage that can most benefit from these really high speeds. For these tests I stayed at the sweet spot, 85% full.
First, RED. I encoded some footage as ProRes 4444 2K…for the really high quality finish. And then I encoded some footage Redcode Native 4K. With the ProRes 444, I was able to get 7 streams streams to play back smoothly…when I hit the 8th video layer things started to stutter…not play back smooth. I didn’t start dropping frames until I hit 10 layer. So 10 streams of realtime playback at ProRes 4444, 2K. When I did Red Raw at 4K, I was able to get 3 streams to play smooth, and the 4th started stuttering. Five caused dropped frames. So 5 streams of Red 4K. Nice. I ran the tests again at 50%…the hig high speeds. 11 streams of playback of ProRes 4444, and still 5 of native 4K.
Now onto the formats I deal with most…1080i and 1080p ProRes and ProRes HQ.
I was able to get 8 streams of ProRes HQ to play smoothly. As soon as I hit 9 streams, playback stuttered, but didn’t drop frames. This seems to be a limitation of FCP smooth playback, as I got this with ProRes HQ 2K as well. I went to 24 streams before I finally hit a dropped frame. More streams than I can imagine myself using. At 50%, I was able to get 25 streams of realtime playback.
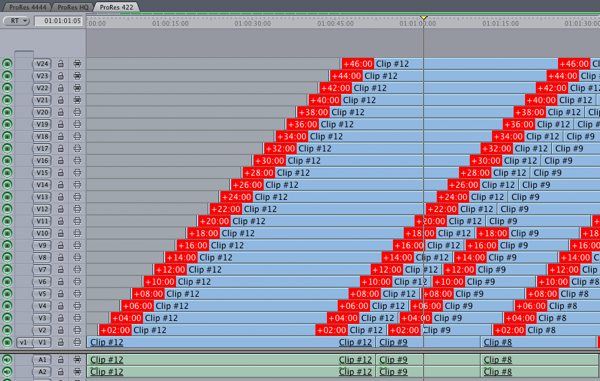
I also tested plain vanilla ProRes 422 and got the same results for 8 streams of smooth playback. But I was able to get up to 30 streams of playback before dropped frames started happening. At 50% I got up to 32 streams. (The picture only shows 24 streams. But I thought it impressive enough an illustration.)
On the Avid side, The highest I could go was DNxHD 220…and the unit played back 10 streams of that before stutter. And 24 before Media Composer cried foul.
ACTUAL USE
I edited a project on the unit, regular ProRes 422, for a week. No issues. No dropped frames. And it was darn quiet. Small too…a smaller footprint than the CalDigit HD One.
Let’s see…how else did I abuse this unit. At one point I simulated a drive failure by yanking out a drive. Did the unit stop? Did my video stop? Dropped frames warning? Unit disappear from the desktop? Nope, nope and nope. All I saw was that in the ATTO interface, the unit went from eight drives to seven.
And you know what was cool? I slid the drive back in and the ATTO interface then had it reappear…as if it just left for a moment and came back. As if nothing had happened. No rebuild of the RAID. The reason it was that easy is that the ATTO software looks at MetaData on the RAID header to determine its timestamps and whether or not the drive is OK to be placed back into the group. If it is, then it just goes back in. If not, then the drive will have to be reformatted and the RAID rebuilt.
I wanted to make it appear as though the drive was damaged. REALLY damaged. So, I pulled it out. Connected it to my MacBook Pro via a SATA to USB adapter, and reformatted it. When the drive was placed back in I saw it marked as “Degraded” which caused the RAID group to be marked as Degraded. I added the drive to the RAID and the software took just over two hours to rebuild the RAID with the new drive. Slick.
In the case of a real drive failure, you would have two options:
1.) Clean the RAID data off the drive previously pulled (erase and reformat) and rebuild it.
2.) Replace this drive with a clean new one and rebuild.
In the case of a drive failure, I would highly recommend getting a new drive. The old one failed for a reason…so it won’t be trustworthy. ATTO Technology does have auto-rebuild options which will be used if the drive pulled was replaced with a new/clean drive.
How else did I abuse it? How about keeping it in my home office (aka, garage) and running those 30 streams of video day and night for four days? And how about knowing that one day, while we were in the middle of a hot streak here in the Valley (in Los Angeles), and that my garage got up to a toasty 102 degrees? And that I left the unit running (ONLY the unit…I powered down my system, I’m not stupid) for 3 days during that streak? I’m sure the RAIDON guys might not like to hear that I abused it like that, but that tells you something. It works in pretty hot temps for a while…if you need it to.
What I really like about this unit was the flexibility it offers. You can do two RAID-5 setups…four drives in each RAID. So you can start with one, then add the other. Or, you can do a seven drive Raid-5, and one as a single drive. Or two as Raid-1, and six as Raid-5, or all as individual drives. And you can buy your own drives. Forget being tied to only the drives the RAID manufacturer wants you to have. You can get what you want, when you want.
I’m not saying that single vendor solutions are bad. No, they are darn good for many reasons, especially for people who aren’t too technical and just want something that they can install simply and that will work. But there are many people out there that like getting all the separate pieces and assembling the unit themselves. Populating the RAID with drives that they buy. For that, this unit is a pretty good solution.
PRICING…
You can buy the unit empty for $690 at places like Otherworldcomputing.com. This will get you the chassis only, no drives, no RAID card for the computer. The ATTO R380 runs about $1050 MSRP. Buy your own 2TB drives for about $140 each…$1120… and you will have a 16TB unit for about $2860. Or if you want a unit populated with drives and bundled with the ATTO mini-SAS card, you can find it for $2999 – $3999, and this will include support for the entire package, which you might find worth it. Compare that to other solutions that run from $7200-$8600 for the same storage and similar connection type. Darn good if you ask me. And I need lots of storage lately. I often have six projects that are off and on and spread about on…well…too many drives. Having one unit with everything, and a protected RAID at that, is much more desirable.
The units can be purchased unpopulated from:
www.powermax.com
www.timelinedigitalinc.com
www.createmore.com
www.transintl.com
www.mbs-direct.com
www.carbonsp.com in Canada.
(The test unit I received was returned at the conclusion of testing.)
copyright © Shane Ross 2010
 Shane Ross is a freelance editor who lives and works in Los Angeles. He mainly works on documentaries for The Discovery Channel, The History Channel and National Geographic, but has been known to stray into MTV or Nickelodeon territory from time to time. When he isn't editing, or writing reviews, or spending time with the family, he is on one of several forums, helping out people with their FCP and Avid issues. And trying to hang out in Venice Beach as often as he can.
This article first appeared on Little Frog in High Def and is reprinted here with permission.
All screen captures and textual references are the property and trademark of their creators/owners/publishers.
are either registered trademarks or trademarks of Apple. Other company and product names may be trademarks of their respective owners.
All screen captures, images, and textual references are the property and trademark of their creators/owners/publishers.