February 25, 2002
Understanding 16:9 in Final Cut Pro
By Kevin Monahan
These days, just about everyone wants to experiment with video that appears more film like. One of the distinguishing "looks" of film is its widescreen aspect ratio. Can Final Cut editors deal with video shot in a widescreen format from a standard DV Camcorder? Of course! In fact, this article focuses on using common camcorders to do this. Let's now examine some of the eccentricities of 16:9 acquired video, so we can learn to shoot and edit with it successfully.
What is Aspect Ratio?
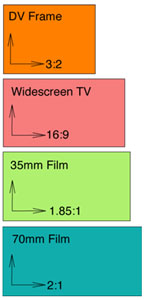
A typical frame of DV video is 720 pixels wide and 480 tall giving it an aspect ratio of 3:2. This width to height "ratio" refers to that of a standard frame of film or video. The aspect ratios of DV (3:2), standard NTSC (4:3), are "less wide" than that of a widescreen ratio.
What is 16:9?
With widescreen television, like that of HDTV, the aspect ratio is roughly 16 parts wide by 9 parts high allowing for a totally different approach to framing and viewing the shot. The aspect ratio of a widescreen frame is what is referred to as 16:9.
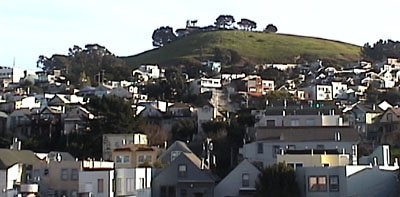
SF's "Bernal Heights":
Widescreen Aspect Ratio as seen in the Canvas and the Viewer
People respond well to 16:9 Widescreen Television viewing
Watching video in 16:9, lends to a more engaging and enjoyable cinematic experience for the viewer, evoking a feeling very similar to experience to film. Presently, just about every DV Camcorder has the option to shoot in a 16:9 frame size, so many are taking the plunge and shooting their projects in the 16:9 ratio to give more impact to their story. A 4:3 ratio seems less "film like" in the overall viewing experience for most folks.
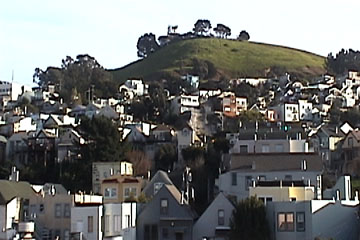
Image Anamorphically Squeezed into a 3:2 Aspect Ratio
OR
How it REALLY looks on your tape and your Consumer TV
What is Anamorphic Video?
Anamorphic Video is 16:9 video acquired by recording on to a 3:2 720 x 480 frame. It is important to know for both those that shoot and edit 16:9 with standard DV is that the recorded DV 16:9 video frame is still only 720 x 480 pixels. It is actually a bit of trickery! When you shoot 16:9, what your DV Camcorder is really doing is recording the 16:9 frame to a 720 x 480 frame.
Why Does Anamorphic Video looked Squished on my NTSC Monitor?
It's supposed to look like that! Although it seems like it shouldn't, think about what is really going on with the frame. While monitoring NTSC video output from Final Cut Pro, we are viewing only what is coming out of Firewire. Recall that the 16:9 anamorphic effect was created when a widescreen 16:9 frame was forced into the same space as normal frame. This information shows up in the monitor with a horizontally squeezed distortion because that is exactly what was recorded on the original 720 x 480 frame,
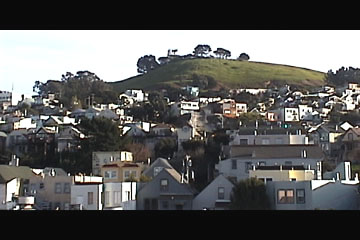
A 16:9 Letterbox image as viewed on a Pro Monitor or in many Camcorder's Viewfinders
OR what it will look like on a Consumer TV after you distort and render
your entire Nested Sequence to adjust for the offset
Can I view Anamorphic Video in 16:9 on my NTSC Monitor?
Typically, it is not possible to view Anamorphic Video on a standard NTSC Television monitor. However, with more expensive, professional NTSC monitors (and in the future, with Consumer Widescreen Television sets, which are now available in Japan) there is a 16:9 feature that will resize the Anamorphic frame on the fly, lending it the proper dimensions of the widescreen format. For Example, with my Sony PVM-20M2U, I have such a button so I can see my 16:9 footage as I edit. If you deal with a lot of 16:9 footage, it might be advisable to purchase such a monitor.
How Can I View My Footage in 16:9 on my Standard NTSC Monitor?
The only way to actually view 16:9 footage on a regular NTSC Television is to "letterbox" or distort it. It is advisable to:
Before you get started, it's a good idea to duplicate
your sequence before doing any major changes to it,
like distorting it for letterbox viewing. To do this:
1. Select the sequence icon in the Browser
2. Edit>Duplicate or Option + D
Cut your show first, then before Outputting to tape, you must Nest and Distort your Sequence before Rendering. There are two techniques to distort your 16:9 sequence
for letterbox viewing on a standard TV set. Choose
which ever method that suits you.
Nesting Options : choose either method
Method One : Make a standard 3:2 Sequence by first
a. Changing your Sequence Presets back to 3:2 then creating a new Sequence
b. Edit your 16:9 Sequence (Your Show) into the new 3:2 Sequence (this is called Nesting). Do this by:
i . Clicking and dragging your Show's Sequence Icon from the Browser onto the Overwrite Radio Button or the Overwrite Canvas Overlay into the Timeline. OR
ii . Drag the 16:9 Sequence Icon directly into the 3:2 Timeline
c. Render : your Sequence (Option + R)
Method Two : You can also change your Current 16:9 Sequence into a 3:2 Sequence by unchecking the Anamorphic 16:9 check box in Current Sequence Settings (Apple + Zero) then:
a. Click on the timeline>Select All. Choose Sequence
Menu>Nest Items or Option + C.
b. Make sure it is a NTSC 3:2 Sequence in the Nest Items Dialog pull down menu.
c. Distort: Now your Nested
Sequence will be on your Timeline. You'll need to
distort the aspect ratio:
i. First, you'll need to load your Nest into the Viewer:
1. Option + Double click on the Nest in the Timeline to reload it into the Viewer. OR
2. Select the Sequence and hit enter
ii. Distort your Sequence
1. Start by going to the motion tab of the 3:2 Sequence. Then you go to the Motion Tab's Distort Property
2. Twirl down the Distort Property
3. Check Aspect Ratio and change it to -33.3%
d. Render: your Sequence (Option + R)
Note that the Sequence now is letterboxed on your standard television set.
It should play back in widescreen at this point. This happened because your formerly stretched Sequence is now distorted by -33.3%, "correcting" the captured footage.
Don't Degrade the 16:9 Footage
 The trick discussed above should only really be used for final delivery to viewers using standard NTSC Television monitors. While editing, dubbing DV tape clones, or when making footage specifically for widescreen capable monitors, don't distort the footage as you will only be degrading it by having to render the new aspect ratio as is mentioned in the above example. Additional renders, no doubt, degrade the footage as well.
Why 16:9? Because it looks cool!
The main reason folks shoot 16:9 is because it looks cool, right? As we have already discussed, 16:9 has more of a film "look" to it and that is what a lot of producers (or you) would want. A wider screen also allows videographers to compose their shots differently with things with the frame's added room.
Another reason for shooting in 16:9 is to prepare the footage for Tape to Film Transfer. If one shoots the project in standard DV with the intention of transferring the video to film, then they will have to crop out a significant amount of pixels to achieve the standard in film aspect ratio, which is 1.85:1 for 35mm film. Therefore, those shooting in 16:9 will be able to make higher resolution transfers by not having to crop out as many pixels as those who shoot in 3:2 DV frame size.
Personally, I like to make video composites in 16:9. Like the videographer, I can frame my "art" in a whole new way. With 16:9, I have more freedom to spread out my composite.
How do I shoot 16:9?
The most common and easiest way of shooting 16:9 is to put your DV camcorder into widescreen mode and shoot away. A higher quality of shooting in 16:9 would be attaching an anamorphic lens adaptor to your camcorder.

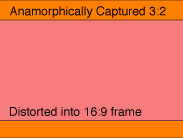
Fewer Pixels means Lower Image Quality,
orange area indicates lines of video that are lost
Should I shoot with an Anamorphic Lens or should I use my DV Camcorder's 16:9 setting?
It should be noted that shooting in your DV camcorder's 16:9 widescreen mode is the lowest quality method in acquiring widescreen video. This is because the camcorder crops the bottom and top of the frame then "stretches" the widescreen aspect ratio (about 25% and 360 lines) onto 480 lines, anamorphically distorting the image before recording it to tape. This results in fewer pixels, therefore reducing resolution, when the image is recorded back to tape. The convenience and compromised quality of being able to shoot 16:9 in camera should be weighed against the higher quality method of acquiring 16:9 with an anamorphic lens attached to the camera.
If image quality is your concern, a better way to shoot 16:9 is to do so optically with an anamorphic lens attached to the camera. With an anamorphic lens, every pixel comes into the camcorder as nothing is cropped or distorted by the DV camcorder's anamorphic setting, so the quality is better from the get-go. The lens will do an optical distortion, sending the full resolution of the 16:9 image to the CCDs (color pick up chip or chips) before it is recorded to tape.
The only format that truly uses the full potential of the16:9 frame is HDTV is because it is the native frame resolution of widescreen and there is no distortion going on. There are a number of frame sizes for HDTV, as the battle for international broadcast standards continues. Stay tuned.
What is the Future of 16:9?
No matter how you acquire widescreen video, those that are producing videos with an eye to the future should also shoot in 16:9. It won't be too many years from now when all shows will be shown in widescreen format. This will be primarily due to the coming broadcast standard of HDTV, which carries the 16:9 frame size.
One other reason for shooting in 16:9 comes to mind. Many foreign markets are already looking for programming available for widescreen. During my recent visit to Japan, last October, I noticed that there are widescreen, consumer TVs in many homes, so already a great variety of widescreen programming is available for that market. Even American broadcasters are now providing widescreen footage for this "widescreen market" in providing footage for sporting events such as, the MLB playoffs (Go Ichiro!). For widescreen and HDTV programming in foreign markets, the future is now, and the future is 16:9.
How does FCP handle 16:9?
No matter how you acquire the 16:9 video, the way you treat it within Final Cut Pro is the same. Since version 1.2.5, Final Cut Pro has had the ability to show anamorphically captured material at the proper 16:9 aspect on the computer display without having to render it. Fortunately, in 16:9 Sequences, transitions are not distorted, and all geometry settings within Final Cut Pro respect the 16:9 aspect ratio, creating fewer problems for the editor.
In displaying 16:9, Final Cut Pro will show the full widescreen frame, both in the Viewer and the Canvas on the computer monitor. However, recall that the display on a standard NTSC "consumer" monitor will likely be distorted. Viewing the computer monitor(s), if you set the drop down menus in your Viewer and Canvas to: "Show as Sq. Pixels" the widescreen image will display 16:9 properly.
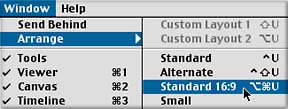
You can also put your windows into "16:9 Mode" using the window menu.


One of the cool things about the 16:9 window mode is that there is no wasted space around the edges of the Canvas and the Viewer providing more space for Timeline layers.
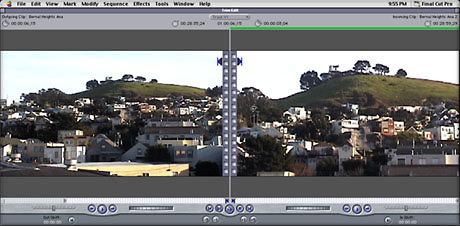
The Trim Edit Window also functions in 16:9 mode as well.

Capturing 16:9 in FCP
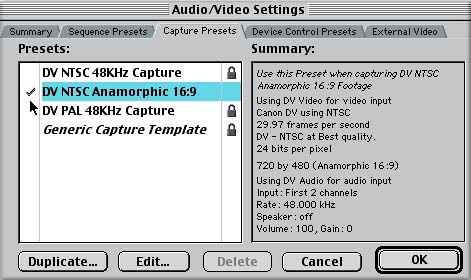
It's not hard to capture 16:9 Anamorphic video into Final Cut Pro. Doing so successfully requires you to manage your Audio-Video settings properly, namely the Capture Presets and Sequence Presets.
While shooting 16:9 Anamorphic, for most camcorders, a "flag" is embedded into the DV Stream information of your tape. To recognize this "flag" and to properly capture 16:9 footage into Final Cut Pro, it is absolutely necessary to:
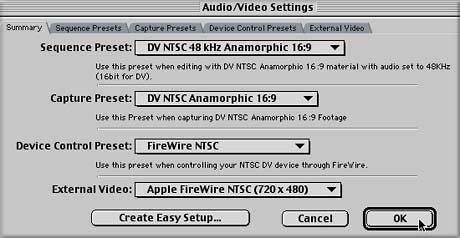
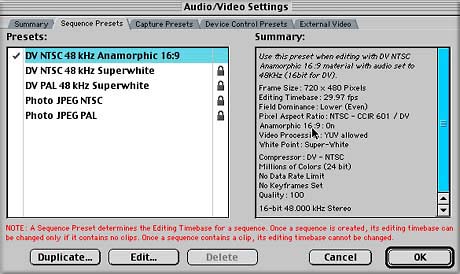
Change your Capture and Sequence Presets in your Audio-Video Settings to accept Anamorphic 16:9 Clips:
1. Go to your Edit Menu>Audio Video Settings Dialog.
2. OR locate it in the Final Cut Pro Menu if running FCP in OSX.
a . Click on the Summary Tab if it isn't already out in front
b . Change the Capture and Sequence Presets to appropriate16:9 settings
c . Then click OK.

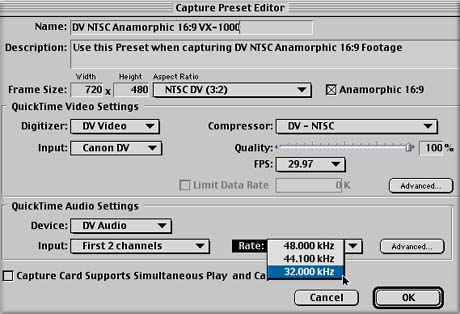
For some reason, if you don't have a 16:9 Capture or Sequence Preset or you have a need for an alternate 16:9 setting. For example, maybe you needed a 32Khz Audio Sample Rate because you shot your piece with a Sony VX1000. So, if you need an alternate setting, the protocol is to make one from a duplicate of one of your current settings.

1. Go to your Audio-Video Settings Dialog
2. Click on Capture Presets Select the Anamorphic 16:9 Setting
3. If an Anamorphic 16:9 Preset is not available, Click on a standard DV NTSC Sequence Preset
4. Click on the Duplicate Button After the duplicate Capture Preset Tab is open, you just need to make sure that the box is checked for " Anamorphic 16:9"
5. Make the only other change that could be made, that is, changing that audio to 32Khz for your VX-1000. Leave it at 48 kHz for all other cameras

6. Name the new Preset something pertinent to the change you made, e.g. "16:9-32Khz Audio-VX-1000."
7. Click OK. The Capture Preset Box closes.
8. You have the choice to have these new Settings as your Default Preset in your Capture Presets Dialog. Click next to the desired Preset if you plan to continue to use this custom Anamorphic 16:9 set up.
9. Click OK, then the Capture Presets Dialog will close
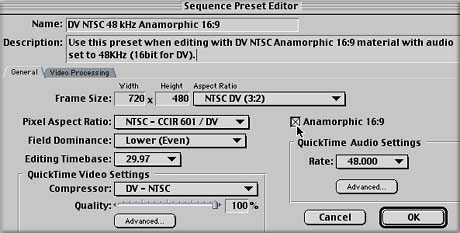
10. Repeat these steps for the Sequence Presets

Following the same logic as setting up your Capture Preset, you could easily make an Anamorphic 16:9 Sequence Preset by duplicating your regular DV NTSC 48 kHz Preset and when the Sequence Preset Dialog Box comes up, just make sure that you have the Anamorphic 16:9 box checked, name the Preset something accordingly then click OK. You're done! However, if you did have that VX-1000 around, you should make a special Sequence Preset with 32 kHz Audio, as was explained above when we were configuring the Anamorphic 16:9 Capture Presets.

How do I set my Capture Presets if I shot with an Anamorphic Lens?
If you are using an Anamorphic lens to achieve widescreen, a 16:9 "flag" is not embedded into your tape. However, by checking the Anamorphic 16:9 option in the Capture Preferences, Clips will Log and Capture as Anamorphic 16:9.
Note: Be sure to change back to the standard NTSC DV Capture Preference before you attempt to capture regular 3:2 DV material or it will end up distorted.
How does Log and Capture Function with Anamorphic 16:9 Clips?
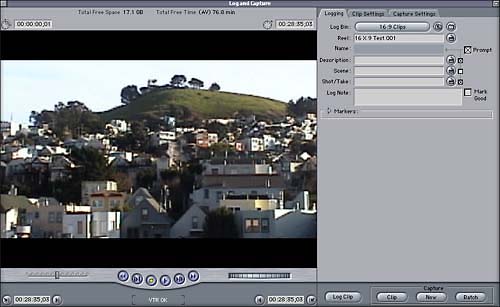
While logging Anamorphic 16:9, Log and Capture should appear in letterbox, regardless of the DV Camcorder you use.

While capturing, in some cheaper camcorders, the picture may look distorted as it is capturing in the Capture Window. Using other camcorders, the 16:9 image appears in letterbox in the Capture Window and the DV Camcorder's viewfinder. If you are baffled as to why it is not viewable in your standard TV set, recall that this is normal. If your camcorder is sophisticated, then that is the reason that it will display 16:9 on the fly in the viewfinder or in the flip out LCD. The cheaper DV Camcorders won't display 16:9 in the viewfinder as you shoot, capture or monitor playback.
Importing 16:9 Clips into Final Cut Pro
In FCP 2 and above, if you are merely importing Clips displaying 16:9 video into Final Cut Pro, it will automatically detect the 16:9 flag and will display the video accordingly.
In FCP 1.2.5, to be sure this will happen properly, go to:
Edit > Preferences > General Tab: you should have 16:9 Import Check enabled. For importing files this is the only crucial thing you must check as Final Cut Pro senses the 16:9 flag whether the "Anamorphic 16:9" button is checked in Audio-Video Settings' Capture Preferences or not.
Switching a Clip between 16:9 and 4:3
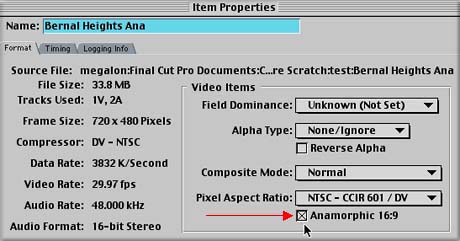
After a Clip is Captured or Imported, it is possible to change its aspect ratio by opening the Clip's Item Properties (Command + 9 is the shortcut) and checking or dechecking Anamorphic 16:9 in the "Video Items" area of the dialog.

Editing with 16:9
Editing with 16:9 is really cool, and was, not long ago, a totally new experience for me in editing with widescreen footage. It's especially nice if you can see it monitored on your NTSC Monitor in widescreen as you are editing.
Let's first look at how the Viewer and the Canvas handle 16:9 clips, then we'll talk about troubleshooting any problems you may be having.
Fortunately, it's a no brainer for the Viewer. It detects which Clips are Anamorphic 16:9 and which are standard 3:2 DV Clips, as they are loaded, automatically. Unlike Clips, Video Generators won't load as 16:9. You'll have to edit them into your Sequence and reload them into the Viewer to see and adjust them in 16:9. Fonts and everything will now be proportioned correctly in 16:9. Even your title safe is now in 16:9.
This isn't so for our friend the Canvas! It won't automatically detect Clips as 16:9. But it makes sense if you think about it. It will display Clips the way you set for them in the Sequence Presets. In other words, you've got to be sure that you have your Current Sequence Settings to accept Anamorphic 16:9 Clips. If you followed the steps leading up to this paragraph, you should be OK.
However, if you weren't careful, and find yourself having to render your 16:9 Clips once they are edited into the Sequence, likely it was your attempt to put 16:9 Clips into a regular 3:2 DV Sequence. Whoops!
This is puzzling to most people because they definitely are displaying as 16:9 Clips, yet they still need rendering! The reasoning behind why this is happening is because the Capture Settings and Sequence Settings weren't matched up precisely, namely, something wasn't reflecting 16:9, forcing you to render every frame.
It should be noted that if you put standard 3:2 Clips into a 16:9 Sequence they will be distorted, and therefore, must be rendered. Adjustment of the aspect ratio will be necessary as dictated by your good old-fashioned Sequence Settings.
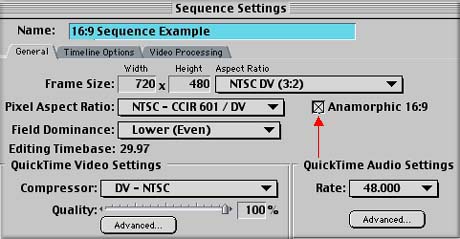
Still have to render? You know, you should not need to render Anamorphic 16:9 Clips whatsoever. Just make sure your Current Sequence Settings have that Anamorphic 16:9 Box checked! You can troubleshoot this by checking out your Current Sequence Settings: Sequence Menu>Sequence Settings or by using the short cut (Command + Zero). You can also Control + Click on the Sequence Icon in the Browser and choose "Settings".
The Current Sequence Settings Dialog Box will launch.

In the Current Sequence Settings Dialog, look for that Anamorphic 16:9 box and make very sure it is checked! If the box isn't checked, and you've already added Clips to your Sequence (here's the "gotcha") checking it after the fact will not save you from having to render the Clip. Although everything is corrected, you may have to start over with a fresh Anamorphic 16:9 Sequence to avoid rendering. Just Copy-Paste the clips into that new Sequence, you won't have to render them at all.
Outputting 16:9 to tape
When outputting an edited sequence using Anamorphic 16:9 video to tape, you have two options, depending on what kind of equipment you want to play your Show to play back on:
Option 1: Letter box to 3:2
Most People want to just output to letterbox for two reasons.
a. You or your clients require outputting for a standard consumer monitor.
b. You do not have a monitor to view the 16:9 footage in "native" widescreen, and want to enjoy playback as you see in the Canvas.
In either case, you will have to render your entire Sequence to display your show in widescreen format on any standard television. It was explained how to do this a bit earlier in the article in the section: How Can I View My Footage in 16:9 on my Standard NTSC Monitor? Revisit this section if you need to do this.
In the case of wanting to see your playback in your Canvas and your standard NTSC monitor after rendering, and want to continue editing your piece, I would suggest that you export a Final Cut Pro Reference Movie first, and then reimport it, working on the Reference Movie instead. That way, you won't have to re-render after each small change is made.
Option 2: Leave the footage as is
Most folks don't want to do this, but some do. There are, however, very good reasons to leave it looking distorted, which are:
a. Outputting for a DV Tape to Film Transfer
b. Outputting in mind for hardware that will display 16:9, such as Pro Monitors or Widescreen Televisions.
Exporting 16:9 to Quicktime and Cleaner for compressing in widescreen
Nowadays, many of us are dabbling, at least a little, in compressing video for the web. The question always comes up about how to export your 16:9 footage into a Quicktime movie in its widescreen format. So let's get some of the basics out of the way.
You might first want to look at some examples of video on the web that are displayed in 16:9 or other flavors of widescreen. For that, you may want to check out www.apple.com/quicktime and download some movie trailers. The frame sizes there are good examples of what to shoot for in your own attempts at compressing.
First decide if you want to export to Quicktime or to Cleaner (you should have Cleaner EZ, as it comes with FCP). Quicktime is fine for a lot of things, especially nowadays with its inclusion of the Sorenson 3 Codec, but there is more power in Cleaner and you can do things in batches with a variety of settings (no batches in EZ version, sorry). I often compress things in large batches in Cleaner while I am away at the ballgame or what have you.
Start by exporting your edited sequence with a 16:9 frame size directly into Quicktime or via a Reference Movie into Discreet's Cleaner. A Reference Movie of a 16:9 Clip could similarly be imported into other applications, such as, After Effects or Combustion.
You've got a couple of options here:
Option 1: Quicktime
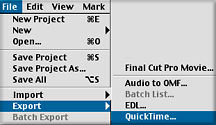
Choose File > Export > Quicktime to go directly to Quicktime

a. Click Options
b. In the Video Section Choose Size
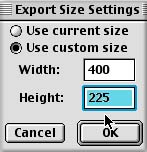
c. Click the "Custom Size" Button

Enter values for the width and height so the desired height is 9/16 of the desired width (to determine this value, multiply the height by 0.5625),
Example frame sizes using this ratio:
If you are exporting from the native DV-NTSC frame size of 720 x 480, set the output frame size to be 720 x 405.
A smaller 16:9 frame size would be 400 x 225
By using the formula above, you can come up with your own values for smaller web widescreen aspect ratios.
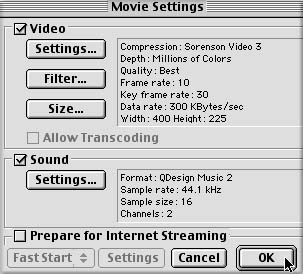
Enter your chosen settings for Video and Audio

d. Click OK, the Movie Settings box will close
e. Navigate to your a Media Drive and save your movie
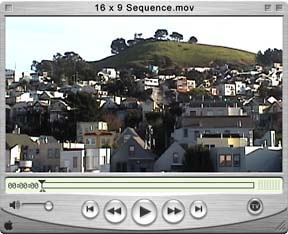
f. Once Compressed, It should look correct as in the example below:

Widescreen Clips may be compressed and uploaded to the
web or business or personal use. Use it for burning it to CD,
embedding into interactive web sites, or adding it to web page.
Option 2: Cleaner
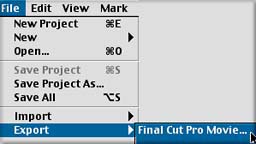
Choose File > Export > Final Cut Pro Movie

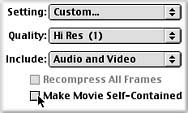
a. Click the "Setting" menu and bring up the custom setting from the Save Dialog

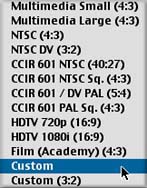
b. A Sequence Settings Dialog for this export will come up. Again, choose Custom from the Aspect Ratio pull down menu

c. Calculate your values for custom size of width and height and enter those values in "Frame Size" in the Sequence Settings Preset

d. Click OK and the Sequence Settings Dialog will close
e. Before Saving, you'll want to make sure you are saving a "Reference Movie, so, uncheck "make movie self contained"

f. Navigate the "Reference Movie to a Media Drive" and click OK.
g. Click Save
h. Import the Reference Movie into Cleaner
i. Double click in the column marked "Setting".
j. Set up your sizing of the movie once more within Cleaner with your widescreen dimensions in mind while working within your Advanced Settings window.
k. The "Image Tab" will have a setting for 16:9 aspect ratios.

l. Set up the rest of the compression settings choosing your values for Audio and Video
m. Save and Compress the movie to a Media Drive
n. Upload and Playback your Movie on the web
o. Enjoy!
There you have it. Plenty of information to get you up and running with editing 16:9 footage within FCP. For me, working with Anamorphic 16:9 footage has been a rewarding experience. I really enjoy the look, and the freedom to experiment with a larger canvas, as I'm sure many of you do. I hope that the article has cleared up any details you may not have been sure of before reading through it. My suggestion is to do a little test and play with the 16:9 footage in FCP and get comfortable with the few quirks you have to deal with. There's also lots of good information on how to deal with Anamorphic 16:9 footage in the manual, if there are any details I haven't covered, be sure to check that out as well. I hope to see your DV Feature out there very soon. Good luck to you all.
Kevin Monahan, aka "Telly", is a video editor, motion graphics artist and
educator from San Francisco, CA. Kevin has a degree in Radio, Television and
Film from San Jose State University and has been working professionally in
radio and television for over ten years. He is an Apple Certified Instructor
for Final Cut Pro and teaches both privately and at the Bay Area Video
Coalition (BAVC) in San Francisco. Kevin co-founded the San Francisco Final
Cutters, the world's first Final Cut Pro User's group and runs a small video
post-production house called Shadowcraft Studios. For bookings and more
information, contact Kevin by e-mail at: videoweb@pacbell.net
copyright © www.kenstone.net 2001
[Top]
All screen captures, images, and textual references are the property and trademark of their creators/owners/publishers.


 The trick discussed above should only really be used for final delivery to viewers using standard NTSC Television monitors. While editing, dubbing DV tape clones, or when making footage specifically for widescreen capable monitors, don't distort the footage as you will only be degrading it by having to render the new aspect ratio as is mentioned in the above example. Additional renders, no doubt, degrade the footage as well.
