
March 12, 2007
By Brian Gary
The lore of YouTube states that its founders were disappointed with the paucity of video sharing outlets on the web, so in silicon maverick style they built one. In short order their creation--YouTube--was heralded as the democratization of broadcasting and with Google's acquisition of it, it's fast becoming ubiquitous. Like all of the content distribution outlets it too pushes the legal bounds of copyright and intellectual property, but on the flip side, it offers a unique way to reach an audience. For example, during the last hiatus the producers of ABCs Lost seeded videos onto YouTube to fuel the show's Lost Experience online and the BBC just announced that it will stream three channels of content on the site. So, a gazillion videos already stream on the YouTube, why not throw your hat into the ring, too.
On your first trip to YouTube what you'll notice though, is that the picture quality is less than optimal--most video looks like cell phone footage of the latest misbehaving member of the celebritocracy. So how do you make your 35mm commercial not look like Lonelygirl15's webcam?
Oh gentle reader, indulge me if you will a transgression from my normal third-person decorum in which I write most of these articles and allow me to opine in the first because the tone of this entire article is going to be quite loose and subjective. I'm going to prescribe (as if your video was ill) a series of encoder settings. I'm even going to offer the Compressor preset for download--that you can apply directly to a job in the Batch window (see the end of the article for install instructions). But I would suggest that even though I'm going to outline a do-this and check-that approach, you should step back and glean from this article an understanding of what to look for when trying encode media via trial and error. For example, I created a channel on YouTube and all 11 videos up there were strictly prepped using my method outlined below. But I have to admit that the Compressor preset looks better on some than others, meaning that ultimately I'll go back in and tweak the settings for ones that I don't think pass muster; again, that's an entirely subjective choice. That's the point though: each source video is unique and although you can use presets to generally dial you in, don't be afraid to veer off the path and create new settings when the road's not leading you where you want to go.
Which brings me to first-person point number two: I'm not an engineer and I don't write CODECs. Am I a compressionist? By trade, no, but I'm sure that just like 99% of the people who come here to Ken Stone's site, by circumstance and necessity I most assuredly have to perform like one. Granted, I know my way around Compressor; I've produced training videos and written a book, but at the end of the day I don't care what CODEC and what settings are used. All I care about is that the output looks (and/or sounds) the best within the delivery constraints. If I have a secret, that would be it. I look at each job uniquely and experiment with settings until I'm satisfied with the compromise. And my friends, that's the only constant in compression: there will always be a compromise because there will always be a delivery constraint. But as Dennis Miller used to say at the end of his rants, "That's just my opinion and I could be wrong."
And that brings us now to YouTube and the daunting task of making your video look great...well at least not suck. I think that in an afternoon of surfing the site I've seen just about all quality levels--including some dude who used his cell phone to capture a television broadcast (I'm not kidding). So, let's go through this process logically. Throughout the piece I will include my thinking and the questions I pose so that you can do likewise. Who knows, you might come up with different answers which illicit different settings that produce even greater quality for your particular, unique source footage. And once again...that's all that matters, the best presented media under the circumstances.
The Basics
What does it mean to have your video on YouTube? You have to sign up for a free account and then upload your videos. Sounds simple right? Well not really.
The first thing to realize is that your video, in the format that you upload, will not be the video that is ultimately broadcast on YouTube. In fact, your video is going to be recompressed AND transcoded into another format altogether. YouTube broadcasts all its video using the Flash (flv) format. From what I can deduce (there is scant direct information and loads of speculation) the final broadcast video is based on a 4:3 aspect ratio (more on that later), 30fps and a data rate of around 200-300kbps. The mono audio sounds crunched down to somewhere around 64kbps, but it doesn't sound too bad. The video data rate though, is the real killer. Video at that rate can only look so good--that's just a fact. So, our realistic goal should be to create the best looking video within that bandwidth. Yet another compromise based on a delivery constraint.
YouTube recommends that you prepare the footage with the following settings:
MPEG 4 (DivX, Xvid)
320 x 240 frame size
MP3 audio
30 fps
100 MB file limit
10 minute duration limit
Let's examine those specs for a moment: they suggest using MPEG container files with DivX or Xvid as the CODEC. DivX requires an additional purchase and does not work as a QuickTime component in Compressor. Furthermore, when you create MPEG 4 movies from either QuickTime or Compressor the default settings use the CODEC MPEG-4 part 2 (you can also use part 10: a.k.a. H.264). Digging a little deeper into the YouTube help files I found this page which sounds like I can upload a .mov file with no problems. That's good, because that means that I can use QuickTime container files and choose my own CODEC. A frame rate of 30fps will work fine; in fact since the video is destined for the web, that's a better choice than 29.97. We'll deal with audio and frame size a little bit later.
I tried YouTube's stock recommendations and let's just say that I was none too happy with the results. So, I searched the web and found many people with similar quality complaints who logged lots of questions, but not many answers. Of the "answers" I did find they were all either circumspect and cheeky about their proprietary cocktail or were of no assistance whatsoever. In fact I even found posts where it was suggested that to achieve great quality on YouTube I should shoot all of my video on a tripod and generally avoid all motion within the frame. Thanks. I'm sure my still-life series will be wildly popular.
So, I decided to create a general preset that would work as a good starting point for clips under 5 minutes in length and use as much of the 100 MB size limit as I needed. Also, I wanted to use what I already owned (Compressor) and not have to buy any plug-ins or use any other software.
It's key to realize before we start that the exercise here is to create an intermediate movie that will help (or trick) the YouTube encoder--a process that we can't control at all--into producing a higher quality output movie.
Flash Video Recompression
The first hurdle is the fact that YouTube recompresses all uploaded content. That's always a painful proposition because recompression introduces compound problems. It harkens back to the old days of tape and generation loss caused when a program was copied successively, resulting in a compound loss of quality with each duplication pass.
Therefore, to follow YouTube's online help, I should introduce an interframe compression scheme during my setup and then upload the file, only to have them squeeze the video through yet another interframe scheme, this time with even lower bandwidth. As a very basic refresher, interframe compression uses keyframes (I frames) placed in the data stream that contain an entire frame's worth of data. The rest of the frames in the stream (between the I frames) derive their pixel information by using algorithms that interpret the preceding and subsequent I frame and then make an educated guess as to where to place each pixel on each in-between frame. Further compression can be introduced by lowering the overall data rate that flows through the stream, thereby reducing the overall picture quality. It's a very efficient system that allows an entire feature film plus bonus material to fit on a DVD (MPEG-2 compression).
However, this is different from intraframe encoding where every frame in the stream is an I frame and any compression that exists occurs within the frames themselves. A good example of this is DV (MiniDV) that, although heavily compressed at a 5:1 ratio, contains a full frame of video for every frame in the data stream.
So, here's my thought process: why would I want to use interframe compression only to have it compressed again with another flavor of interframe encoding? My answer is, I don't, because I can't control the keyframe values of the re-compression. Remember, when you upload to YouTube you are in fact uploading to an encoder. When all these movies are re-encoded, some unknown setting will determine where the encoder places the keyframes in the data stream and the last thing I want is for the YouTube encoder to use as the basis for a new I frame, an interpreted frame from my heavily compressed source movie. This process is not like uploading a movie to your website or .Mac account where the file you encoded becomes accessible to the world immediately. You are uploading to a Flash 5 assembly-line encoding system that will process your movie and then make it available sometime down the line. In fact, while uploading the 11 movies that I sent to the Flying Chaucer channel I noticed that the time it took for them to become available varied greatly. Some were up within an hour, some took several hours and one, for no apparent reason, took six.
My answer to the recompression problem is to use the often-overlooked PhotoJPEG CODEC. What's interesting though, is that many Final Cut Pro users have worked with PhotoJPEG without ever knowing it because that's the CODEC behind the Offline RT Easy Setups. Granted, I did realize that I was going to chew up some bandwidth with this CODEC versus MPEG-4, but I estimated that I would probably still be able to keep videos less than five minutes under YouTube's 100 MB file size limit.
The first step is to create a custom preset in Compressor by clicking the button with the plus sign in the Settings tab of the Presets window.
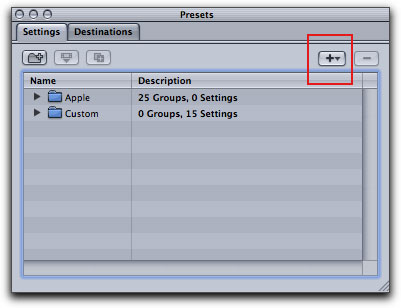
From the pop-up menu choose QuickTime Movie. A new custom preset will appear in the Custom Folder and automatically load into the Inspector window. Remember that the help document on the YouTube site permitted the use of QuickTime container files for uploaded video, so keep the File Format and Extension unchanged.
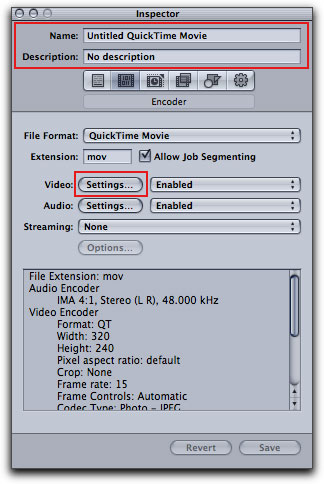
You can give the new setting a name and description by entering text into the corresponding fields. Then click the "Settings..." button next to video to open the QuickTime interface.
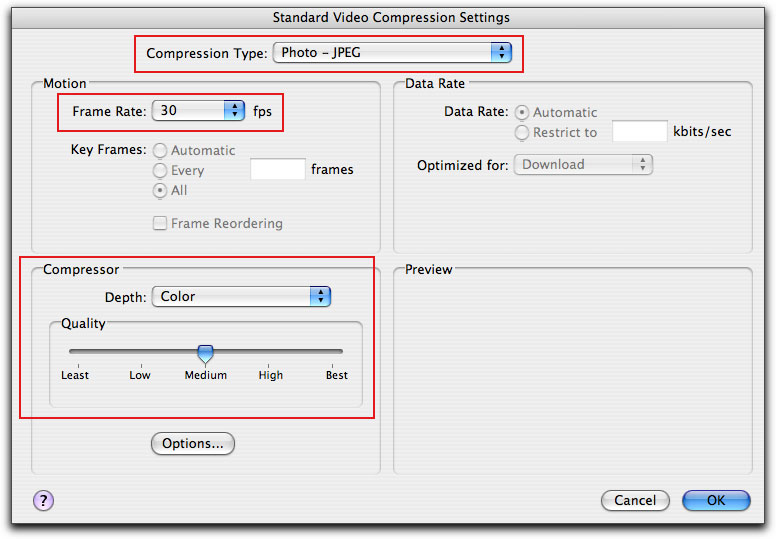
In the Compression Type pop-up menu choose Photo-JPEG and set the Frame Rate to 30.
Next, let's take a look at the Compressor section. The Depth pop-up menu is an easy one: set it to Color (unless you want Grayscale). In PhotoJPEG, the Quality slider pretty much dictates everything, so where you set it will have the greatest impact on the file size / video quality compromise. To give you a reference, Offline RT is PhotoJPEG at 35%. In terms of the slider, that's about a third of the way between Least and Best. From all the testing that I performed, setting the slider to Medium (50%) yielded the best results for the file size, meaning that I could encode up to five minutes of video, have it look really good and still stay within 100MB. When I moved it up to High (75%) the quality didn't really seem to increase noticeably, but the file sizes really jumped up. You can place the slider anywhere along the Quality line, not just at the text-based intervals, so experiment with settings between Low and Medium if your movie is longer than 5 minutes.
When you're finished with this window, click OK.
Next, back in the Inspector, click the "Settings..." button next to Audio to open the QuickTime window.
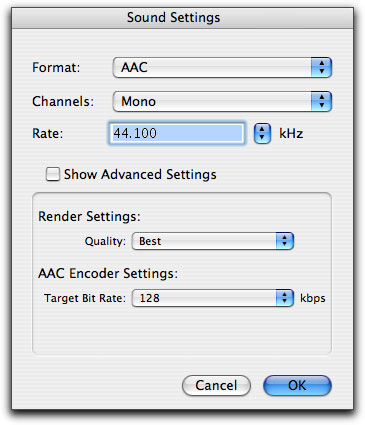
Here it becomes pretty subjective and you can basically use whichever audio CODEC you prefer. In my testing, I found that the above settings yielded the best results for the level of compression. When you're finished, click OK.
Frame Size Scaling to Boot!
That pretty much takes care of the encoding part, so let's re-examine the frame size of a video broadcast on YouTube. To reiterate, on its help pages YouTube recommends that users upload video with a frame size of 320 x 240--a standard computer based 4:3 aspect ratio.
What I find odd though, is that when you watch any video on YouTube the broadcast window is NOT 320 x 240. It is in fact 425 x 318, an odd, but still 4:3 aspect ratio.
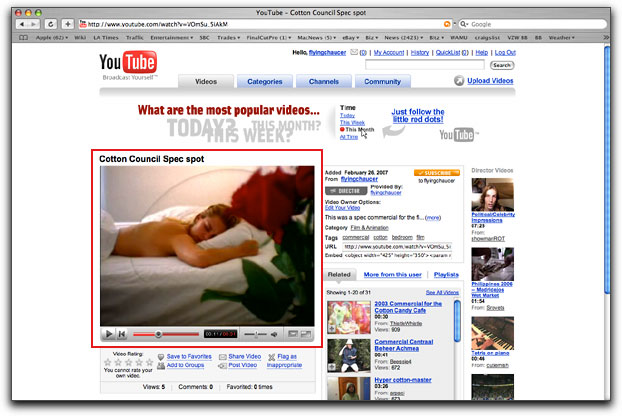
So, in addition to recompression, if you strictly follow YouTube's guidelines your video will also be scaled back up for playback. I write "back up" because I'm assuming that most people are like me in that all of our original source video has frame sizes greater than 320 x 240 so we are going to scale down when creating the intermediate movie.
Besides not making a lot of sense it's just another quality killer.
Therefore, why not try to scale only once and scale to the broadcast size of 425 x 318. Fortunately, that's easy to establish in your custom preset inside Compressor. In the Inspector, click the Geometry button to open that pane.
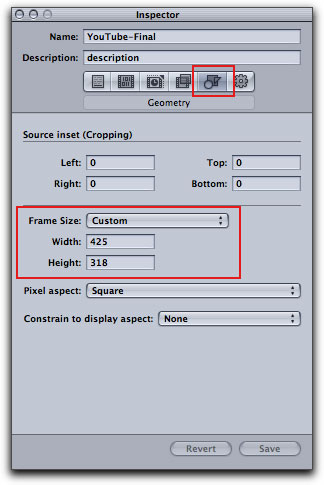
In the Frame Size pop-up menu choose Custom and then type in the width and height values above. Now's a good time to save the preset so click Save in the lower right of the Inspector to commit all the changes.
If your movie is 16:9 (widescreen), that makes the process a little trickier because the initial thought may be to change the settings here in Geometry pane to accommodate the non 4:3 aspect ratio. However, that would not yield the best results, because remember, no matter what you upload to YouTube, its going to broadcast it in a 425 x 318 window. Therefore, do NOT change the "Constrain to display aspect" pop-up menu to 16:9.
In fact, if you foresee that you're going to have a lot of widescreen source media you may want to create separate presets for standard and wide media (I've also included a widescreen preset for download). You can do this easily by selecting the current setting in the Custom folder of the Presets window, then clicking the Duplicate Selected Setting button at the top of the same window.

To address the widescreen issue you need to add a filter. With your custom widescreen preset selected, click the Filters button in the Inspector.
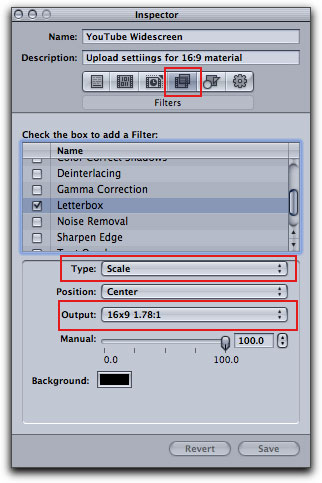
Check the box next to the Letterbox filter to engage it and reveal the settings. Leave the type pop-up menu to Scale so that your movie will be stretched properly instead of cropped, and then from the Output pop-up menu choose the 16:9 option. Click Save to commit the changes.
So how do all of these frame size gymnastics work in practice? Well, it's not really clear, meaning it's challenging to see exactly what settings YouTube used on the intermediate movie. Furthermore, it's not entirely clear as to whether the 425 x 318 frame size settings make it all the way through to the broadcast window. It's quite possible that for some or all of the uploaded movies the YouTube machine scales them to 320 x 240 and then does the up-scaling during playback.
Regardless, I would rather send the Flash encoder more data at a larger frame size because whenever you present an encoder with more data it tends to produce better results. For example, going from HD to SD always produces better quality than going in reverse...I'm just applying a similar principle here.
I have built two 'You Tube' Compressor Presets for you, one SD and one Widescreen. To install the Compressor presets, first make sure you are running Compressor version 2.3 or higher, and then copy the two files into: ~/Library/Application Support/Compressor. Just a note, the "~" represents your user folder. The presets will appear in the Custom folder of the Presets window and can be applied like any other Apple or Custom preset.
A Few Finishing Touches
While we're in the Filters pane let's add another one: check the box next to Sharpen Edge.
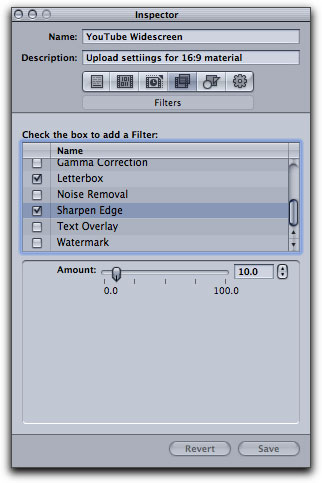
I find that one overarching aspect of video on YouTube is that it appears uniformly soft, so my assumption is that during the Flash re-encoding process some image detail gets lost--not surprising at such low data rates. So, to combat this I've found that adding some edge sharpness, with a value between 10 and 25, keeps the final broadcast video on YouTube looking cleaner and sharper. Granted your intermediate movie may look a bit severe, but remember that when it goes through the YouTube voodoo it should soften back to normal, instead of starting normal and then ultimately appearing soft.
The last step is to conform the output fields from Interlaced to Progressive so that the movie plays and looks better on computer monitors and displays. To accomplish this we need to turn on Frame Controls. Now, before you freak out and say that it will cause encoding times to go through the roof, I'm going to show you a little undocumented trick that will produce the same results with a negligible hit to encoding speed.
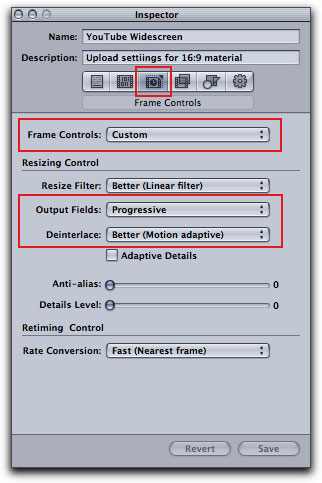
Click the Frame Controls button and then from the Frame Controls pop-up menu choose Custom. Change the Output Fields pop-up menu to Progressive and the Deinterlace pop-up to Better (Motion adaptive).
Now, here's the trick...deselect the Adaptive Details option. What this does is allow the encoder to harness the same algorithms that the application DVD Player uses to deinterlace video on the fly during playback. But before you get too excited, this workflow only applies to output destined for the Web, computers, portable devices etc. This won't help a NTSC to PAL conversion. Click Save to commit the changes.
Lastly, if you find that your video is looking a bit washed out, go back into Final Cut Pro and apply a Color Corrector 3-Way filter to the clip and increase the saturation.
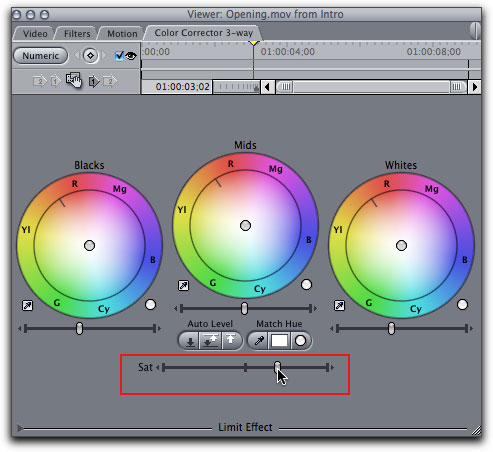
Again, as with the Sharpen Edge filter the resulting intermediate movie might be a little intense, but remember you are attempting to exaggerate a quality that is being de-emphasized by the YouTube encoder.
Some Closing Thoughts...
I really do encourage you to experiment with all these settings and find the ones that work well with your footage. It may take several passes until you find a preset that creates an intermediate movie that will encode nicely through the YouTube encoder. To that end, you can utilize the handy, Private feature in YouTube.
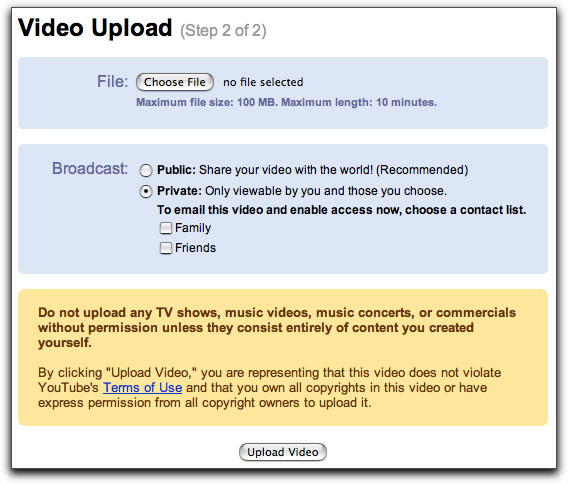
During the upload process, select Private from the Broadcast settings. That way you can upload multiple test clips, see how YouTube handles them and then only publicly broadcast the final version.
And what about that final broadcast version and is there a way to see what it really looks like? The answer is, yes, but with a caution. First, let me state that I'm not an attorney and this is not legal advice, so check with yours if you have one before proceeding. The YouTube terms of use are pretty clear that you are not allowed to download movies that are broadcast off their site. They also state very clearly, "...you retain all of your ownership rights in your User Submissions." So, if you want to download your uploaded movies only for testing purposes, then follow these steps:
There are several Firefox plug-ins out there that will download online video, but they require installing something into your browser. It's easier to use one of the many websites that will perform the task like KeepVid.com. Just copy the URL of your movie into the site and click Submit. If you've typed everything in correctly, downloading will begin. The file will probably be named something like "get video" with no file extension.

The downloaded movies won't open in QuickTime player, so you'll have to use an open-source application like VLC Player. Open the downloaded movie into VLC player and then from the Window menu choose Information (shortcut is Command I).
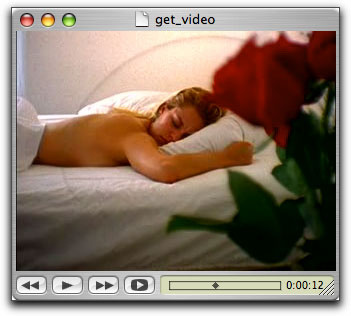
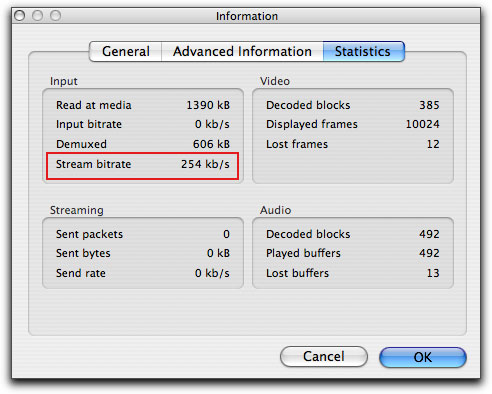
Click the Statistics button in the Information window to view what stats the VLC player can provide. As you can see, the data rate is between 200 and 300kbps as suspected.
Lastly, click the Advanced Information button to view the resolution and the audio settings:
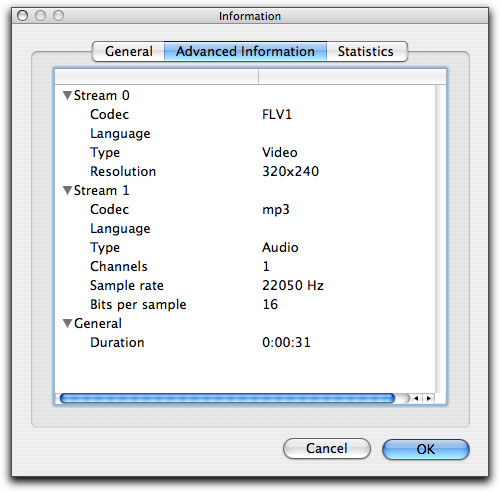
As you can see with this test, my 425 x 318 intermediate movie was scaled down to 320 x 240 by the YouTube encoder. Therefore, it will still have to scale up for the broadcast window. However, I maintain that the movies I uploaded at the larger frame size looked better than the intermediate movies I encoded at 320 x 240. But then again, maybe I just have way too much time on my hands.
One thing for sure, this was a long article and I hope you've made it this far. I also hope that not only will you be able to create better-looking YouTube content, but that you will glean from this article the experimental process that will help you when the next YouTube like option enters the scene. Best of luck and happy coding...and by all means put the cell phone video down and step away from the celebrity. There're many more interesting things to shoot.
 Award-winning writer, producer and director, Brian Gary heads Flying Chaucer
Films LLC in Los Angeles and Flying Chaucer Productions LLC in New Orleans. Under those shingles, the multi-hyphenate Gary, creates a wide array of content for commercial, television, theatrical release and the Web. Gary's education includes the Actors Studio MFA program in New York City. Accomplished editor rounds out his filmmaker's skill-set and always on the cutting edge of technology, Brian Gary tours globally speaking to an audience of Final Cut Pro editors. In 2005, he joined forces with Sennet/Sheftell Entertainment, where he infuses the company with tech-savvy entertainment industry
experience and acumen. In addition, Brian has a DVD tutorial, The Art of Encoding with Compressor from Ripple Training and is the author of the Apple Pro Training Compressor Quick Reference Guide Apple Pro Training Series.
copyright © www.kenstone.net 2007
are either registered trademarks or trademarks of Apple. Other company and product names may be trademarks of their respective owners.
All screen captures, images, and textual references are the property and trademark of their creators/owners/publishers.